Written by Rudrank Riyam.
WWDC 2022 wrapped up several weeks ago, and it was one of the best installments for developers so far, especially when it comes to Xcode changes and improved developer experience. In this article, we’ll focus on what’s new in Xcode 14. We will discuss plenty of new enhancements, improvements, and features for you to check out and give you some examples! Also, Xcode 14 is already available on Codemagic, so you can try it out and enjoy the blazing-fast builds with M1 Mac mini build machines.
Lighter Xcode with optional SDKs
Xcode 14 is about 30% percent smaller than Xcode 13. For example, Xcode 13.4.1 is roughly 10 GB, while Xcode 14 Beta 3 is only 7 GB. watchOS and tvOS are also available as optional SDKs that you can download separately if you are building apps for these platforms. Developers usually focus on iOS and macOS apps, so it makes sense to make these optional, reducing the size and enabling Xcode to be downloaded significantly faster.
You can download the latest beta of Xcode 14 from Apple’s developer website, unzip it, and then install it on your machine. Note that this is the beta version, and you cannot use it to ship apps to the App Store. The official release should take place around mid-September.
Note that based on the experience of downloading the additional simulators in the first two betas of Xcode 14, it is very slow. Alternatively, you can directly download it from the developers’ website and install it using the simctl command-line utility.
For example, after you download the tvOS simulator for Xcode 14 Beta 2 and place it on your desktop, you can run the following command in the terminal to install it:
xcrun simctl runtime add "~/Desktop/tvOS_16_beta_2_Simulator_Runtime.dmg"
After the installation completes successfully, the additional simulator is ready to be used!
Fast and reliable Xcode Previews
One of the prominent features of SwiftUI was the seamless experience of working with Xcode Previews, which help you see your changes side by side in a simulator and view updates to your code in real time.
This is great for a seamless, distraction-free experience that enables you to view incremental changes. It creates a great workflow that does not require the context switching of building and running the whole project in an external simulator every time you make a change in the UI.
In Xcode 14, the preview canvas is interactive by default, while it used to be static in older versions of Xcode. This means you can immediately interact with the preview after making changes!
To create variants of the previews, like a separate preview for dark mode or a large dynamic size for accessibility, you used to have to write code for it. Not anymore! Xcode 14 has specific controls that help you view your UI in different color schemes, device orientations, and text sizes. You can view your UI in 12 different text sizes with just a single click!
If you’re a designer or work on UIs, the faster, reliable, and more fluid Xcode Previews will help you tremendously.
Smarter autocompletion
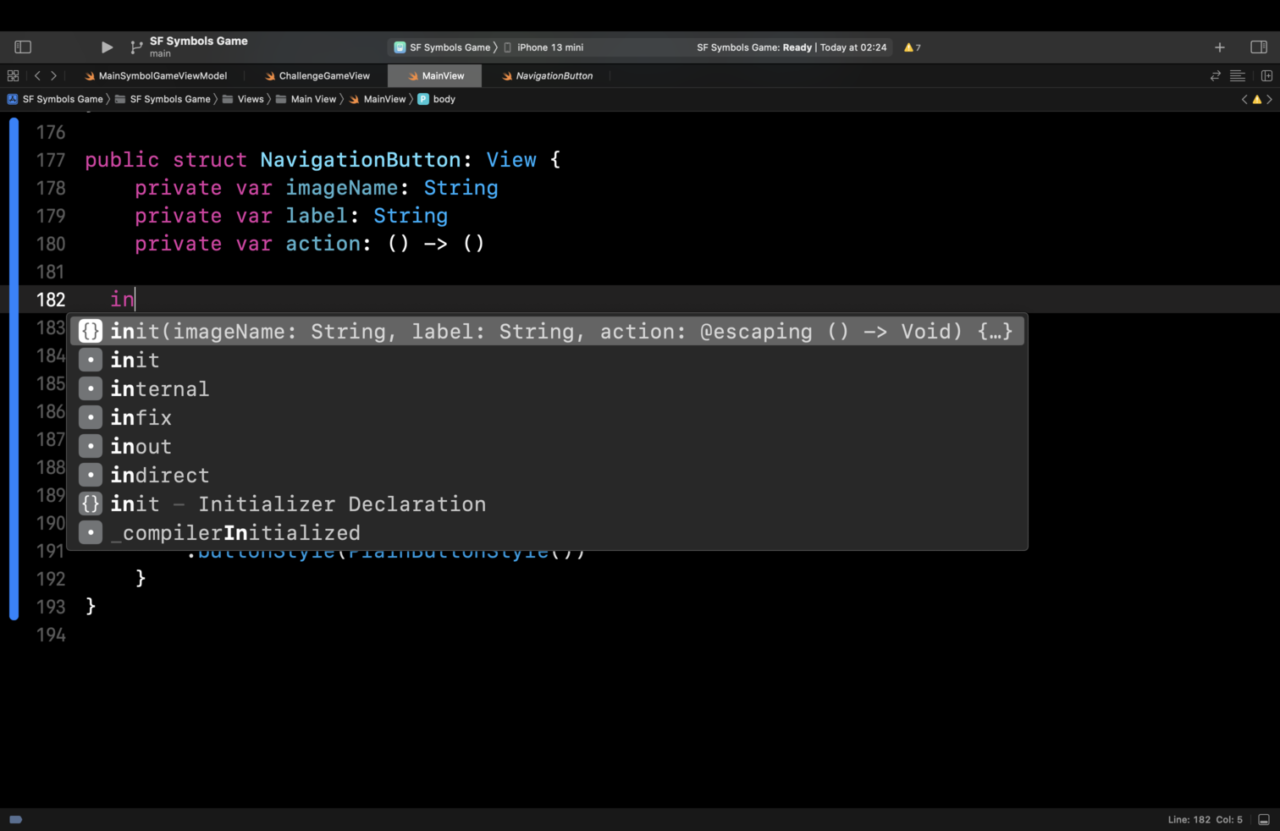
Having an IDE that intelligently autocompletes your code is something that all developers desire. Luckily, Xcode 14 has made massive improvements in this area this year that will delight you. For example, it can automatically add the whole initializer when you start typing init! Here is an example of a NavigationButton view in Xcode 14 that gives you the default value as a starting point that you can modify later. It provides you with the initializer that you previously wrote yourself:
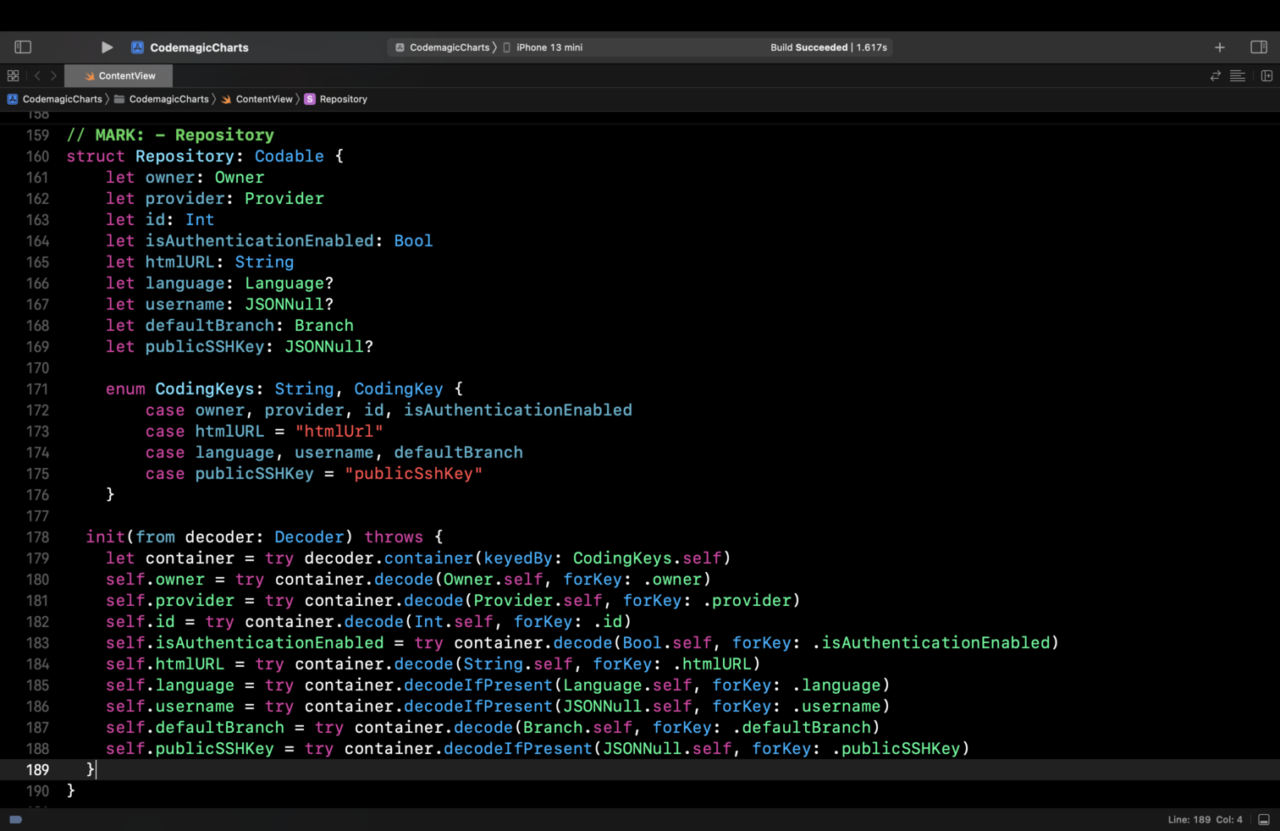
This also works for objects that conform to the Codable protocol. When you start typing init, it shows you the autocompletion as init(from decoder: Decoder) {...}. When you hit enter, it automatically provides the whole decodable implementation. This saves you tons of time when you’re writing your custom decodable implementation.
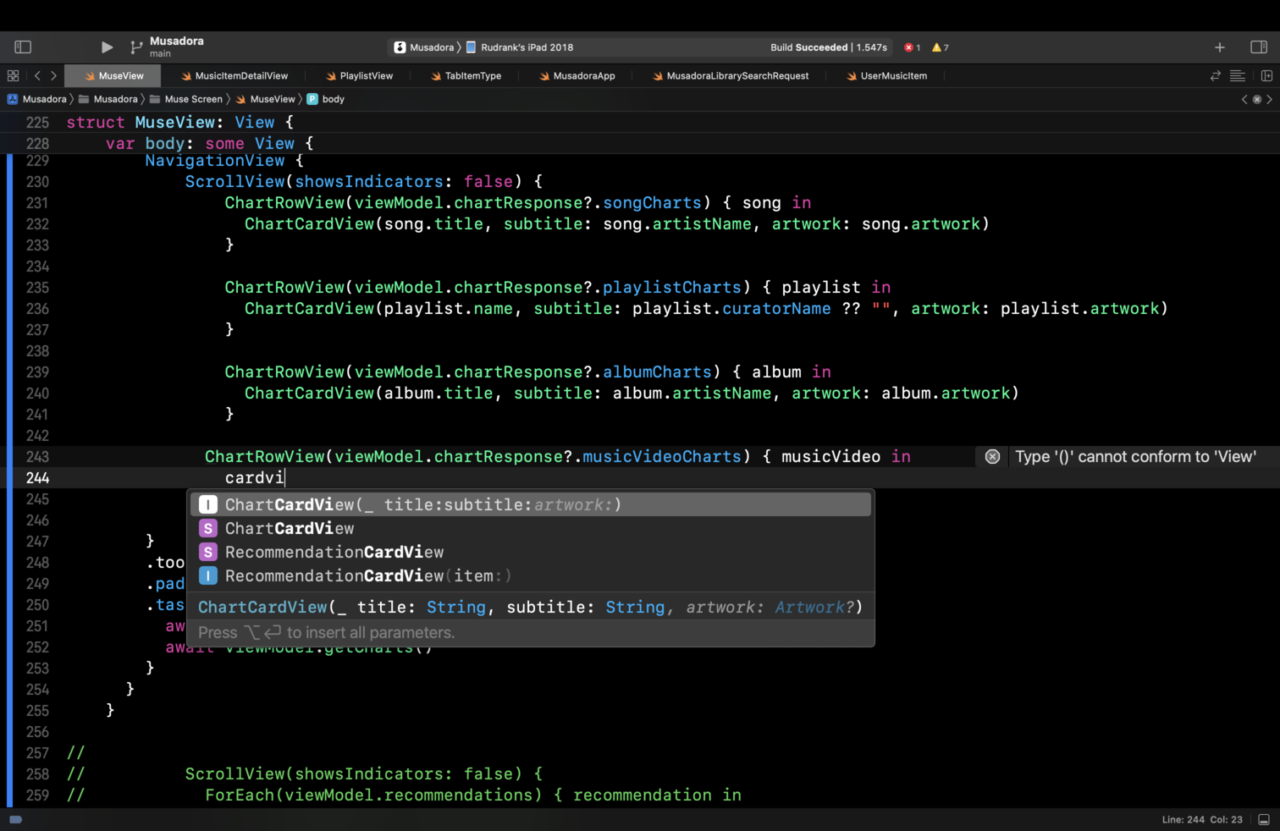
It also gives you intelligent recommendations that help you write code quickly and easily. For example, the initializers can be found directly in the completion list, where the default values are marked with italics. You can use Option + Return to add all the parameters:
Another example is the infamous .frame(maxWidth: .infinity) modifier that takes up all the width available for a view. Previously, Xcode provided all of the extra parameters that were not needed. Now, if you simply type max and hit Enter, it provides you with .frame(maxWidth: <Placeholder>). This is just a small quality of life improvement, but it elevates the experience nonetheless.
In general, the experience of working with code completion has improved greatly in Xcode 14, and I’m sure you will enjoy writing less code and being supported by intelligent recommendations.
Build time improvements
The Xcode team didn’t stop at making Xcode a smarter IDE — they also improved the build times for us! With increased parallelism and 2x faster linking, the projects build up to 25% faster overall. The machines with the most cores will see the biggest improvements. Time to get the M1 Ultra Studio! Test execution time has also improved by up to 30%.
Not enough speed? Notarizing the build is now 4x faster in Xcode 14! If you use the Interface Builder, document loading is up to 50% faster, and switching between iPhones and iPads in the device bar is up to 30% faster.
Phew, that’s a lot of big-number improvements in Xcode 14. Let’s visualize the changes with the new Build Timeline!
Build Timeline
Even with so many enhancements in Xcode, you may also want to visualize areas where you can improve the code in your app. In Xcode 14, you have the option to see the Build Timeline on a build log or result bundle.
When scrubbing through different files across the build, you can identify areas that are taking much more time than expected, like a custom script.
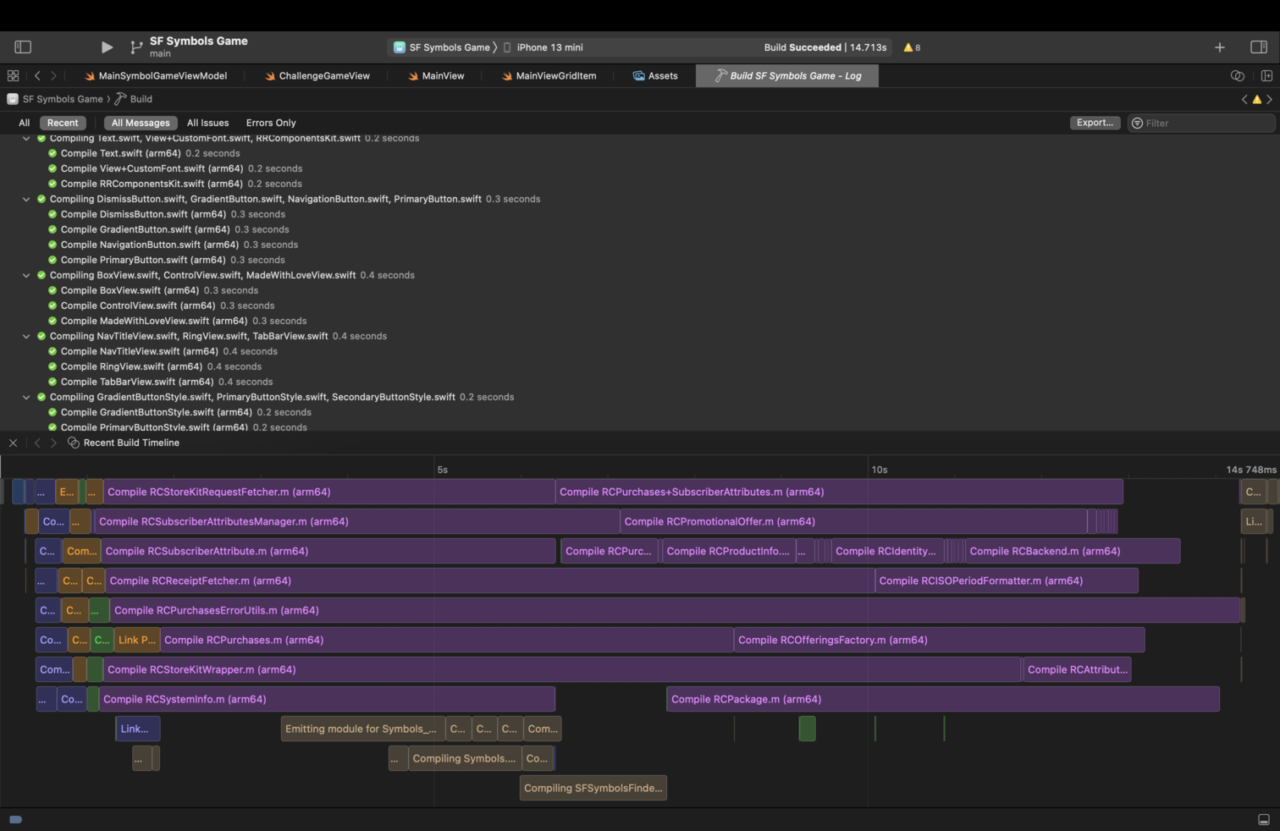
As you can see from the timeline, an external SDK is taking up most of the build time compared with the project files, as it is a relatively small project. Based on the visual information provided, you can make further actionable decisions.
To learn more about parallelization and the Build Timeline, watch the session Demystify parallelization in Xcode builds. It will help you understand how to use your hardware resources when compiling your project.
Test Flight and Hangs
Building upon removing the need for context switching, Xcode 14’s Organizer has two new reports:
Feedback
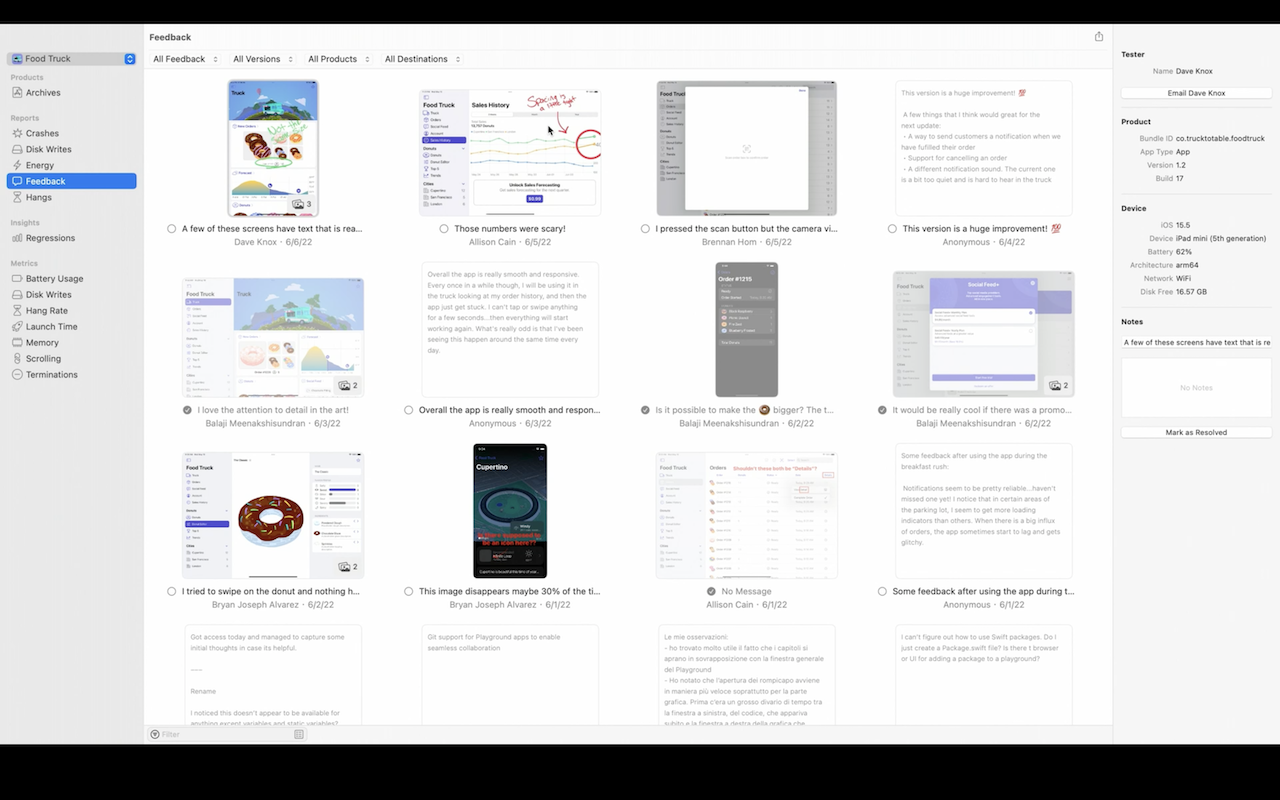
When you launch an app on TestFlight, users have the option to send feedback to you. This is available on App Store Connect for that particular app, which shows the feedback and the optional screenshots on the website. In Xcode 14, you get a new Feedback organizer that shows all of the TestFlight feedback. It provides the same detailed information that you get on the site. You can also email the testers directly from the organizer.
Hangs
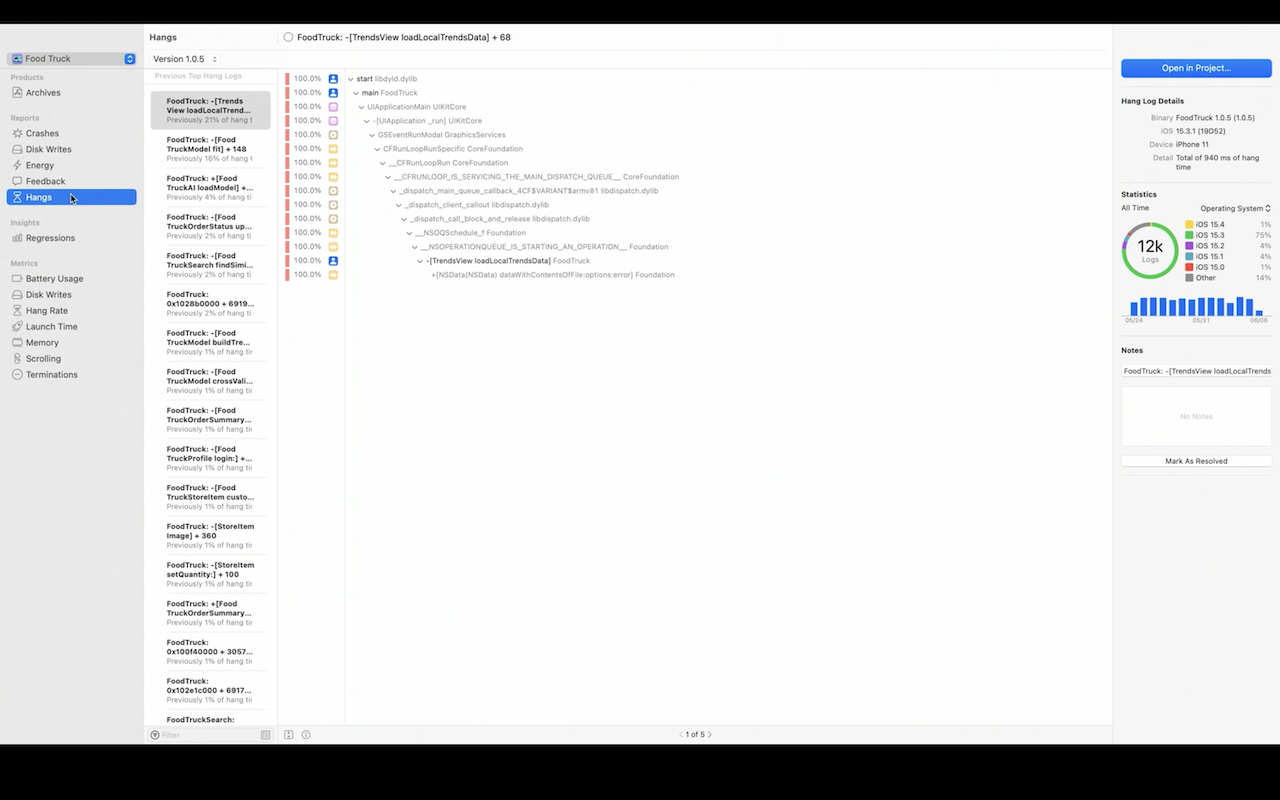
When your code runs something important on the main thread that it shouldn’t, it can result in an unresponsive UI. This leads to a bad user experience that can be avoided by using the new Hangs report, which shows the highest-impact hangs. It is directly available in the Organizer. By selecting a particular hang, you can navigate to the code that causes it, helping you fix it quickly.
To learn more about fixing hangs, check out Track down hangs with Xcode and on-device detection. This session also shows you how you can enable on-device detection of hangs on your phone. You can set a threshold number, like 250 ms, and if your app takes longer than that to render the UI, you get a small pop-up alert on the screen that tells you the exact time it takes so that you know where to improve your code, thereby minimizing hangs.
Single size icon
When you add the icon for your app, you must provide images for iPhone notifications at 20pt, settings at 29pt, Spotlight at 40pt, etc. It is cumbersome to provide these icons, especially if your icon looks great at any size.
In Xcode 14, you don’t have to deal with this hassle anymore! The IDE will automatically create all the different sizes with a single image of 1024pt. You can enable this by clicking on the image and selecting Single Size in the inspector:
![]()
In-built SF Symbols
In Xcode 14, you can access the SF Symbols by clicking on the Library button in the top-right corner of the navigation bar. This opens the list of SF Symbols for you to choose from while indicating the availability, such as iOS 15.0, macOS 12.0, tvOS 15.0, watchOS 8.0. After searching for the desired symbol, you can press Return to include the symbol’s name in your code.
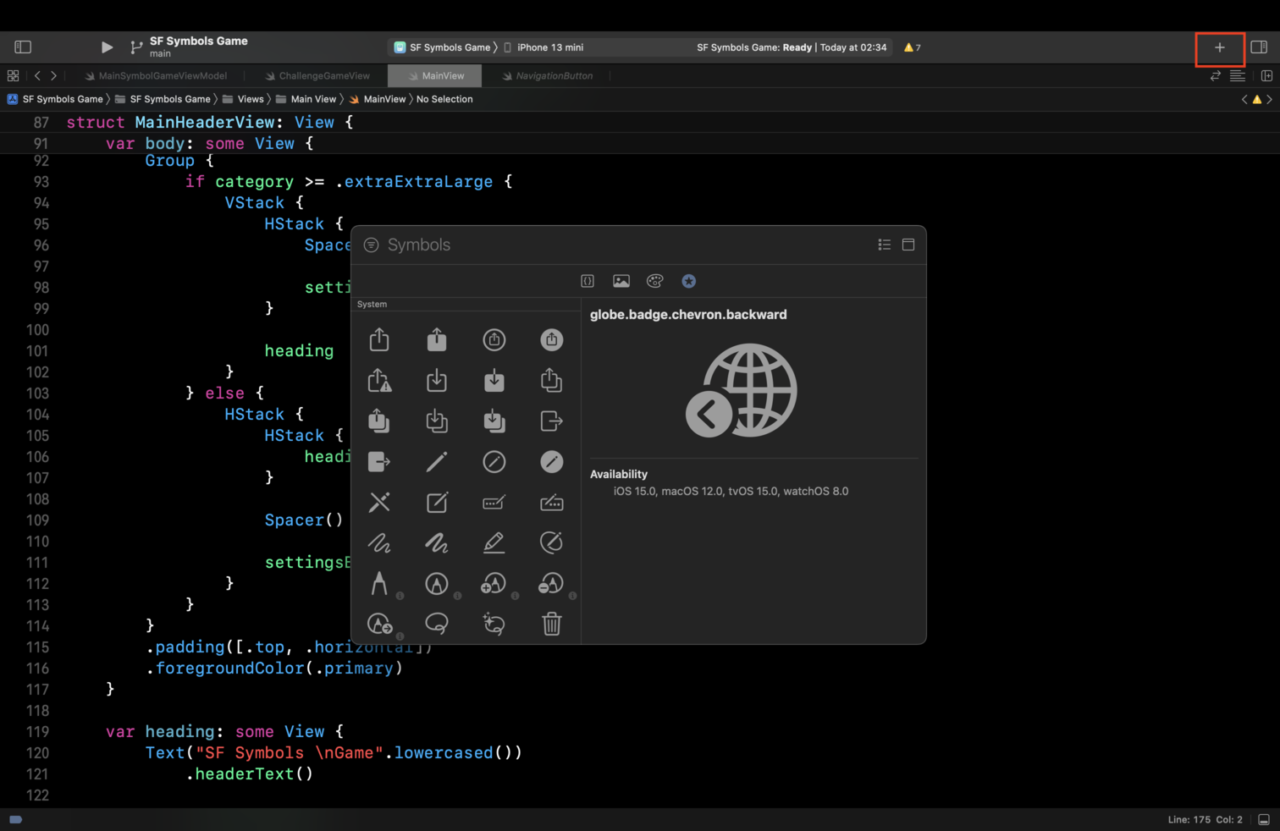
This is another great addition that saves you from having to switch back and forth between the SF Symbols app, enhancing your productivity.
Conclusion
This year’s WWDC has been great for developers, with quality of life improvements to Xcode that make it fun to write Swift and SwiftUI code.
We hope that you enjoyed WWDC 2022 as much as we did! And for those who didn’t have the time to go through the sessions related to Xcode, we hope our article has helped you to catch up! Please share your favorite announcement of the conference with us by joining our Slack community or mentioning @codemagicio on Twitter. Have a great year ahead exploring and experimenting with the new features! And stay tuned — more articles about new things announced at WWDC are coming!
Reminder: M1 Mac mini build machines are already available on Codemagic for you to take advantage of faster iOS and macOS builds. If you’re on the pay-as-you-go plan, use
instance_type: mac_mini_m1to try them out. If you’re on the Professional plan and want to set up a trial for the Mac mini M1, reach out to our customer engineering team using the form below so that they can help you get fast green builds on the new machines!





Discussion about this post