


TL;DR: You can use Codemagic CI/CD to build and publish Electron desktop apps. In this article, we will create a sample app for monitoring and trading stocks using React and Electron and build it for macOS, Windows, and Linux using Codemagic.
Build a stocks application with React and Electron
Building a desktop application usually requires a lot of work. You have to learn the language, tools, and processes of each platform you are targeting. For example, if you want to create the application on Windows, you’ll use Visual Studio, and your desktop application will only be available for Windows users.
How do you create the same application on Linux or macOS? Well, you’ll have to learn the languages of these platforms and build the same application separately for each. Conclusion: You’ll need to have three different codebases for the same application.
But with some knowledge of React and JavaScript, you can easily build cross-platform applications. In this article, we’ll build a stocks application with React and Electron. We’ll also create a basic CI/CD pipeline for our Electron desktop app so that we can build it for all the main desktop platforms — Windows, Linux, and macOS.
What is Electron?
Electron is a cross-platform desktop application framework. It is used to build desktop applications with the JavaScript language. It’s definitely also possible to use JavaScript frameworks like React and Vue to build desktop applications with Electron.
A few notes about Electron’s architecture: Electron is a platform-agnostic framework, meaning it’s not tied to any specific platform, language, framework, or tool.
Electron embeds Chromium and Node.js in its core, enabling web developers to write desktop applications using JavaScript and HTML. To do this, Electron implements a multi-process model composed of the main and renderer processes, similar to the Chromium browser.
Each app’s window is a renderer process, which isolates the code execution at the window level. The main process — powered by Node.js — is responsible for not only application lifecycle management, window management, and the renderer process but also access to native APIs, such as system menus, notifications, and tray icons.
Now that we know what Electron is, let’s set up the environment for the project we’ll be building.
Prerequisites
To follow along comfortably with the following tutorial, you will need to have:
- A basic understanding of React and how it works.
- Node.js installed. If you don’t already have it, you can install it from here.
- An API key from Alpha Vantage, a stock API service. If you don’t have one, you can get one from here.
Setting up the project
This article uses create-react-app to set up the project.
npx create-react-app stock-app
A new directory named stock-app will be created. Let’s cd into it.
cd stock-app
Now, let’s install electron and electron-is-dev. electron-is-dev is a package that helps us to run the application in development mode. It checks if the Electron application is running in development mode or production mode.
yarn add electron electron-is-dev
Next, create the configuration file for Electron. This file will be located in the project’s public directory.
// ./public/electron.js
const path = require('path');

const { app, BrowserWindow } = require('electron');
const isDev = require('electron-is-dev');

function createWindow() {
  // Create the browser window.
  const win = new BrowserWindow({
    width: 800,
    height: 600,
    webPreferences: {
      nodeIntegration: true,
    },
  });

  // and load the index.html of the app.
  // win.loadFile("index.html");
  win.loadURL(
    isDev
      ? 'http://localhost:3000'
      : `file://${path.join(__dirname, '../build/index.html')}`
  );
  // Open the DevTools.
  if (isDev) {
    win.webContents.openDevTools({ mode: 'detach' });
  }
}

// This method will be called when Electron has finished
// initialization and is ready to create browser windows.
// Some APIs can only be used after this event occurs.
app.whenReady().then(createWindow);

// Quit when all windows are closed, except on macOS. There, it's common
// for applications and their menu bars to stay active until the user quits
// explicitly with Cmd + Q.
app.on('window-all-closed', () => {
  if (process.platform !== 'darwin') {
    app.quit();
  }
});

app.on('activate', () => {
  if (BrowserWindow.getAllWindows().length === 0) {
    createWindow();
  }
});
Let’s quickly explain what we’ve done here:
appis the Electron application.BrowserWindowis the class that represents the browser window. It’s used to render web content. It also handles the events of the window, like closing, resizing, etc.isDevis a package that helps us to run the application in development mode. It checks if the Electron application is running in development mode or production mode.app.whenReady()is a function that returns a promise. It’s used to wait until the application is ready to create the browser window.app.on('window-all-closed', () => {is a function that is called when all the windows are closed.if (process.platform !== 'darwin') {is a condition that checks if the platform is not macOS.app.quit();is a function that quits the application.
You can learn more about Electron configuration here.
The significant change is that we have added a custom index.html file to be launched. This will be in your build file, which will be the destination in production.
The final step for the configuration is to rewrite the package.json file. This is important because we need to tell Electron where to find the main file and how to launch the desktop application.
Before doing so, install concurrently and wait-on. You can use these packages to run the application in development mode. When you try to launch the application in the browser, the browser will launch an Electron application instead.
yarn add concurrently wait-on -D
Concurrently allows us to run multiple commands within one script. wait-on will wait for port 3000, the default CRA port, to launch the app.
Open your package.json file and add this entry.
"main": "public/electron.js",
"homepage": "./"
In the scripts section, add the following:
...
"scripts": {
    "start": "react-scripts start",
    "build": "react-scripts build",
    "test": "react-scripts test",
    "eject": "react-scripts eject",
    "dev": "concurrently -k "BROWSER=none yarn start" "yarn:electron"",
    "electron": "wait-on tcp:3000 && electron ."
  },
Great! We have installed everything. Now you can launch the application with yarn dev.
Developing the application
Now that everything is set up, let’s build our stocks application. To fetch the data from the API, we’ll use the axios and swr packages. To display a candlestick chart, we’ll use the apexcharts package.
yarn add axios swr apexcharts react-apexcharts
Great! Now, let’s build the application.
In the src directory, create a new file named config.js. This file will contain the configuration for the application.
export const API_URL = "https://www.alphavantage.co";

export const symbols = ['MSFT', 'AAPL', 'AMZN', 'FB', 'GOOG'];
After that, create another file named axios.js. This file will contain the fetch method that will be used for the hooks we’ll be writing to get data from the Alpha Vantage API.
import axios from "axios";
import { API_URL } from "./api";

const axiosService = axios.create({
    baseURL: API_URL
});

export function fetcher(url, params) {
    return axiosService.get(`${url}${params}&function=TIME_SERIES_DAILY&outputsize=compact&apikey=${process.env.REACT_APP_API_KEY}`).then((res) => res.data);
}

export default axiosService;
As you can see here, the fetcher function is used to fetch data from the API. The baseURL is the base URL of the API. The url is the path of the API. The params are the parameters that will be sent to the API. We need to create the REACT_APP_API_KEY variable in an .env file.
Securing the sensitive data
React provides a way to secure the data that is sent to the API. We’ll just create an .env file and add the REACT_APP_API_KEY variable. When working with React and environment variables, make sure all your environment variables start with REACT_APP_.
Create an .env file at the root of the project — and make sure to add it to .gitignore, as it will be storing our secrets. Alternatively, you can use .env.local for this, as it is already in .gitignore. Add this to the file:
REACT_APP_API_KEY=<your-api-key>
Great! Now that we have the fetcher function, let’s create a useAlphaVantage hook.
Writing the useAlphaVantage hook
A React hook is a function that returns a value. Why use a hook? Hooks make React so much better because they enable you to use simpler code that implements similar functionalities faster and more effectively. You can also implement React state and lifecycle methods without writing classes.
What’s even cooler is that we can create our own hooks. Inside the src directory, create a new file named useAlphaVantage.js.
In this file, add the following code:
import useSWR from "swr";
import { fetcher } from "./axios";

const useAlphaVantage = (params) => {

    const seriesData = useSWR(
        ["/query", params],
        fetcher,
        {
            refreshInterval: 20000
        }
    );

    if (seriesData.error) return null;

    if (seriesData.data) {
        const data = seriesData.data["Time Series (Daily)"];

        if (!data) return null;

        const series = Object.keys(data).map(key => {

            const values = Object.values(data[key]);
            values.pop();
            return {
                x: key,
                y: values
            };
        });

        return series;
    }

}

export default useAlphaVantage;
What are we doing here? Let’s explain:
useSWRis a hook that allows us to fetch data from the API. It needs to know the URL of the API and the function that will be used to fetch the data. We have also added a refresh interval of 20 seconds.fetcheris the function that we’ll use to fetch the data.seriesDatais the data that will be returned by the hook.if (seriesData.error) return null;is a condition that checks if there is an error. If there is an error, we return null.if (seriesData.data)is a condition that checks if there is data. If there is data, we can work with it and return exactly what we want.
The hook accepts a params parameter. This parameter will basically be the symbol that we’ll be using to fetch the data. If this symbol changes, the hook will automatically fetch the data again.
Great! The hook is now implemented. Let’s add it to the App.js application.
Writing the UI logic
ApexCharts is a data visualization library that allows us to display charts. Since it’s well integrated with React, we can use it to display the candlestick chart.
The ApexCharts documentation is available here.
It comes with a component called Chart that we can use by passing the necessary props.
import { useState } from 'react';

import Chart from 'react-apexcharts'
import useAlphaVantage from './useAlphaVantage';

import { symbols } from './api';

import './App.css';

function App() {


  const [symbol, setSymbol] = useState("MSFT");

  const dataAlpha = useAlphaVantage(`?symbol=${symbol}`);

  if (!dataAlpha) return <div className='loading'>Loading...</div>;

  const state = {
    series: [{
      data: dataAlpha
    }],
    options: {
      chart: {
        type: 'candlestick',
        height: 350
      },
      title: {
        text: 'Candlestick Chart',
        align: 'left'
      },
      xaxis: {
        type: 'datetime'
      },
      yaxis: {
        tooltip: {
          enabled: true
        }
      }
    },
  };

  return (
    <div>
    </div>
  );
}

export default App;
We can also add the UI.
return (
    <div>
      <div>
        <select className="select" value={symbol} onChange={e => {setSymbol(e.target.value)}}>
          {symbols.map(symbol => <option key={symbol} value={symbol}>{symbol}</option>)}
        </select>
      </div>
      <Chart options={state.options} series={state.series} type="candlestick" height={350} />
    </div>
  );
A select menu will be used to select the symbol.
Let’s add some CSS to make the application look nice. Inside the App.css file, add the following code:
.select {
  width: 100%;
  height: 40px;
  border-radius: 4px;
  border: 1px solid #ccc;
  padding: 0 10px;
  font-size: 16px;
  color: #333;
  outline: none;
}

.loading {
  position: absolute;
  top: 0;
  left: 0;
  width: 100%;
  height: 100%;
  background: rgba(255, 255, 255, 0.8);
  z-index: 10;
  display: flex;
  justify-content: center;
  align-items: center;
}
Once that’s implemented, you’ll have a UI that looks like this:
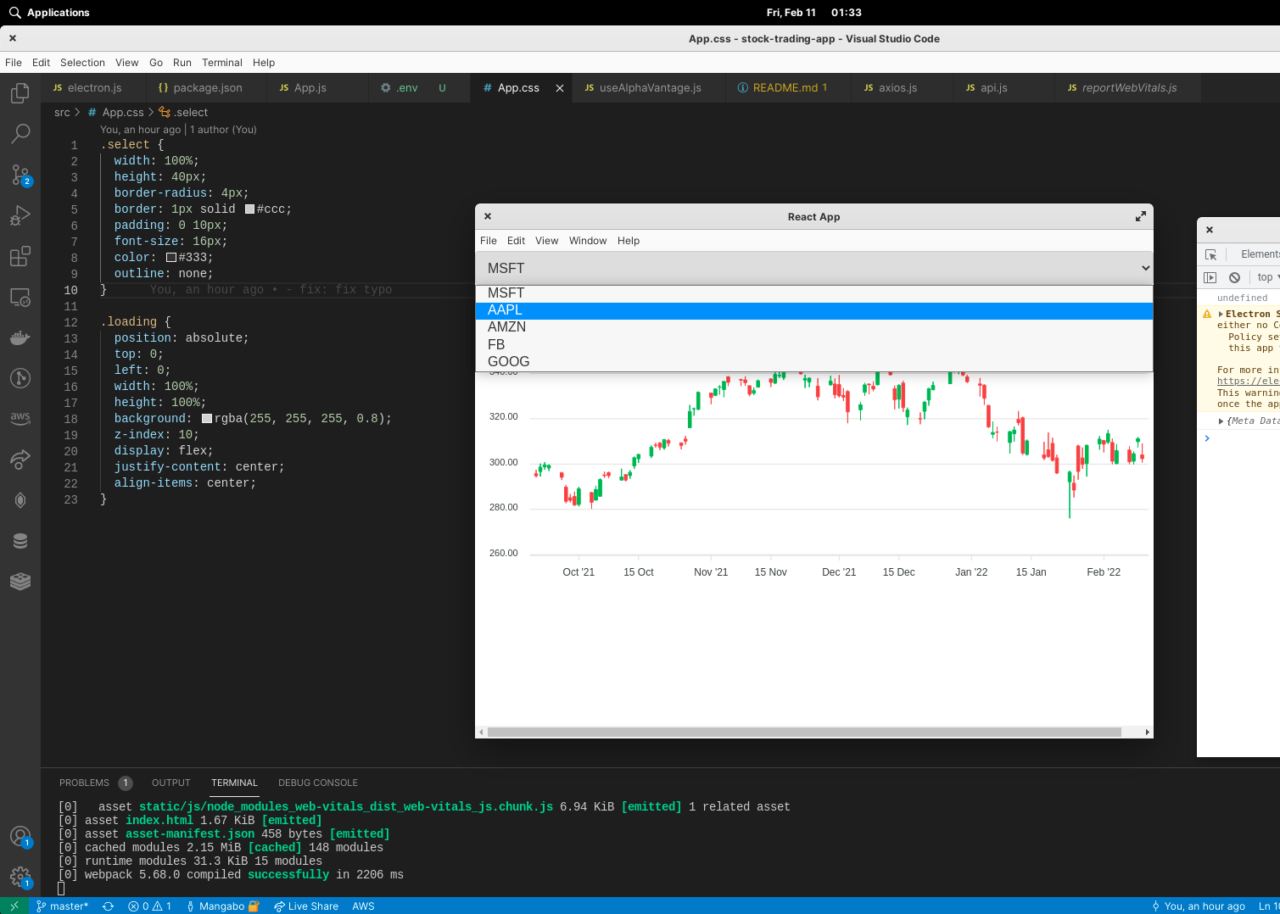
Excellent! Now that we have a working application, let’s see how we can build it for different platforms.
Building the Electron app
We have a working Electron application, and we can build it on different desktop platforms. There are many tools that we can use to build the application, the main three being electron-builder, electron-forge, and electron-packager.
In this tutorial, we will use electron-forge to build our stocks app for macOS, Windows, and Linux.
yarn add electron-forge
For macOS, add this dev dependency:
yarn add -D @electron-forge/maker-dmg
Once that’s done, let’s add some requirements to the package.json file. Make sure that the scripts section looks like this.
...
  "scripts": {
    "start": "react-scripts start",
    "build": "react-scripts build",
    "test": "react-scripts test",
    "eject": "react-scripts eject",
    "dev": "concurrently -k "BROWSER=none yarn start" "yarn:electron"",
    "electron": "wait-on tcp:3000 && electron .",
    "package": "react-scripts build && electron-forge package",
    "make-mac": "react-scripts build && electron-forge make --platform darwin",
    "make-linux": "react-scripts build && electron-forge make --platform linux",
    "make": "react-scripts build && electron-forge make"
  },
...
And add the config section in the package.json file.
"config": {
    "forge": {
      "packagerConfig": {},
      "makers": [
        {
          "name": "@electron-forge/maker-squirrel",
          "config": {
            "name": "stock_trading_app"
          }
        },
        {
          "name": "@electron-forge/maker-zip",
          "platforms": [
            "darwin",
            "linux",
            "win32"
          ]
        },
        {
          "name": "@electron-forge/maker-deb",
          "config": {}
        },
        {
          "name": "@electron-forge/maker-rpm",
          "config": {}
        }
      ]
    }
  }
Here’s the full package.json file.
{
  "name": "stock-trading-app",
  "version": "0.1.0",
  "private": true,
  "license": "MIT",
  "main": "public/electron.js",
  "homepage": "./",
  "author": {
    "name": "Kolawole Mangabo",
    "email": "kolagithub@gmail.com"
  },
  "description": "A simple Electron app",
  "dependencies": {
    "@testing-library/jest-dom": "^5.16.2",
    "@testing-library/react": "^12.1.2",
    "@testing-library/user-event": "^13.5.0",
    "apexcharts": "^3.33.1",
    "axios": "^0.25.0",
    "electron-is-dev": "^2.0.0",
    "electron-squirrel-startup": "^1.0.0",
    "react": "^17.0.2",
    "react-apexcharts": "^1.3.9",
    "react-dom": "^17.0.2",
    "react-scripts": "5.0.0",
    "swr": "^1.2.1",
    "web-vitals": "^2.1.4"
  },
  "scripts": {
    "start": "react-scripts start",
    "build": "react-scripts build",
    "test": "react-scripts test",
    "eject": "react-scripts eject",
    "dev": "concurrently -k "BROWSER=none yarn start" "yarn:electron"",
    "electron": "wait-on tcp:3000 && electron .",
    "package": "react-scripts build && electron-forge package",
    "make-mac": "react-scripts build && electron-forge make --platform darwin",
    "make-linux": "react-scripts build && electron-forge make --platform linux",
    "make": "react-scripts build && electron-forge make"
  },
  "eslintConfig": {
    "extends": [
      "react-app",
      "react-app/jest"
    ]
  },
  "browserslist": {
    "production": [
      ">0.2%",
      "not dead",
      "not op_mini all"
    ],
    "development": [
      "last 1 chrome version",
      "last 1 firefox version",
      "last 1 safari version"
    ]
  },
  "devDependencies": {
    "@electron-forge/cli": "^6.0.0-beta.63",
    "@electron-forge/maker-deb": "^6.0.0-beta.63",
    "@electron-forge/maker-dmg": "^6.0.0-beta.63",
    "@electron-forge/maker-rpm": "^6.0.0-beta.63",
    "@electron-forge/maker-squirrel": "^6.0.0-beta.63",
    "@electron-forge/maker-zip": "^6.0.0-beta.63",
    "concurrently": "^7.0.0",
    "electron": "^17.0.0",
    "wait-on": "^6.0.0"
  },
  "config": {
    "forge": {
      "packagerConfig": {},
      "makers": [
        {
          "name": "@electron-forge/maker-squirrel",
          "config": {
            "name": "stock_trading_app"
          }
        },
        {
          "name": "@electron-forge/maker-deb",
          "config": {
            "name": "stock_trading_app"
          }
        },
        {
          "name": "@electron-forge/maker-rpm",
          "config": {
            "name": "stock_trading_app"
          }
        },
        {
          "name": "@electron-forge/maker-dmg",
          "config": {
            "name": "stock_trading_app",
            "format": "ULFO"
          }
        },
        {
          "name": "@electron-forge/maker-zip",
          "platforms": [
            "darwin",
            "linux",
            "win32"
          ]
        }
      ]
    }
  }
}
Now that we have configured our Electron app to be built for all three major desktop operating systems, we can move to Codemagic and start writing the building script for the CI/CD pipeline.
CI/CD for Electron apps with Codemagic
Codemagic helps you write CI/CD pipelines for mobile or desktop applications, including building, testing, and publishing your apps. You can use it for Electron apps as well.
In this tutorial, we will first write a build script targeting Linux machines. Then, we’ll add the scripts to build the desktop application on Windows and macOS.
First, make sure you have created a Codemagic account. If you haven’t, sign up here.
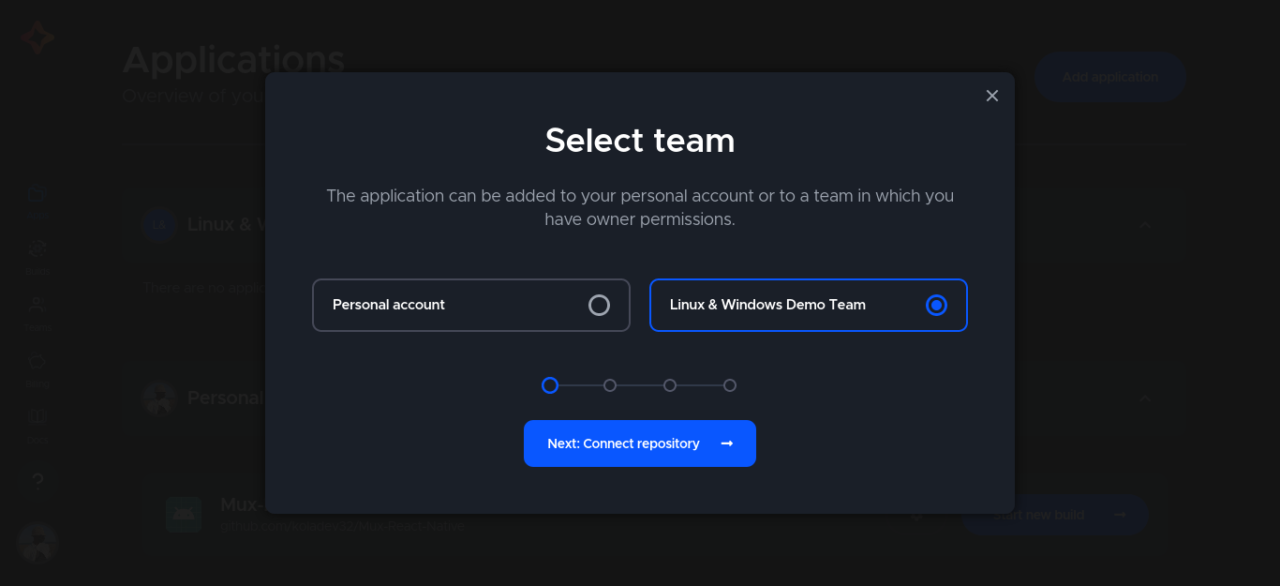
Once that’s done, add a new application. Codemagic’s teams feature provides a way to not only better manage your build scripts but also share many instances, which is very helpful if you are looking to build your application on multiple machines.
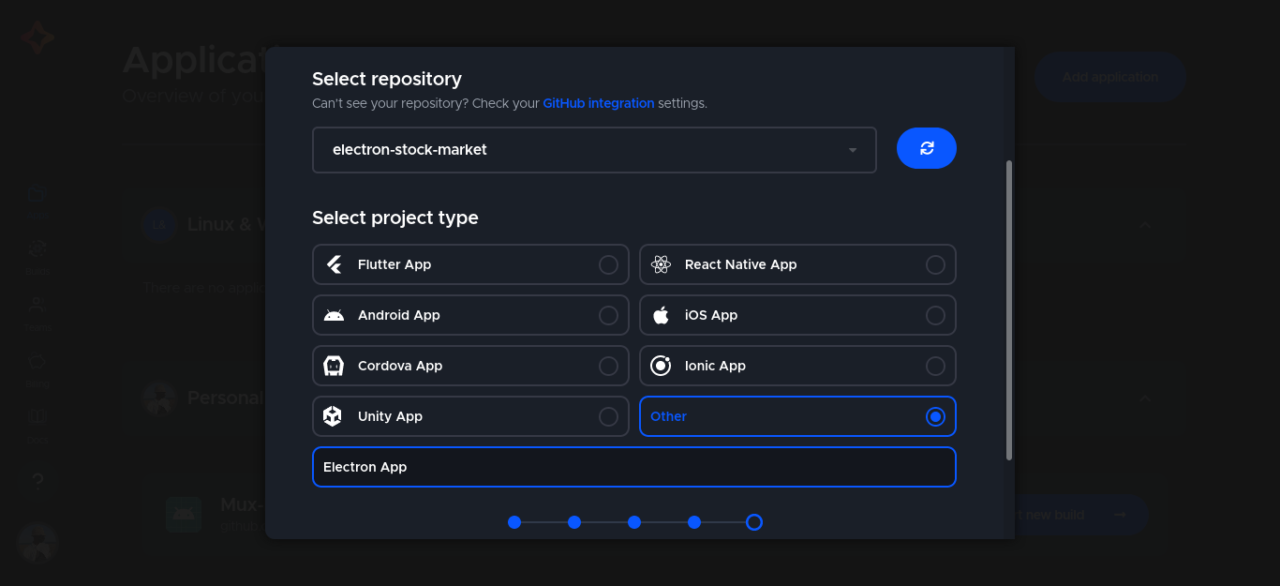
After that, you’ll need to specify the type of application. In this case, we’ll go with Other and enter Electron App as the name. And don’t forget to select the application from your preferred repository.
Now, we can start writing the script. Create a file called codemagic.yaml at the root of your project.
Build the Electron app for Linux
Inside the codemagic.yaml file, add the following content.
workflows:
  linux-build:
    name: Linux Build
    instance_type: linux
    environment:
      groups:
        - prod
      node: 16.14.0

    scripts:
      - name: Injecting env vars
        script: echo "REACT_APP_API_KEY=$REACT_APP_API_KEY" >> .env
      - name: Installing packages
        script: yarn install
      - name: Installing RPM to build for arch linux
        script: sudo apt install rpm -y
      - name: Building Applications
        script: yarn make-linux

    artifacts:
      - out/make/deb/x64/*.deb
      - out/make/rpm/x64/*.rpm
      - out/make/zip/linux/x64/*.zip
Here, we are building our Electron application for Debian and Arch Linux using a standard Linux machine that Codemagic provides. We’ll get .deb and .rpm files as build artifacts that we can run on the machines with their respective operating systems. It is also possible to make snaps of your Linux apps and publish them to the Snap Store with Codemagic — you can read more about this here.
Build the Electron app for macOS
Building the Electron application on macOS — and for macOS — is very similar to building it on Linux.
Add the following workflows to the codemagic.yaml file.
  macos-build:
    name: macOS Build
    instance_type: mac_mini
    environment:
      groups:
        - prod
      node: 16.14.0

    scripts:
      - name: Injecting env vars
        script: echo "REACT_APP_API_KEY=$REACT_APP_API_KEY" >> .env
      - name: Installing packages
        script: yarn install
      - name: Building Applications
        script: yarn make-mac

    artifacts:
      - out/make/*.dmg
In this example, we will get an unsigned .dmg file that will contain our Electron app. If you want to learn how to code sign it and publish it to the App Store, take a look at the docs.
Finally, we can add the scripts to build the desktop application on Windows.
Build the Electron app for Windows
We can use a very similar workflow for Windows as for the other platforms.
  windows-build:
    name: Windows Build
    instance_type: windows_x2
    environment:
      groups:
        - prod
      node: 16.14.0

    scripts:
      - name: Injecting env vars
        script: echo "REACT_APP_API_KEY=$REACT_APP_API_KEY" >> .env
      - name: Installing packages
        script: yarn install
      - name: Building Applications
        script: yarn run make

    artifacts:
      - out/make/squirrel.windows/x64/*exe
      - out/make/squirrel.windows/x64/*nupkg
      - out/make/zip/win32/x64/*.zip
Here, we’re using a premium Windows VM from Codemagic to get an .exe artifact.
Now, remember that Codemagic allows you to automate building and publishing for all of your target platforms, so you can put all of these yaml scripts into one codemagic.yaml file. As a result, it will look like this:
workflows:
  linux-build:
    name: Linux Build
    instance_type: linux
    environment:
      groups:
        - prod
      node: 16.14.0

    scripts:
      - name: Injecting env vars
        script: echo "REACT_APP_API_KEY=$REACT_APP_API_KEY" >> .env
      - name: Installing packages
        script: yarn install
      - name: Installing RPM to build for arch linux
        script: sudo apt install rpm -y
      - name: Building Applications
        script: yarn make-linux

    artifacts:
      - out/make/deb/x64/*.deb
      - out/make/rpm/x64/*.rpm
      - out/make/zip/linux/x64/*.zip

  windows-build:
    name: Windows Build
    instance_type: windows_x2
    environment:
      groups:
        - prod
      node: 16.14.0

    scripts:
      - name: Injecting env vars
        script: echo "REACT_APP_API_KEY=$REACT_APP_API_KEY" >> .env
      - name: Installing packages
        script: yarn install
      - name: Building Applications
        script: yarn run make

    artifacts:
      - out/make/squirrel.windows/x64/*exe
      - out/make/squirrel.windows/x64/*nupkg
      - out/make/zip/win32/x64/*.zip


  macos-build:
    name: macOS Build
    instance_type: mac_mini
    environment:
      groups:
        - prod
      node: 16.14.0

    scripts:
      - name: Injecting env vars
        script: echo "REACT_APP_API_KEY=$REACT_APP_API_KEY" >> .env
      - name: Installing packages
        script: yarn install
      - name: Building Applications
        script: yarn make-mac

    artifacts:
      - out/make/*.dmg
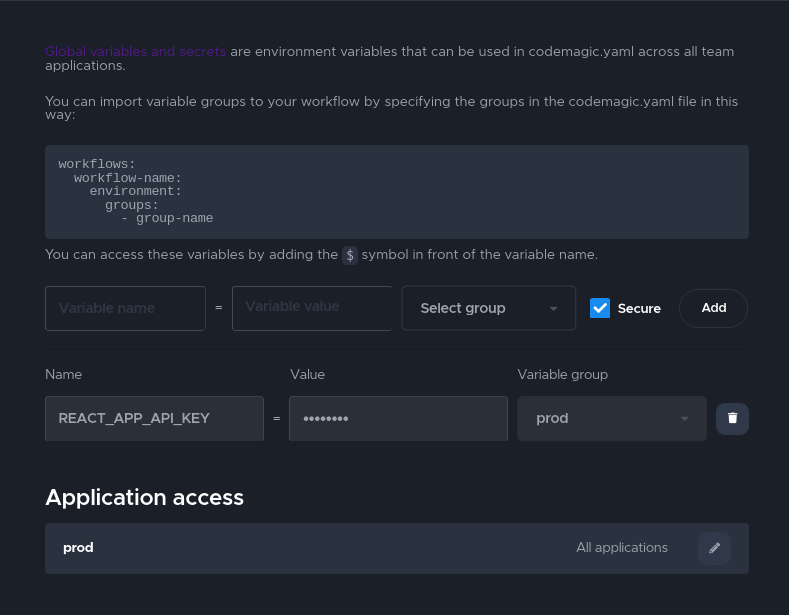
Before building the scripts, you’ll need to add an env var. In this case, it’ll be REACT_APP_API_KEY. For each build, we want Codemagic to inject the secret in the .env file.
And voilà! We’ve just created an electron application and written CI/CD pipelines to build the application on different platforms.
Conclusion
In this article, we’ve covered how to create a simple Electron app to monitor stocks using React and the Alpha Vantage API, relying on the axios, swr, and apexcharts packages. We’ve also created a simple pipeline with Codemagic CI/CD to build our Electron app for all three major desktop operating systems — macOS, Linux, and Windows.
Being able to deliver cross-platform apps is one of Electron’s main advantages, and Codemagic CI/CD can help you get the most out of it by automatically building them. You can also automate publishing the app to the App Store, Microsoft Store, and Snap Store and add a webhook to trigger builds automatically. But that’s a story for another blog post.
If you want to learn more about Electron CI/CD, tell us by tagging @codemagicio on Twitter or posting to #codemagic-feedback on Codemagic’s Slack. Or use the form below.
Finally, you can find the code for this project with a working codemagic.yaml file on GitHub
here.
Kolawole Mangabo is a full-stack engineer who works with Python and JavaScript. Currently busy building things in a foodtech company, he’s also a technical writer who covers Django, React, and React Native on his personal blog.


Discussion about this post