This post is written by Mina Pêcheux
TL;DR: You can automate the publishing of your Unity VR apps to the Oculus Store using Codemagic and the Oculus CLI tools.
Creating VR Unity apps is really cool… but how can you easily share them with your friends during the dev phase?
In a previous article, I discussed why automating building and publishing of your Unity projects can be interesting and useful, particularly when you want to get continuous feedback from your nice beta testers. To demonstrate this, I used an example in the form of an Android mobile game called “Slash’n’crack”.
Though many development projects are similar, there are differences in some cases. The other day, as I was playing around with the brand-new Oculus Quest 2 VR headset I got last Christmas, I obviously started to wonder how I could make some VR apps of my own… and how I could share them with my fellow developers, just like I did with the “Slash’n’crack” game! Eventually, this resulted in an idea that turned into a project of its own.
Unity has integrated a lot of XR (eXtended reality, a term that includes virtual, augmented, and mixed reality) features recently, making it a lot easier to create a small prototype game for various types of VR headsets. With this engine, you can now quickly set up simple VR prototypes that are compatible with, for example, an Oculus set.
So, this time, I created another basic arcade game in which you have to destroy objects. However, this one is in a 360° room, and you have to shoot at the incoming targets. Here’s a demo of my new prototype game, “Ico-pop”!
If you want to take a look at the project itself, it’s available for free on GitHub over here 🚀
Just like with Android apps, sharing VR apps can sometimes be a bit cumbersome, especially during the dev phase. Thankfully, I discovered that we can reuse some of our prior knowledge of Codemagic and the Oculus CLI tools to automate the build and release of a Unity VR project like my small game to the Oculus Store.
So, in this post, I’ll discuss:
- How to build my Unity VR app using Codemagic
- How to set up an Oculus app with some testers for Ico-pop
- How to automatically publish the build from Codemagic as a new Oculus release
Ready to dive in? Then let’s go! 🙂
A quick note about Oculus distribution automation
As devs, we’re used to using various publishing tools and having some APIs and easy-to-call URLs to automate our workflow (such as the ones offered by Microsoft Partner Center, Google Play, and the Apple App Store, for example).
However, I actually haven’t found such readily accessible tools for the Oculus Store! (If you happen to know some, please tell me about them.)
But luckily, there is still a solution for automation: Meta, which owns Oculus, released a set of Oculus command-line (CLI) tools that allow you to perform some actions programmatically instead of having to go and click on a bunch of buttons in the dashboards and UIs. This CLI utility is an easy way to get info on your app’s current builds, create a new one, download a specific version, and more. Along with Codemagic, this CLI utility provides us with the toolset we’re going to rely on to build and distribute an Oculus app in the cloud.
Part 1: Configuring the Unity project to build VR apps for Oculus
As you can quickly find out from the official Unity docs, making VR apps with Unity actually means compiling for Android and creating packages. So we’ll need to prepare our project to build for Android but also make sure that the project settings are suited for an Oculus distribution.
Be careful: Even if some settings are common for Unity Android builds, there are also some requirements or limitations specific to Oculus!
Picking the build target
If your project is not yet configured to build for Android, you’ll need to change this first. This step is easy: In your “File” > “Build Settings” panel, choose “Android” as the build target and click on “Switch Platform”:
This might take a while because your projects will need to re-compile, but once you’re done, you’ll see that the button at the bottom now says “Build”.
While you’re at it, you can check that you have added all the scenes you need in your build to this list — these are the only ones that will be accessible to Unity when the build starts. 😉
Also, if you have already configured the XR for another build platform, you might need to re-update your config and re-pick the right XR management plugin in the “Edit” > “Project Settings” window by going to the “XR Plug-in Management” tab and setting up the Android options:
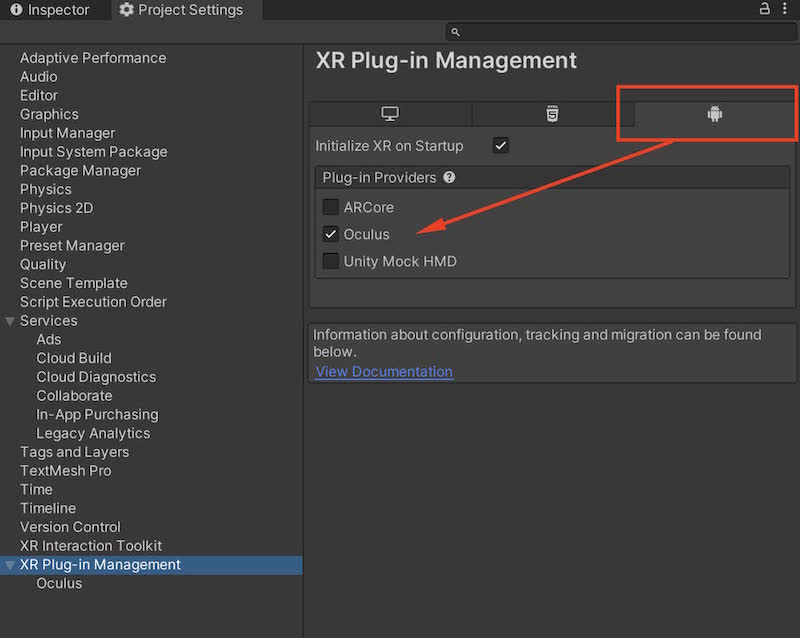
Choosing the right project settings
This is where things get interesting! If you go to “Edit” > “Project Settings” in the “Player” tab, you’ll see that there are quite a few settings you can adjust.
According to the Oculus docs and the Codemagic docs for Android publishing (even if I’m disregarding the .aab-related options since I’m making an .apk package), we need to configure three of these settings:
- In the “Other Settings” block, make sure that your Minimum API Level and Target API Level are set to Android 10.0 (API Level 29) or lower — this is required for Oculus apps
- Also, set the “Scripting Backend” to “IL2CPP”
- Then, in the “Publishing Settings” block at the bottom, check the “Custom Base Gradle Template” toggle
Enabling this option will automatically create a new file called baseProjectTemplate.gradle in your project in the Assets/Plugins/Android folder. Now, open this file and copy the following contents into it:
// GENERATED BY UNITY. REMOVE THIS COMMENT TO PREVENT OVERWRITING WHEN EXPORTING AGAIN

allprojects {
    buildscript {
        repositories {**ARTIFACTORYREPOSITORY**
            google()
            mavenCentral()
        }

        dependencies {
            // If you are changing the Android Gradle Plugin version, make sure it is compatible with the Gradle version preinstalled with Unity
            // See which Gradle version is preinstalled with Unity here https://docs.unity3d.com/Manual/android-gradle-overview.html
            // See official Gradle and Android Gradle Plugin compatibility table here https://developer.android.com/studio/releases/gradle-plugin#updating-gradle
            // To specify a custom Gradle version in Unity, go do "Preferences > External Tools", uncheck "Gradle Installed with Unity (recommended)" and specify a path to a custom Gradle version
            classpath 'com.android.tools.build:gradle:4.0.1'
            **BUILD_SCRIPT_DEPS**
        }
    }

    repositories {**ARTIFACTORYREPOSITORY**
        google()
        mavenCentral()
        flatDir {
            dirs "${project(':unityLibrary').projectDir}/libs"
        }
    }
}

task clean(type: Delete) {
    delete rootProject.buildDir
}
Creating a keystore file to secure the app
Finally, we want to make the app a bit more secure so that it passes all of Oculus’s checks when it’s released. To do this, we’ll create a keystore credentials file for it — this type of file is a safe way of storing cryptographic keys in a container, as explained here.
To generate a new keystore file, you can use the keytool utility; this is provided with Java, so you most likely already have it on your computer. But just in case you don’t, here is a short post explaining how to install it.
You can call keytool with the following options to get a nice new keystore file (remember to adapt the parts between the < and > signs):
keytool -genkey -v -keystore <keystore_name>.keystore -alias <alias_name> -keyalg RSA -keysize 2048 -validity 10000
After running this command, you will be prompted to answer a few questions — you’ll need to pick some passwords and other settings. In particular, these “passwords” are actually the private and public keys of your cryptographic key pair. You don’t need to know all the intricate details, but just make sure to remember the “keystore password” and “key password” you pass the tool because we’ll need them very soon when we set up our Codemagic app.
Important note: These keystore credentials should NEVER be committed to the Git repo. Add them to your
.gitignoreto make sure you don’t add them by accident! I’ve discussed how to set up the right.gitignorefor Unity projects in this article.
Part 2: Automating the build of our VR app with Codemagic
If you’re already familiar with Codemagic workflows, feel free to jump directly to the third part about setting up Oculus apps!
Important note: Deploying Unity apps with Codemagic requires a Pro or Plus Unity license!
As I’ve explained in more detail in previous articles, Codemagic is a CI/CD tool that is really easy to use, scales well, and allows you to quickly build all sorts of projects: React Native, Flutter, Android, iOS… and of course, Unity! The nice thing is that because you are using a dedicated build machine, you can also choose the target platform you want — which will make it a breeze to create our Android .apk artifact.
To use Codemagic with your Unity project, all you need to do is version the project with Git so that you can create a Codemagic app from it.
Once you’ve added your Unity project to a Git provider (like GitHub, GitLab, or Bitbucket), log in to your Codemagic account and go to your dashboard. You’ll be able to add a new app, choose the proper Git provider, and then pick the repo you want to fetch the source code from:
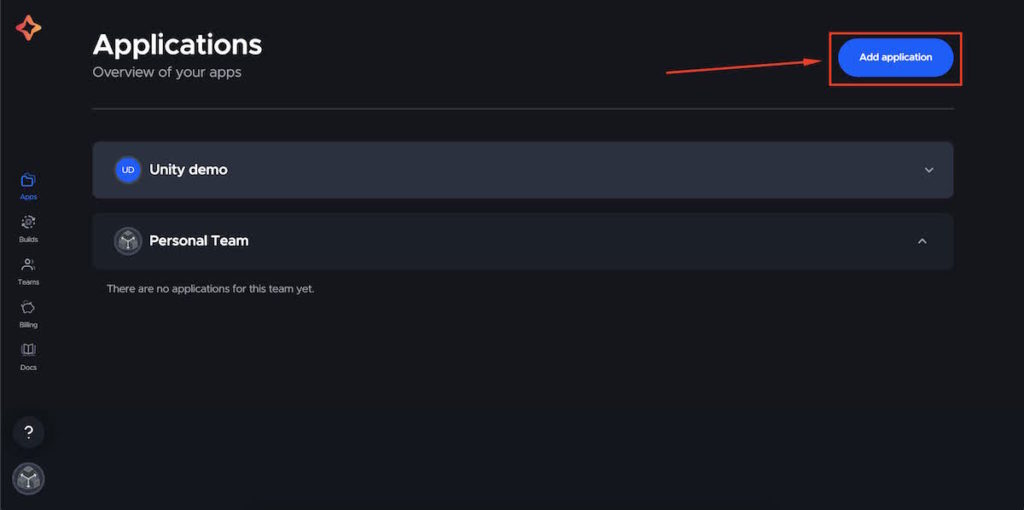

The next step is to add two files to your project:
- A
Build.csscript that allows the Codemagic workflow to run your project via the command line and build the project automatically (this is the equivalent of you opening the “Build Settings” panel and clicking the “Build” button) - A
codemagic.yamlconfiguration file, placed at the root of your Git repository, that defines the work environment to use and the different steps for the build and additional deployment stages
The Build.cs file should be placed in your assets folder within the Editor/ folder:
using System.Linq;
using System;
using UnityEditor;
using UnityEngine;

public static class BuildScript
{

    [MenuItem("Build/Build Android")]
    public static void BuildAndroid()
    {

        PlayerSettings.Android.useCustomKeystore = true;
        EditorUserBuildSettings.buildAppBundle = false;

        // Set bundle version. NEW_BUILD_NUMBER environment variable is set in the codemagic.yaml
        var versionIsSet = int.TryParse(Environment.GetEnvironmentVariable("NEW_BUILD_NUMBER"), out int version);
        if (versionIsSet)
        {
            Debug.Log($"Bundle version code set to {version}");
            PlayerSettings.Android.bundleVersionCode = version;
        }
        else
        {
            Debug.Log("Bundle version not provided");
        }

        // Set keystore name
        string keystoreName = Environment.GetEnvironmentVariable("CM_KEYSTORE_PATH");
        if (!String.IsNullOrEmpty(keystoreName))
        {
            Debug.Log($"Setting path to keystore: {keystoreName}");
            PlayerSettings.Android.keystoreName = keystoreName;
        }
        else
        {
            Debug.Log("Keystore name not provided");
        }

        // Set keystore password
        string keystorePass = Environment.GetEnvironmentVariable("CM_KEYSTORE_PASSWORD");
        if (!String.IsNullOrEmpty(keystorePass))
        {
            Debug.Log("Setting keystore password");
            PlayerSettings.Android.keystorePass = keystorePass;
        }
        else
        {
            Debug.Log("Keystore password not provided");
        }

        // Set keystore alias name
        string keyaliasName = Environment.GetEnvironmentVariable("CM_KEY_ALIAS");
        if (!String.IsNullOrEmpty(keyaliasName))
        {
            Debug.Log("Setting keystore alias");
            PlayerSettings.Android.keyaliasName = keyaliasName;
        }
        else
        {
            Debug.Log("Keystore alias not provided");
        }

        // Set keystore password
        string keyaliasPass = Environment.GetEnvironmentVariable("CM_KEY_PASSWORD");
        if (!String.IsNullOrEmpty(keyaliasPass))
        {
            Debug.Log("Setting keystore alias password");
            PlayerSettings.Android.keyaliasPass = keyaliasPass;
        }
        else
        {
            Debug.Log("Keystore alias password not provided");
        }
        BuildPlayerOptions buildPlayerOptions = new BuildPlayerOptions();
        buildPlayerOptions.locationPathName = "android/android.apk";
        buildPlayerOptions.target = BuildTarget.Android;
        buildPlayerOptions.options = BuildOptions.None;
        buildPlayerOptions.scenes = GetScenes();

        Debug.Log("Building Android");
        BuildPipeline.BuildPlayer(buildPlayerOptions);
        Debug.Log("Built Android");
    }

    private static string[] GetScenes()
    {
        return (from scene in EditorBuildSettings.scenes where scene.enabled select scene.path).ToArray();
    }

}
In this file, we get a few environment variables and set up the build options. Then we get our list of scenes from the build settings and create the android.apk artifact.
Those environment variables are defined in Codemagic’s interface for our app. But why do we need them? Well, to build our Unity project with Codemagic, we’ll be “borrowing” a Codemagic computer for a while. So, even if it has some built-ins and preinstalled tools, we still need to set it up properly with our own work environment, which we can do thanks to env vars!
To configure our env vars, we need to go to our Codemagic app dashboard, navigate to the “Environment variables” tab, and then define some key-value pairs. We want to set up eight variables:
UNITY_SERIALUNITY_PASSWORDUNITY_USERNAMECM_KEYSTORECM_KEYSTORE_PATHCM_KEY_ALIASCM_KEYSTORE_PASSWORDCM_KEY_PASSWORD
The first three need to be added to the “unity” group and the other five to the “keystore_credentials” group. (To do this, simply start typing the name of the group in the “Variable group” column to create it, or pick it from the dropdown list if it already exists.)
UNITY_SERIAL, UNITY_USERNAME, and UNITY_PASSWORD are your own Unity account credentials. The rest of the variables are related to the keystore file we just created; CM_KEY_ALIAS, CM_KEY_PASSWORD, and CM_KEYSTORE_PASSWORD are the various options you set up when you created your keystore file.
CM_KEYSTORE_PATH needs to be set to keystore.keystore.
Finally, CM_KEYSTORE is the actual contents of your keystore file encoded in base64.
Here’s how it should look in the end:
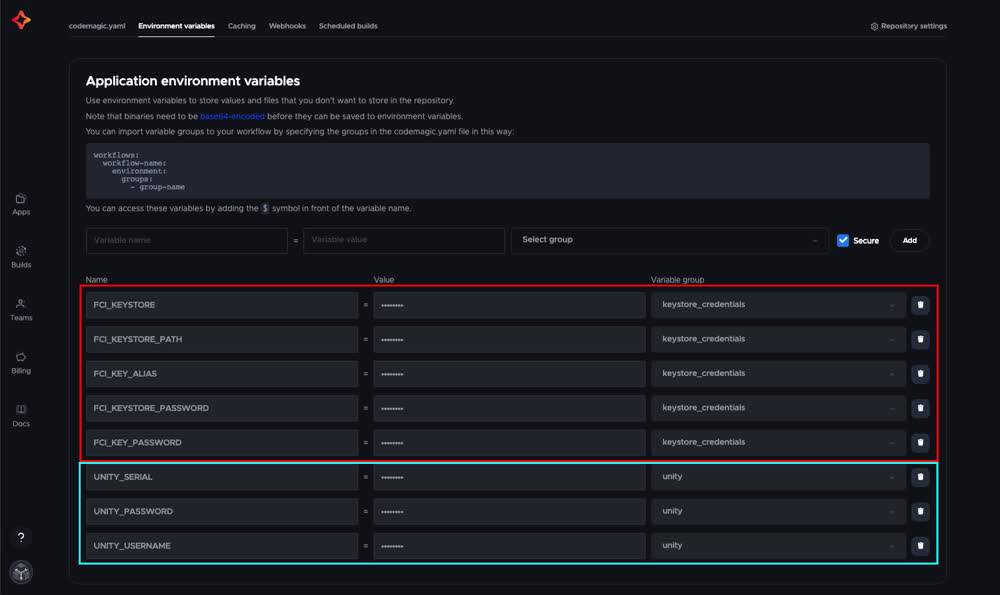
With all that prepared, we just need to commit the codemagic.yaml file to your Git repo. Here’s an example of a build on a Codemagic Mac machine:
workflows:
  unity-android-workflow:
    name: Unity Android Workflow
    max_build_duration: 120
    environment:
      groups:
        - unity # <-- (Includes UNITY_SERIAL, UNITY_USERNAME, UNITY_PASSWORD)
        - keystore_credentials # <-- (Includes CM_KEYSTORE, CM_KEYSTORE_PASSWORD, CM_KEY_PASSWORD, CM_KEY_ALIAS)
      vars:
        UNITY_BIN: ${UNITY_HOME}/Contents/MacOS/Unity
        BUILD_SCRIPT: BuildAndroid
        PACKAGE_NAME: "com.minapecheux.Icopop"
    scripts:
      - name: Activate Unity License
        script: |
          $UNITY_BIN -batchmode -quit -logFile -serial ${UNITY_SERIAL?} -username ${UNITY_USERNAME?} -password ${UNITY_PASSWORD?}
      - name: Set up keystore
        script: |
          echo $CM_KEYSTORE | base64 --decode > $CM_BUILD_DIR/keystore.keystore
      - name: Build Unity app
        script: |
          $UNITY_BIN -batchmode -quit -logFile -projectPath . -executeMethod BuildScript.$BUILD_SCRIPT -nographics -buildTarget Android
    artifacts:
      - android/*.apk
    publishing:
      scripts:
        - name: Deactivate License
          script: $UNITY_BIN -batchmode -quit -returnlicense -nographics
Important note: The Oculus CLI tools are only available for Windows or Mac, and it looks like Linux support is not yet on the roadmap. This means you’ll be limited to either one of these two OSes if you wish to automate the build and release of your Oculus app. 😉
In the environment block, we re-inject the env var groups we defined earlier so that we have access to the eight variables in our scripts and commands; then, we just call Unity via the command line and use our build logic (from the Build.cs file) to create our Android package.
It is very important to provide the -buildTarget Android option in the build command; otherwise, Unity will have trouble gathering all the XR- and VR-related assets!
You can now try your first Codemagic build of your Unity VR app — just click the “Start new build” button in the top-right corner, choose your Git branch or tag, and start the workflow!


After a few minutes, you’ll see that your workflow has ended and produced an .apk artifact:
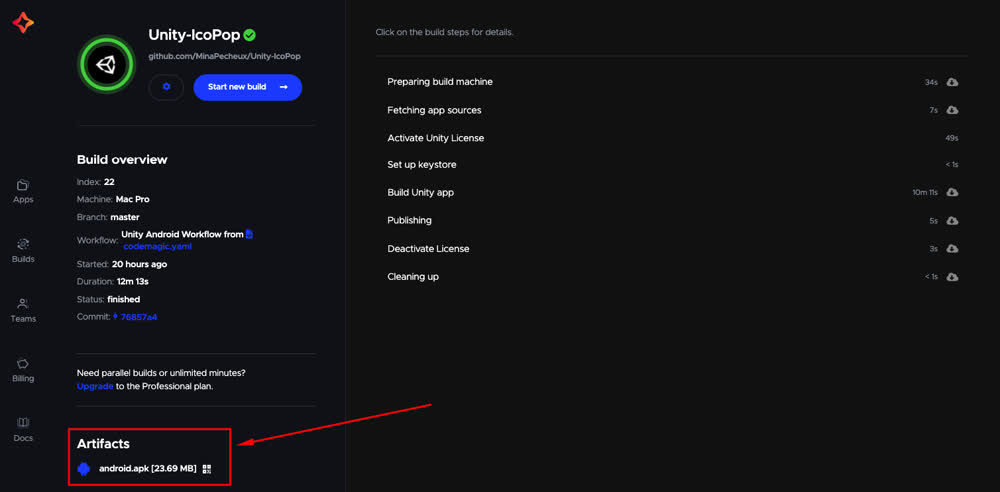
This .apk package is what we want to automatically distribute on Oculus… but first, we need to set up the Oculus app itself so that we can connect it and upload our new builds directly from the Codemagic workflow!
Part 3: Setting up the Oculus app
Creating the app
To make and share your own VR Oculus apps, you’ll need to sign up for the Oculus developer program. You’ll just need to connect with your Oculus or Facebook account to join. Then you’ll be taken directly to your dev dashboard, where you can get a list of all your existing apps or create a new one.
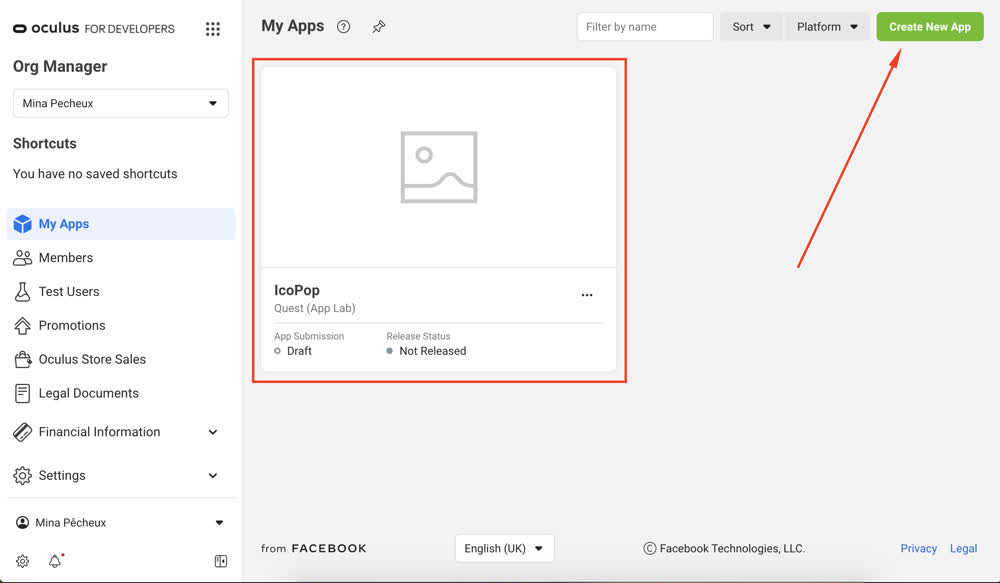
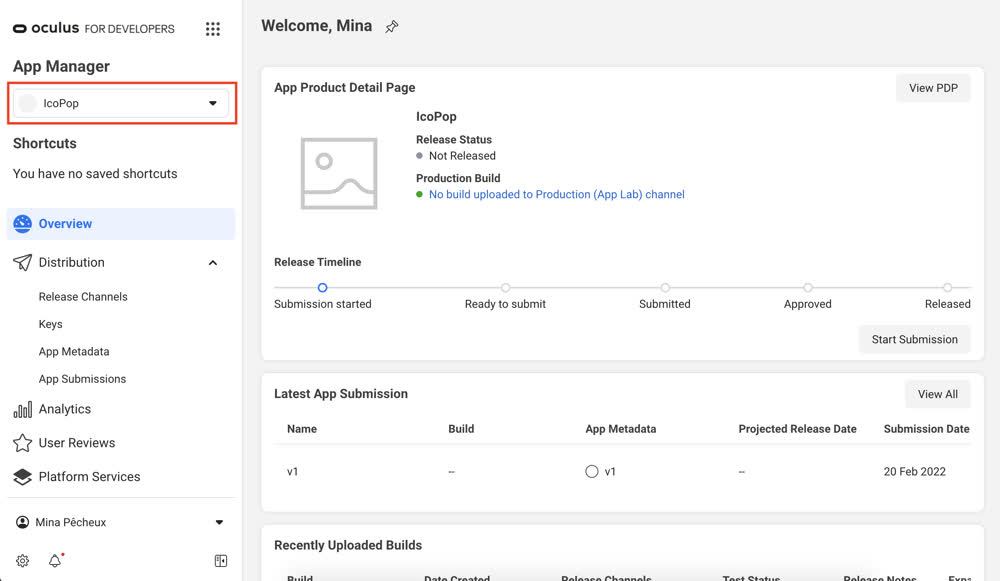
For example, I’ve created my “IcoPop” app, and now I can get an overview of the app’s info on its dashboard:
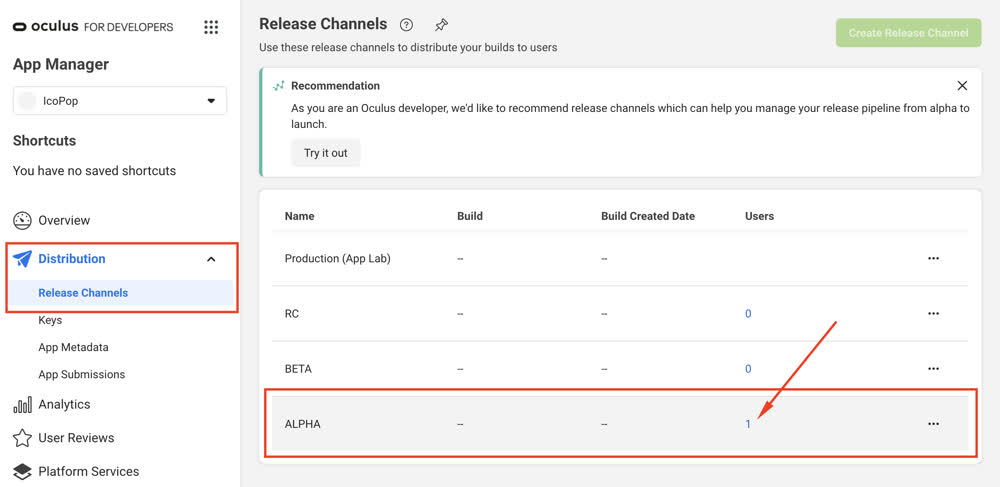
To distribute our app to users, we have to register them in the various available release channels. And because we want to automate the deployment of our app using the Oculus CLI tools for dev, we should use one of the test release channels, i.e., the RC, BETA, or ALPHA channel. According to the Oculus docs, the app initially gets into the ALPHA channel, and then you can choose a channel and even make the channel public if you want.
I’m going to choose the ALPHA channel here, so first, I’ll add some testers to this channel. I just need to click on the channel and go to the “Users” tab, then enter the email addresses of the various testers I want to subscribe. Note that the testers should be registered with Oculus; otherwise, it’ll throw an error.
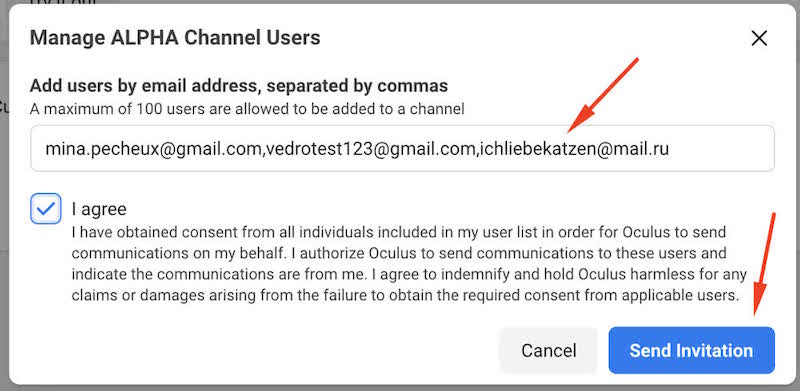
Note: You can only add the emails of users who have a valid Oculus account!
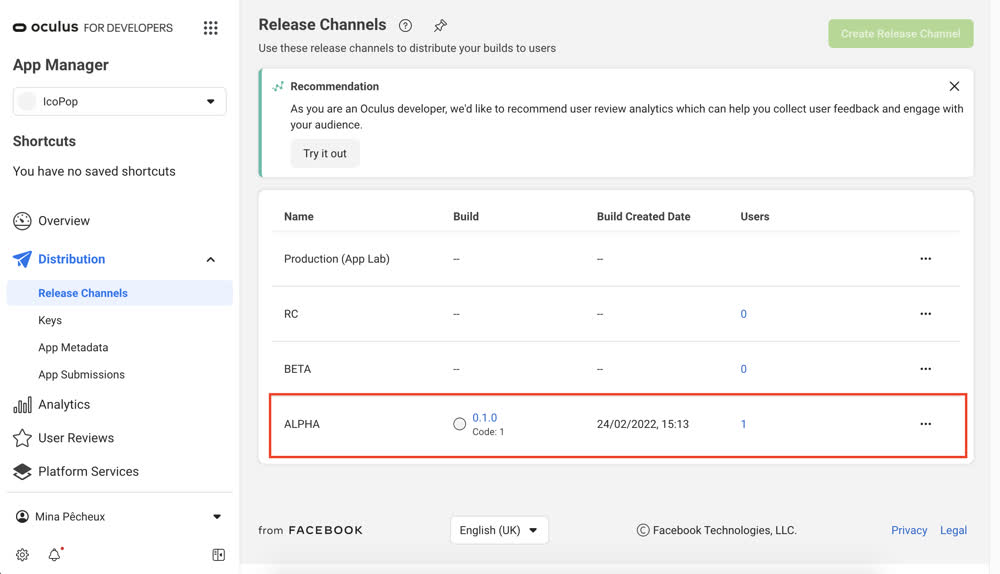
Once the subscribers accept the invite, they’ll be listed in the channel users. On the overall channel dashboard, you can also see that the users count has been incremented:
Getting the Oculus app credentials
The last step is to get some info about our app so that we can use the Oculus CLI tools and upload a build from the Codemagic workflow; more specifically, we’ll need to get the app ID and a token credential to allow the CLI to act on your behalf.
All this info can be found in the “API” tab of the app:
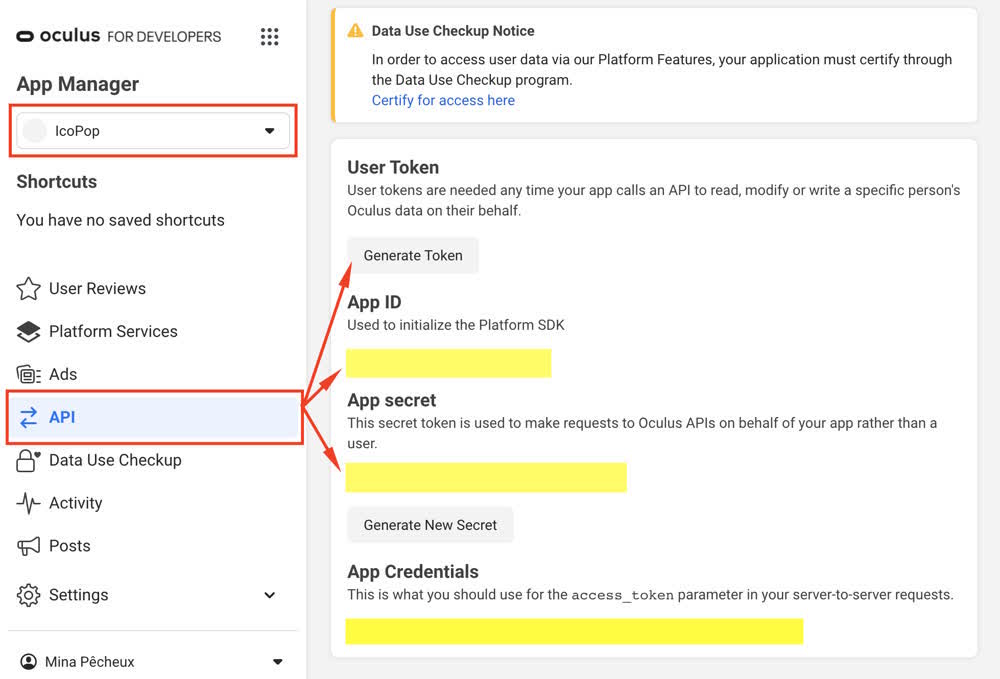
First, we’ll get the app ID. Then, we’ll get an access token.
There are actually two ways of authenticating with the CLI tools:
- With an app secret if you are the main manager of the app
- With a generated user token if you’re a basic consumer
Here, I’ll use my app secret — if you want to use a user token, you can click the “Generate Token” button and copy the token.
Part 4: Finishing up our Codemagic workflow configuration
Now that we have the Oculus app ID and app secret (or user token), we can finally automate the distribution of our .apk artifact to the Oculus “ALPHA” channel, all with the CLI tool and the Codemagic workflow!
To do this, we first have to add the two new environment variables to our Codemagic app in the “oculus” group:
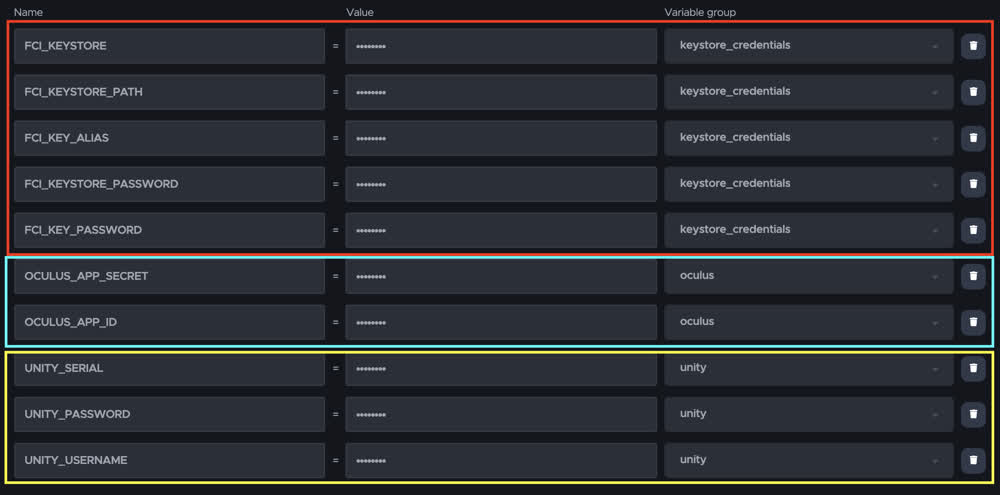
Note: If you’re using a user token for your Oculus app, you can, of course, replace the
OCULUS_APP_SECRETvariable with anOCULUS_USER_TOKENvariable.
Then, we’ll just add this env group and our final instructions to the publishing block of our codemagic.yaml config file:
- First, we’ll install the Oculus CLI tools (as explained in the docs over here) because at the time of publishing this post, they are not preinstalled on Codemagic computers
- Second, we’ll use the tool to upload our
.apkfile as a new Oculus build for our app
workflows:
  unity-android-workflow:
    name: Unity Android Workflow
    max_build_duration: 120
    environment:
      groups:
        ...
        - oculus # <-- (Includes OCULUS_APP_ID, OCULUS_APP_SECRET)
      vars:
        ...
        OCULUS_RELEASE_CHANNEL: ALPHA # should be a test channel, not "store" (= Production)
    scripts: ...
    artifacts: ...
    publishing:
      scripts:
        - name: Deactivate License
          script: $UNITY_BIN -batchmode -quit -returnlicense -nographics
        - name: Install Oculus CLI tools
          script: |
            wget -O ovr-platform-util "https://www.oculus.com/download_app/?id=1462426033810370&access_token=OC%7C1462426033810370%7C"
            chmod +x ./ovr-platform-util
        - name: Publish app on a Oculus test release channel
          script: |
                        ./ovr-platform-util upload-quest-build --app_id $OCULUS_APP_ID  --app_secret $OCULUS_APP_SECRET --apk android/android.apk --channel $OCULUS_RELEASE_CHANNEL
Note: If you’re using a user token, you need to replace the last command with:
./ovr-platform-util upload-quest-build --app_id $OCULUS_APP_ID --token $OCULUS_USER_TOKEN --apk android/android.apk --channel $OCULUS_RELEASE_CHANNEL
This publishing block is automatically executed after the scripts, so we’ll be able to get the .apk artifact we just made and send it to the Oculus app as a new build upload.
If you run this new workflow, you should now have a new release in the “ALPHA” channel of your Oculus app! 🙂
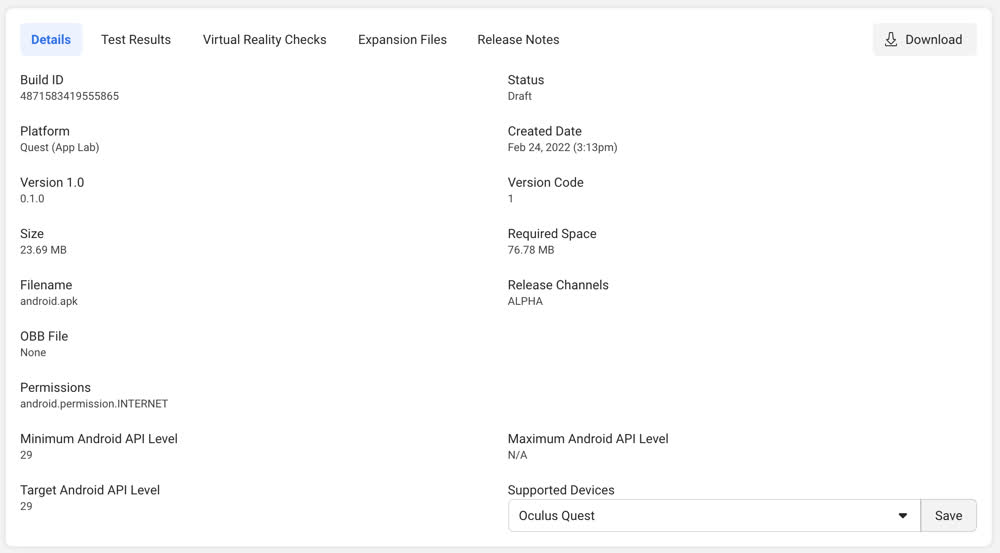
You can even click on this build to get more info and, in particular, a detailed listing of all the settings and versions:
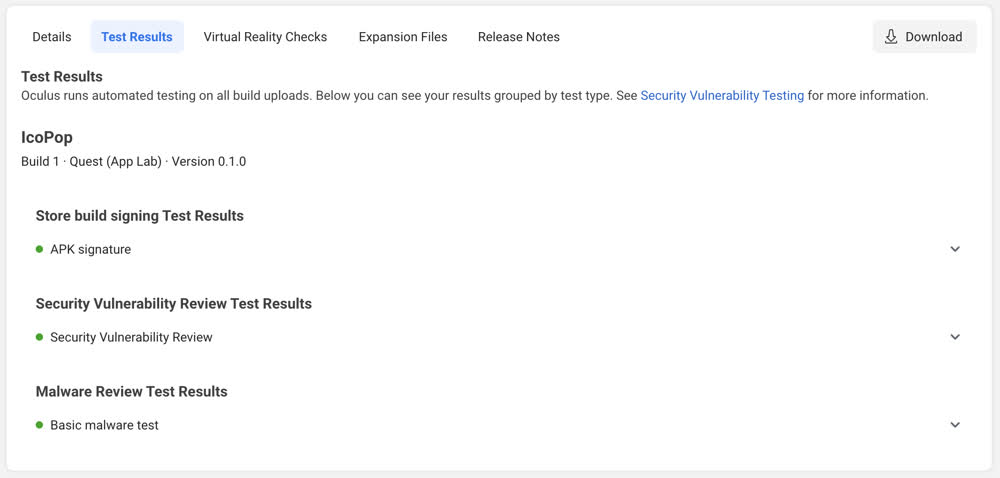
Or a recap of the tests that were run upon release to the channel:
On the user end, all your subscribers will automatically get the latest build of your app in their Oculus library when they put on their headsets. 🙂
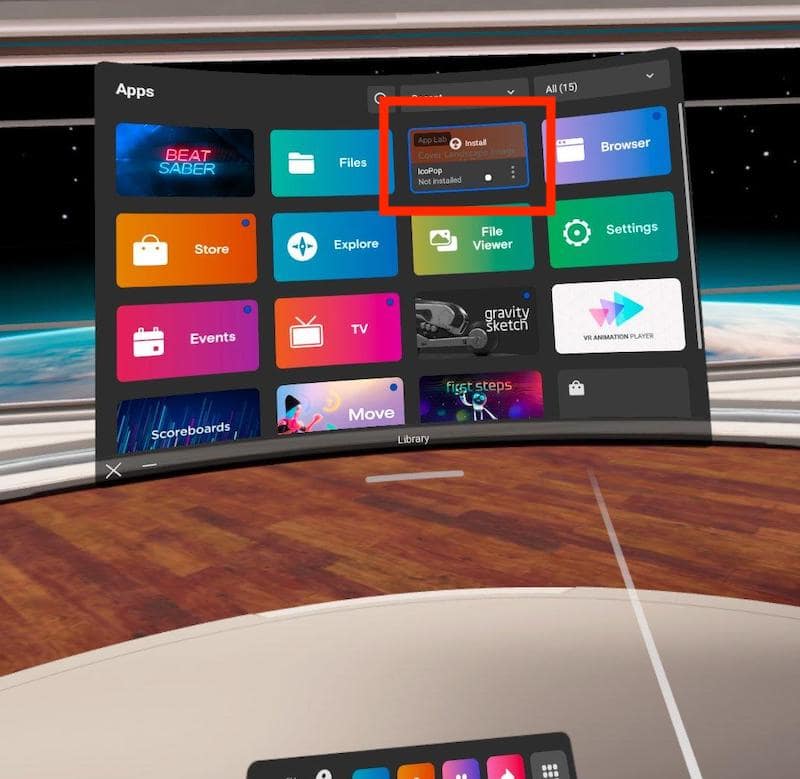
They can even browse the app details a bit. This is where you’ll want to make your greatest pitch and add some landscape images to better advertise your product — check out the Oculus docs for more info on how to modify your app’s metadata!
Conclusion
Making VR apps is definitely a treat, but it’s sometimes a bit of a pain to share them with your friends or fellow developers during the dev phase. However, thanks to great tools like Codemagic or the Oculus CLI tools, we can set up an automated CI/CD workflow to build and distribute our Unity VR project to the Oculus Store release channels that we want, all with the click of a button!
I hope you enjoyed this tutorial — and of course, don’t hesitate to share your ideas for other DevOps topics you’d like me to make Unity tutorials on! You can find me on Codemagic’s Slack, on Medium, or on Twitter.
Don’t forget that you can check out the entire “Ico-pop” project on GitHub over here. 🚀
Mina Pêcheux is a freelance full-stack web & game developer. She’s also passionate about computer graphics, music, data science, and other topics! She runs her own blog. Alternatively, you can find her on Twitter.










Discussion about this post