Written by Lewis Cianci
There’s tonnes of high quality Continous Delivery/Continous Integration (CI/CD) tools out there at the moment. We use these tools to quickly build, test, and then deploy our code.
One of these tools that is used quite frequently today is Visual Studio App Center (VSAC). VSAC is an excellent, high quality CI/CD tool that is used quite extensively today.
It’s so pretty 🤩. But there’s no official Flutter support (well, as of November 2019 anyway) 😞.
So, then, what do you do? Well, you’re on the codemagic.io blog reading this article, so maybe you’re thinking about giving the Codemagic CI/CD pipeline a shot?
You can do that, and you can even do that for free.
But it looks different to Visual Studio App Center. You’ll have some questions, questions like:
- How do I connect codemagic to my repository?
- How can I make codemagic perform a build when I push to a certain branch?
- How can I write tests to run as part of my pipeline?
- How can I publish to the Google Play Store or Apple Store?
Well, for the rest of this post, I’ll show you how to get started with codemagic and how to make the move across.
For this guide, I’ll create a brand new Flutter app and then connect it into codemagic, and also get it deployed onto the Play Store and the iTunes store.
Ready? Let’s go 🚀🚀🚀
Creating the project that we’re going to use
Open a terminal or command window and type in flutter create continual. You can call it whatever you want to, I just called it continual.
Your window should look like this now:
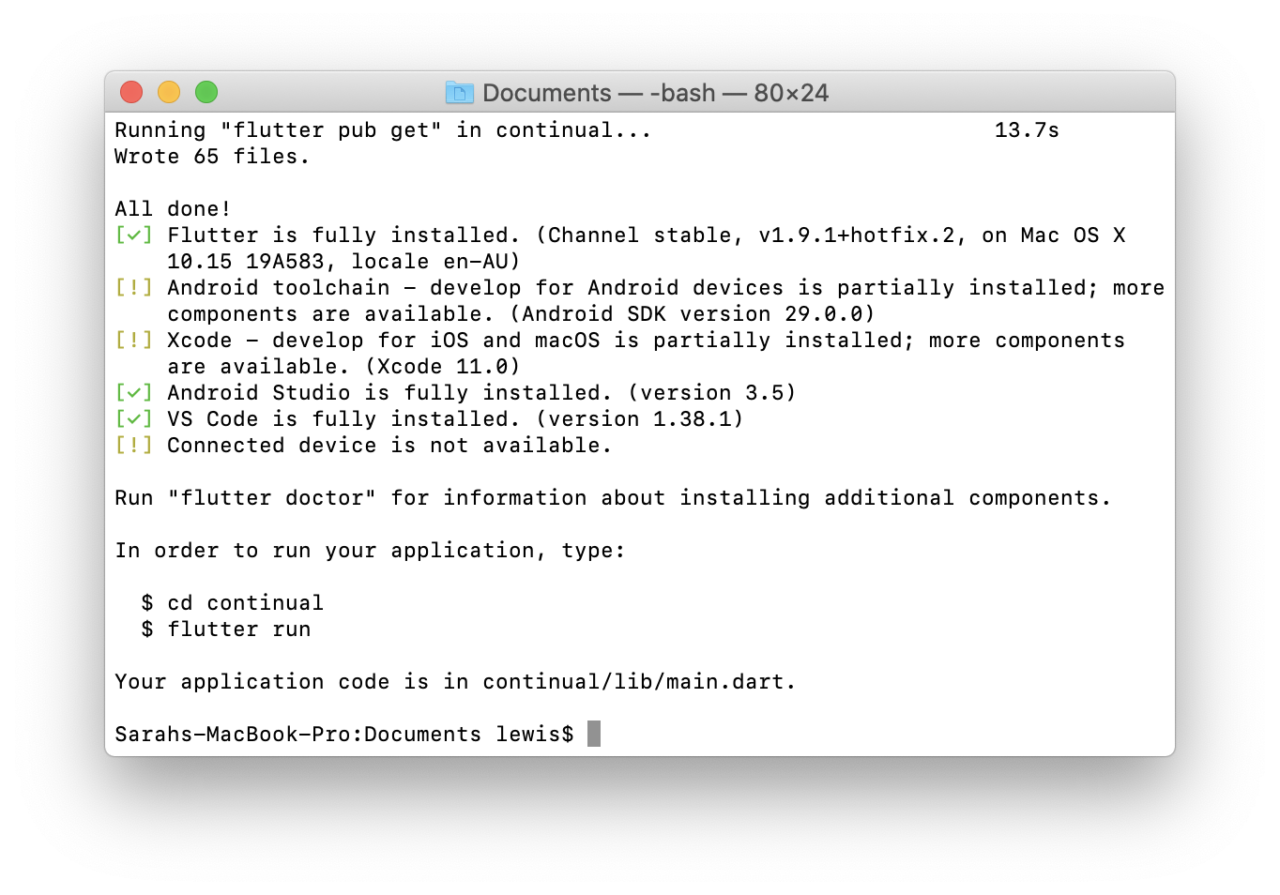
Changing into that directory, you can simply run flutter run . You should get the default Flutter app starting up if you have a device connected. Awesome.
Connecting to an existing repository (GitHub)
For this article, I created https://github.com/lewcianci/continual. I’ll assume you already have a repository to connect to and you’re already using source control (because its 2019 and you probably don’t live in a cave).
Now, if I go to codemagic and login using GitHub, the repository will just automatically appear. Which is pretty cool.
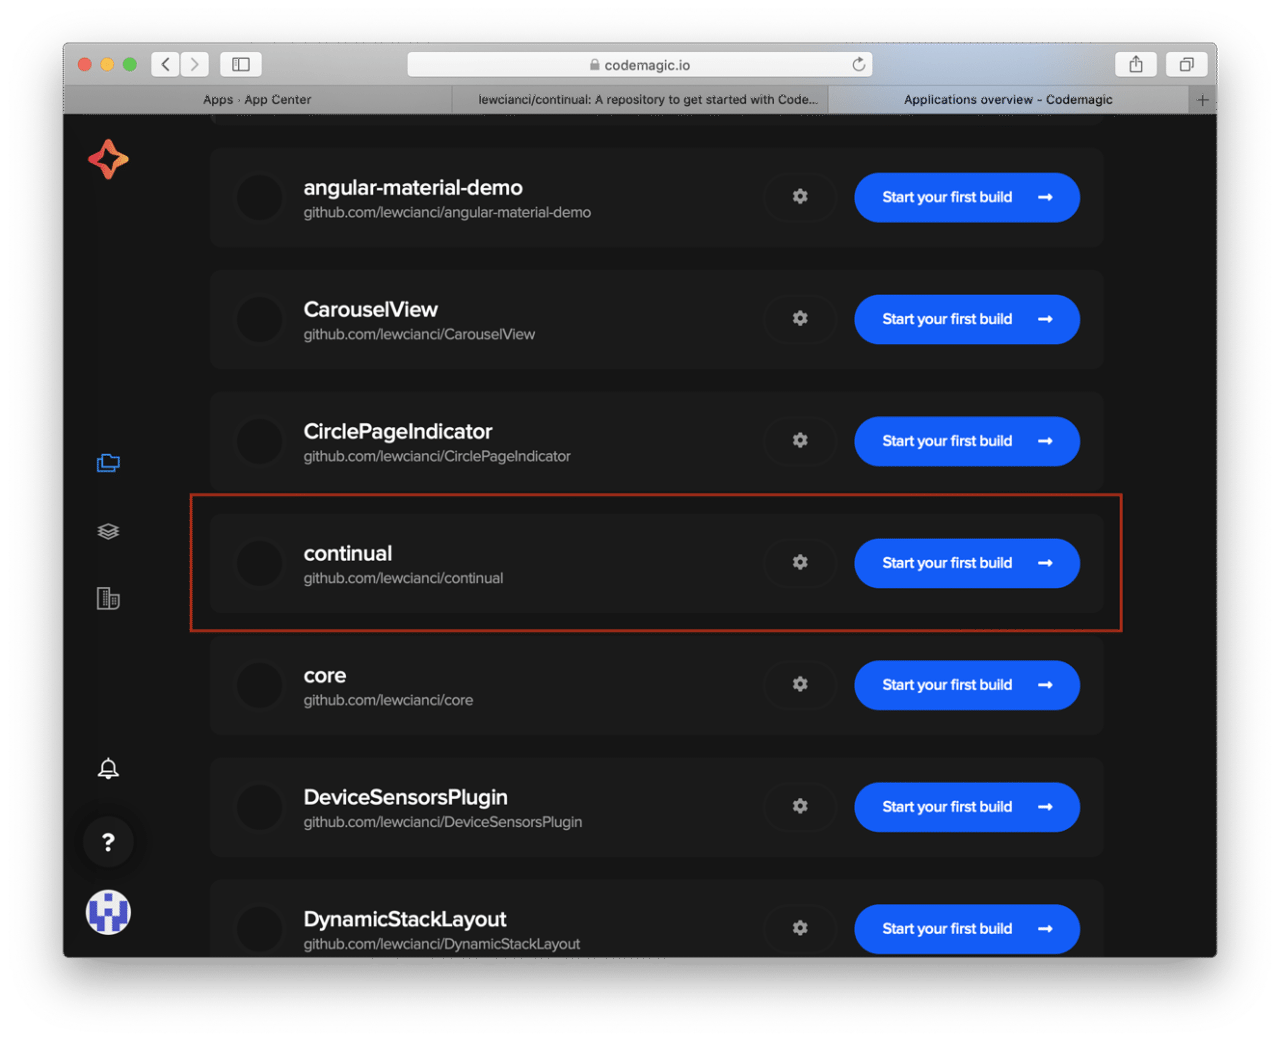
In Visual Studio App Center, you configure builds based on their targeted platform. So even when you are using a cross-platform framework like Xamarin Forms, you wind up creating two projects that are based on the one codebase. With codemagic, you just configure your source repository once and then build whatever platform you want from that (iOS, Android, or even the Web, etc.)
That’s great, but how easy is it exactly to start a build of this app that we just made? Let’s find out.
First, we’ll sync our brand new project to this code repository. In this case I’ve set a repository up on GitHub to push my code to. So that’s as easy as changing to that directory and typing the following.
git init (initialises the git repository)
git add . (adds all the files to git)
git remote add origin https://github.com/lewcianci/continual (sets the git repository as our upstream)
git commit -m 'initial' (adds our first commit to the repository)
git push --set-upstream origin master --force (pushes our code to master and also forces it as the first check-in (github usually initialises a repository with a single file/commit, so this just overwrites that))
Now that our repository has a functional Flutter app in it, let’s start that build on Codemagic.
And then we can watch it build (I’ve sped this up).
This flow is fairly reminiscent of how Visual Studio App Center (VSAC) handles its builds, except with VSAC they are called pipelines. There’s not a lot that different here.
Fun fact – you can start builds on codemagic.io from your phone while you are on the go, you’re not restricted to only starting it from the desktop site.
Making codemagic build when you push to a certain repository
This is really straight forward. Click on the cog next to your repository.
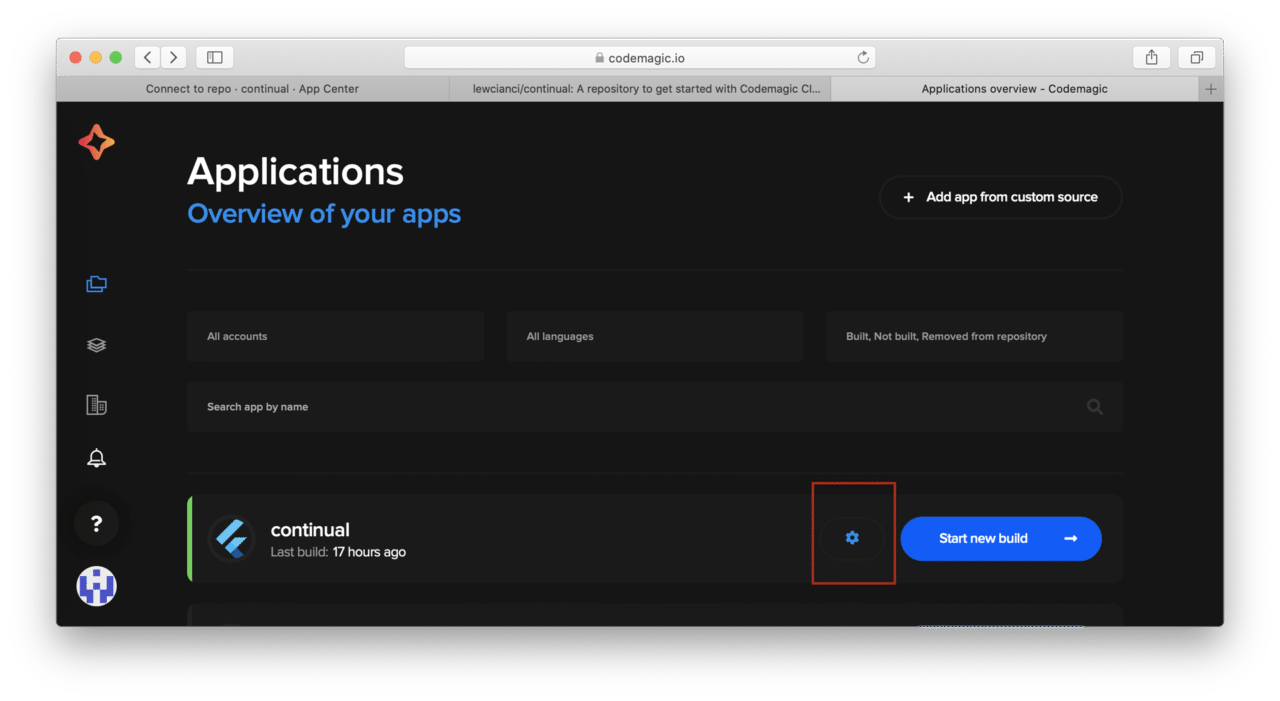
And then expand “Build triggers”
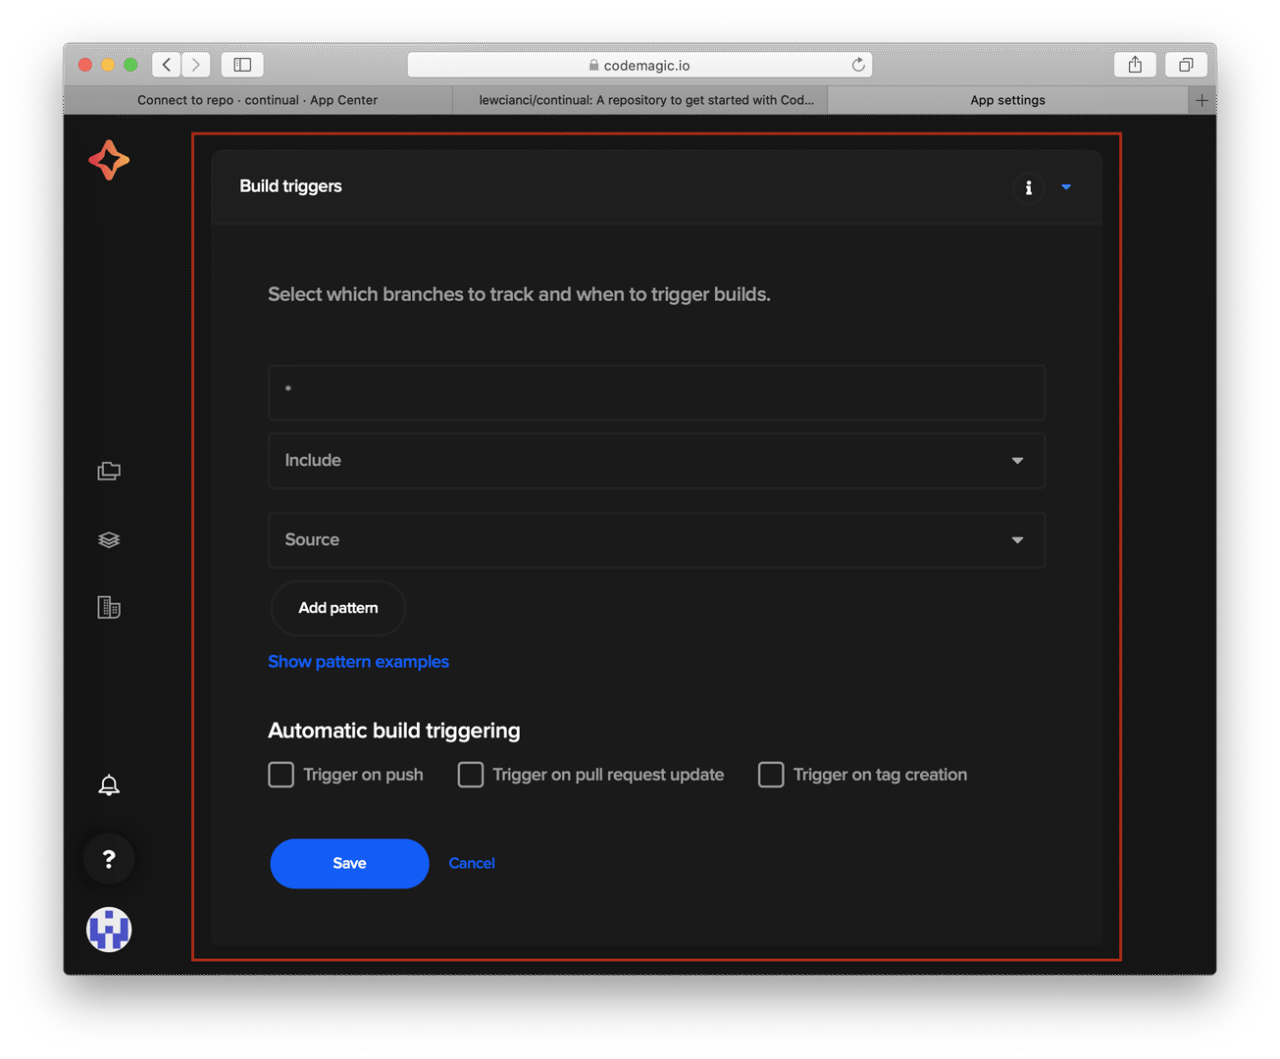
From here you can tick whatever you want, you can build on push, or on a pull request, whatever you like.
How do I access the build artefacts (like the built APK, etc?)
This is very straightforward as well. Click the three squares on top of each other to the left of the screen.
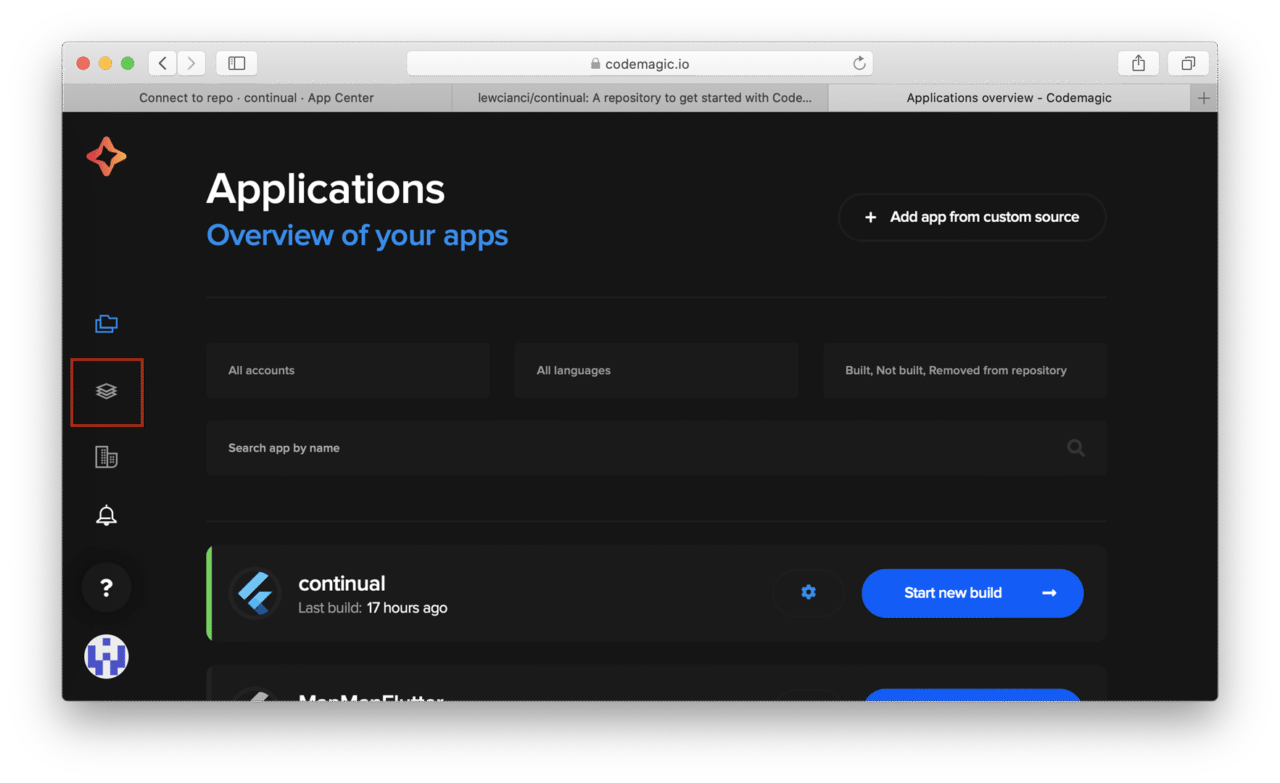
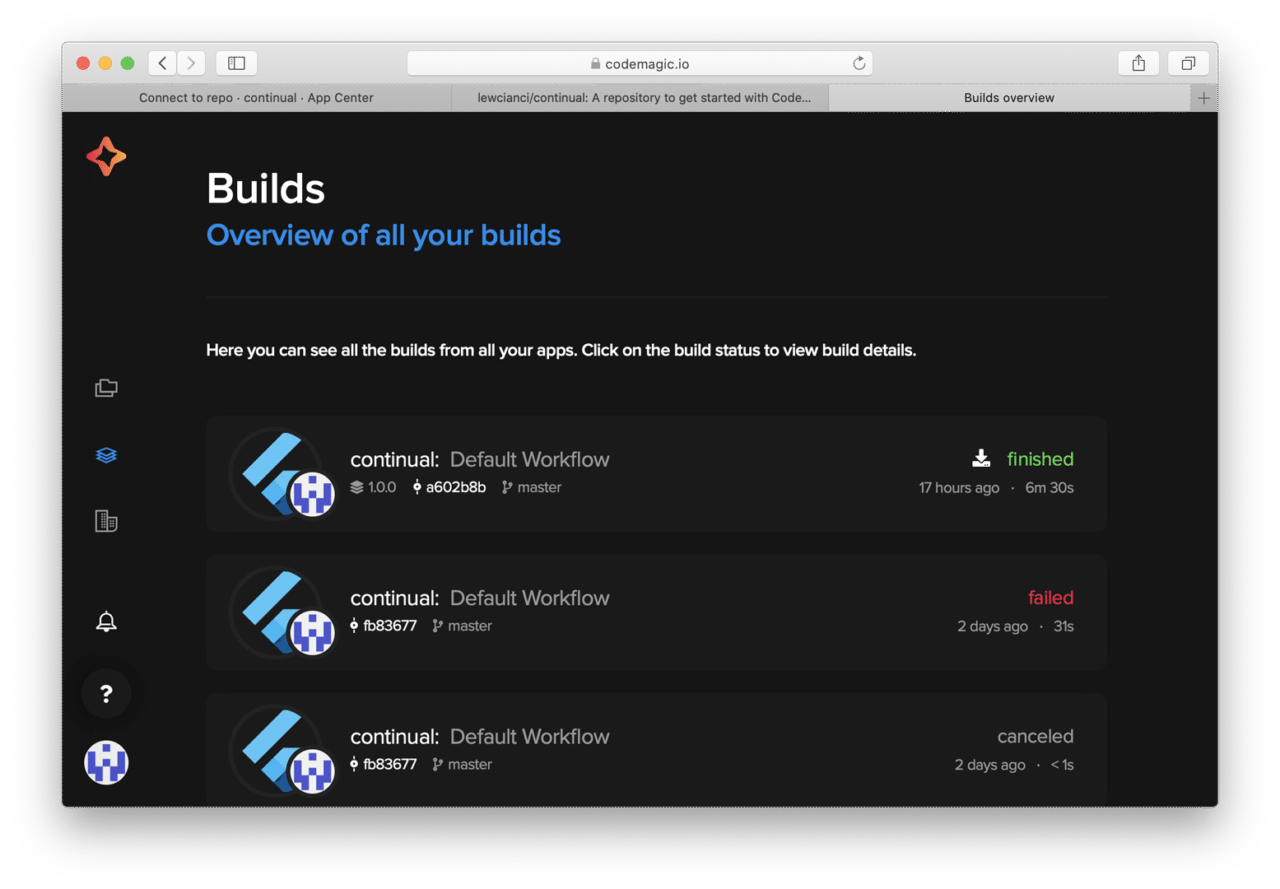
You are then shown all the builds that have ever run in your Codemagic account (including failed builds)
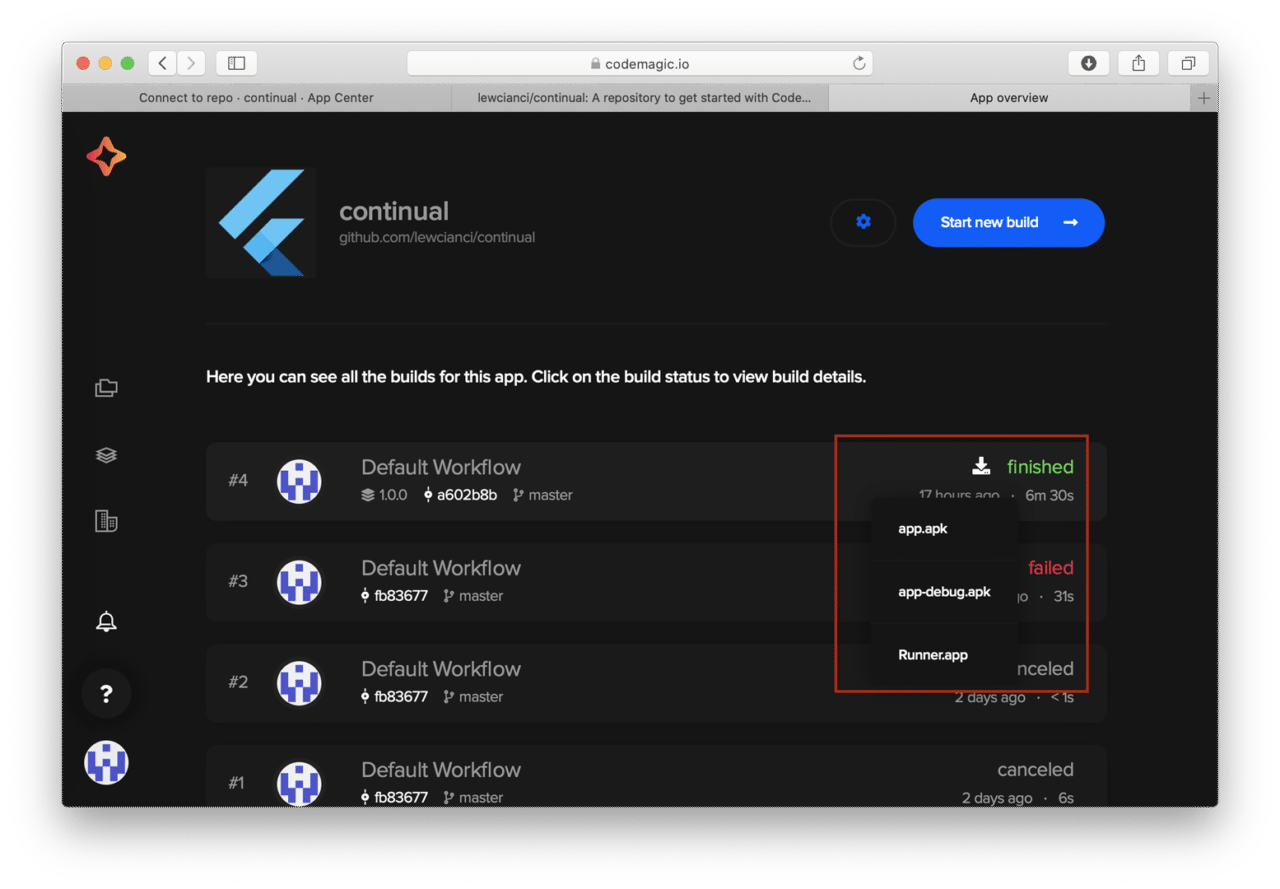
We can then click on a build that has passed to access its artefacts. That’s as easy as hovering over the dowload icon and choosing what APK you want to download.
How do I write tests and execute them as part of my pipeline?
Writing tests in Xamarin Forms basically boiled down to two options. You could either write unit tests and mock the dependent services, or you could do full blown automated UI testing. If you wanted to test UI functionality without standing up an emulator, there wasn’t a straightforward way to do that.
Fortunately, with Flutter, you can run Widget tests (spoken about more here. Widget tests let you validate UI functionality in a mocked environment without having to spin up an entire emulator.
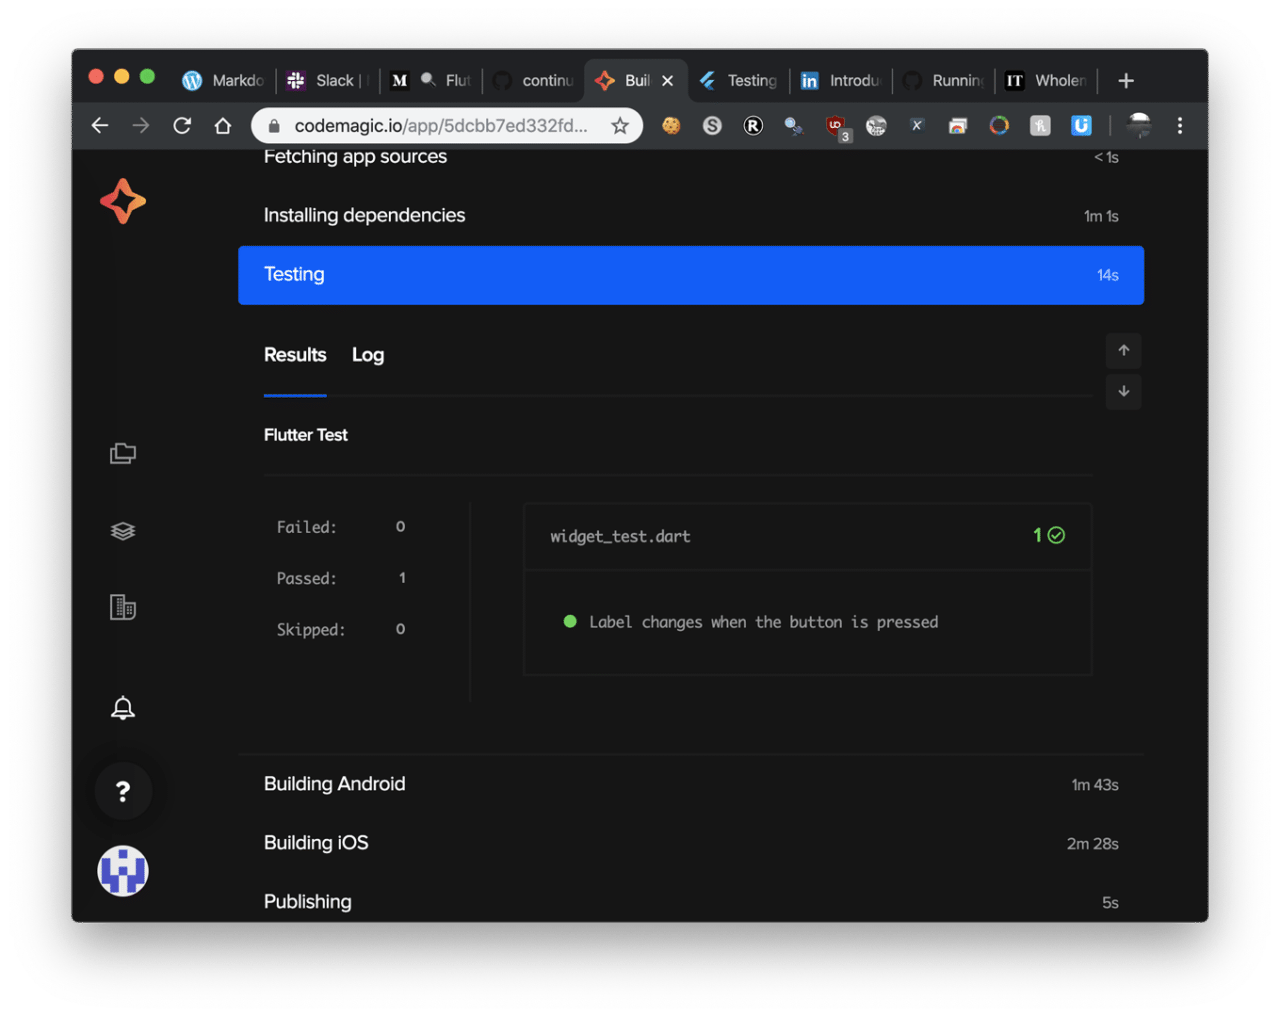
Codemagic will detect your tests and run them automatically for you. You can read their results in the test tab.
This is the test I made for continual.
void main() {
  testWidgets('Label changes when the button is pressed',
    (WidgetTester tester) async {
    await tester.pumpWidget(MyApp());

    expect(find.text("Codemagic rocks! 🎉 🎉 🎉 "), findsOneWidget);
    expect(find.text("Pictures of cats"), findsNothing);

    // then change the text and assert that it changes properly

    expect(find.text("Codemagic rocks! 🎉 🎉 🎉 "), findsOneWidget);
    await tester.tap(find.byIcon(Icons.navigate_next));
    await tester.pump(); // get the ui state update

    expect(find.text('Codemagic is easy'), findsOneWidget);
    await tester.tap(find.byIcon(Icons.navigate_next));
    await tester.pump();

    expect(find.text('Its easy to use'), findsOneWidget);
    await tester.tap(find.byIcon(Icons.navigate_next));
    await tester.pump();

    expect(find.text('And it looks great'), findsOneWidget);
    await tester.tap(find.byIcon(Icons.navigate_next));
    await tester.pump();

    expect(find.text("Codemagic rocks! 🎉 🎉 🎉 "), findsOneWidget);
    await tester.tap(find.byIcon(Icons.navigate_next));
  });
}
Codemagic runs these tests for you automatically, and gives you the results.
How do I publish to the stores?
On the same screen that we were on above, you can also configure build signing and publishing.
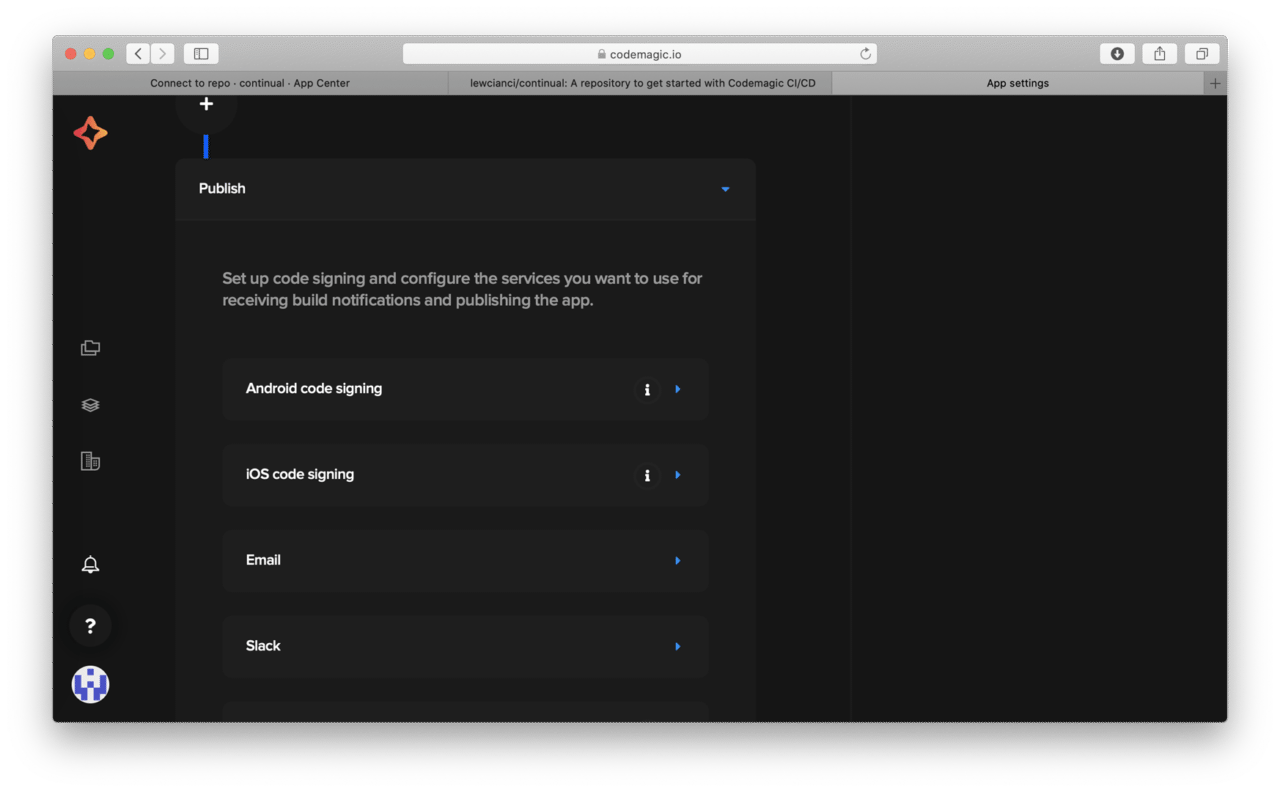
After you have configured code signing, you can then configure to publish your app to the Play Store, or to App Store Connect.
Okay, but why would I use Codemagic for this when I could use Visual Studio App Center to run these builds?
It’s true, shifting can be a hard sell, especially if you already have a tonne of applications in Visual Studio App Center. You probably already know that as of November 2019, Visual Studio App Center doesn’t support Flutter builds natively (but you can add it via a build script – more on this later).
The underlying issue is tracked at GitHub here. It was opened on the 14th of Feburary and there’s no ETA. Maybe it’ll get added tomorrow, maybe it won’t be added at all. There’s not really any official way of knowing…
“But” you say “I could use build scripts! And there are sample build scripts on that GitHub issue”. And you’d be right! But, because Visual Studio App Center handles builds per platform and not per project, you would have to create build scripts for iOS and Android (and in the future, who knows? Desktop, Web? The list goes on).
For me, when it hits that point, I reflect on why I am using a CI/CD pipeline, and why I am using a dedicated Flutter CI/CD tool like codemagic. It’s so I can speed up my builds and my deployment process, right? In saying that, I can lovingly craft my build scripts and put them into Visual Studio App Center, (again, one for iOS, one for Android), and they will work today. But tomororrow, XCode could deprecate a command line operation, the Android build pipeline could change, or any number of things. There is huge value in understanding how the build process works (and being able to create it locally!) but for my purposes of developing and releasing software, I’d rather have that task managed by a mature online CI/CD tool like codemagic.io. You can also configure a lot of your build through the codemagic.yaml file (which I will write about in a later article) so you can still retain granular control without maintaining full per-platform build scripts. Plus, you check your codemagic.yaml file in, meaning you can see what changed and why through git history.
Oh, and I already said this, but you can start builds from your phone, which I couldn’t do with Visual Studio App Center.
Connect your own repository, and give it a go!
That’s a really quick start to how to get started with Codemagic if you are coming from another CI/CD tool like Visual Studio App Center. Codemagic also lets you test your code, notify your slack channel if a build passes or fails, plus a tonne of other things that we’ll cover in another blog post.
Feel free to fork my repository at https://github.com/lewcianci/continual and play around some more yourself. If you have any questions be sure to let me know in the comments.
That’s all for now. Happy hacking!
Lewis Cianci is a software developer in Brisbane, Australia. His first computer had a tape drive. He’s been developing software for at least ten years, and has used quite a few mobile development frameworks (like Ionic and Xamarin Forms) in his time. After converting to Flutter, though, he’s never going back. You can reach him at his blog, read about other non-fluttery things at my Medium, or maybe catch a glimpse of him at your nearest and most fanciest coffee shop with him and his dear wife.








Discussion about this post