In one of the previous posts, we discussed why iOS developers should pay attention to Flutter in 2019 and also compared Flutter app development with native iOS development. In this post, we will do a side-by-side comparison of Flutter and native iOS app written in Swift. We build an identical app for comparison and started timer to discover, which platform is more suitable for your needs native iOS (Swift) vs Flutter. If you are impatient to see the results, check the infographic in the end of the article.
Let’s dig in.
Swift vs Flutter: Introduction
Native iOS app development became more interesting with the launch of the Swift programing language. Swift is a modern, fast and type-safe programming language but it’s still evolving and new features are under development. In order to develop iOS apps with native tools, we have to use developer tools and frameworks provided by Apple. Apple has great documentation to get started with native iOS development.
Flutter is an open-source, multi-platform mobile SDK from Google which can be used to build iOS and Android apps from the same source code. Flutter uses the Dart programming language for developing both iOS and Android apps and also has great documentation available. Flutter is similar to React Native but with full support of native features. Check out our detailed comparison of Flutter vs React Native.
Identical iOS app for comparison
Every iOS app is different and might have unique features, technologies and frameworks used inside. Therefore, there is no point to create a complex app for comparison. However, it’s important to build an identical app using both technologies so that we can justify our points of comparison. In this post, we will create an app which has a button called “Press Me”, and once the button is pressed, it prints the message “button pressed” to the console. That’s it!
The main comparison points are as follows:
- Onboarding process
- Build time
- Reloading
- Profiling
- Accessibility
- Building on CI
- App size
Now that we have defined the comparison points, let’s jump in and start writing an app for comparison. We will in parallel develop an app in Flutter and a native iOS app using Swift.
Onboarding process
Native iOS apps can be developed with Swift and Flutter apps are developed with Dart programming language. We need different setup for both apps.
Native iOS (Swift)
While developing iOS apps with native tools, we need to use Xcode as the IDE. The basic development kit for iOS development is included in Xcode itself. You just need to have a macOS machine with Xcode installed. Once Xcode is installed on the macOS, we can create a new iOS project in Xcode by selecting File> New > Project > iOS > Single View App. We can then name this app and select Swift as the language.
Once we provide the details, Xcode will create the iOS template code, and we can start developing our iOS apps. This post is not aimed for iOS development with Xcode, but you can follow these tutorials for more information. For our sample app, we will just create a button from the storyboard and link to the ViewController. In viewController.swift, we need to add the following code.
@IBOutlet var pressmeButton: UIButton!
@IBAction func pressMe(_ sender: Any) {
    print("button pressed")
}
Once the app is built in the simulator, we see the Press Me button displayed, and once the button is pressed, you will see the “button pressed” message in the console.
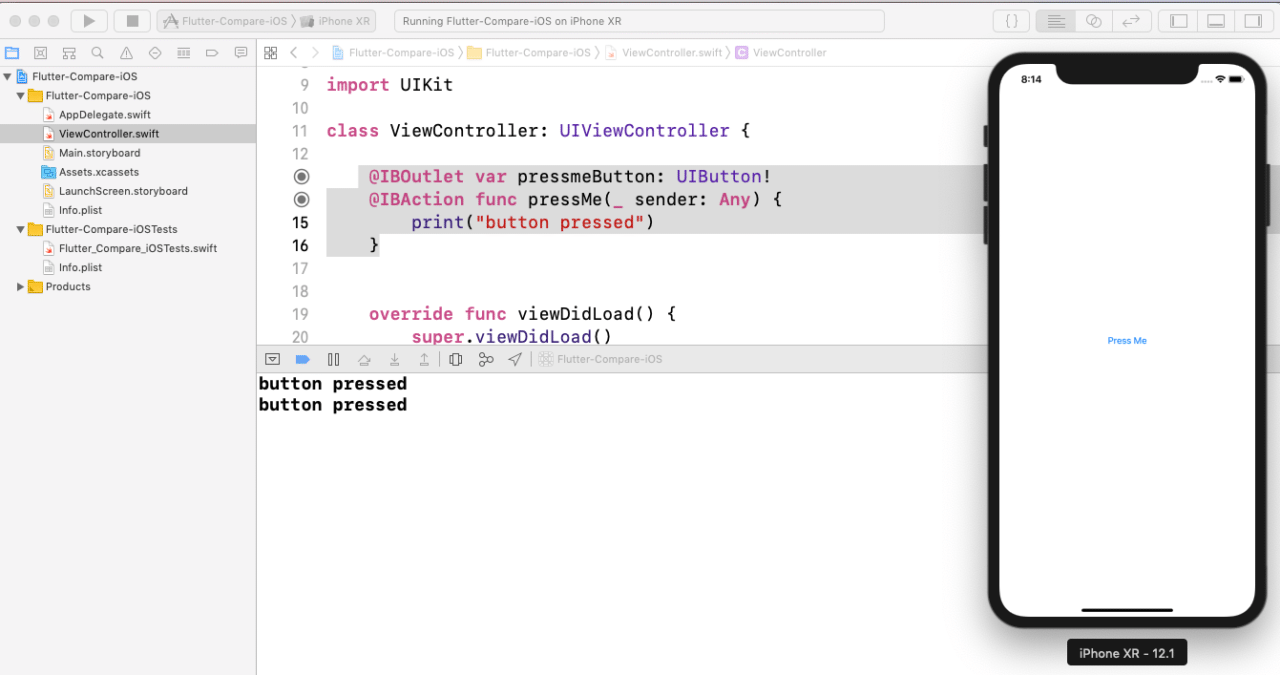
At this stage, our native iOS app is ready for comparison.
Flutter iOS
In order to develop a Flutter app for iOS, we are going to use Xcode + the Flutter binary installed, although you can also use Android Studio or IntelliJ IDEA or any other text editor for developing Flutter apps. Flutter’s getting started guide for macOS explains all the setup that is required for iOS development. You can check all the requirements by running the `flutter doctor` command. Once the setup is done, you can run the following commands to create a new Flutter app, let’s call the app native-compare.
flutter create native_compare
cd app_name
This command will generate the skeleton of the Flutter project. We can implement the button using the Flutter Raised Button widget in the lib/main.dart file.
body: Center(
    child: RaisedButton(
        color: Colors.blue,
        child: Text('Press Me'),
        onPressed: (){
            print('button clicked');
        }
    ),
)
The full source file is available here.
Once, we implemented the button, we can run the app using the command
$ flutter run
You need to have a simulator open to see the app running in the simulator.
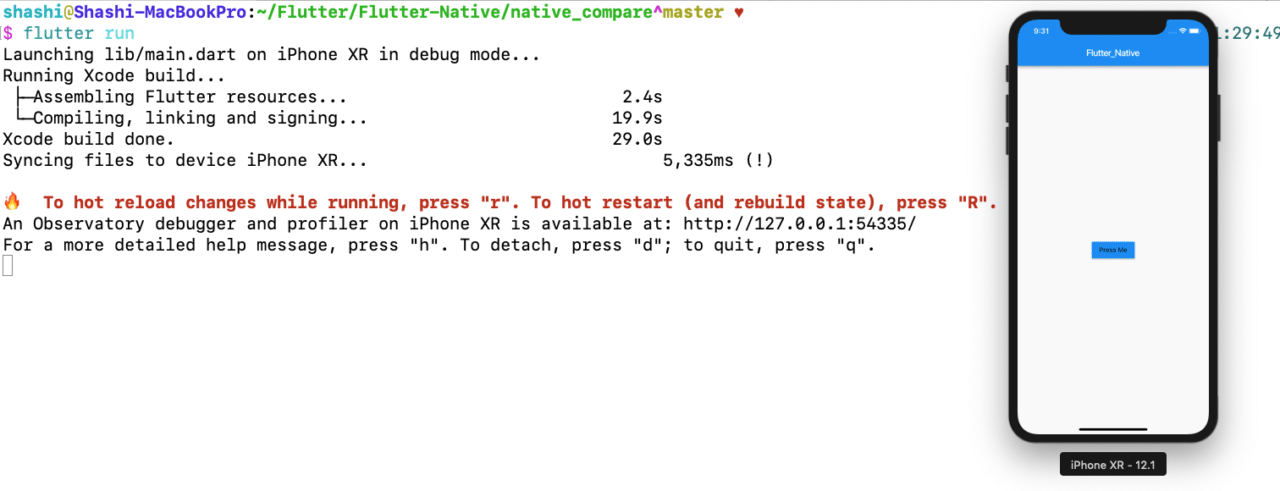
At this stage, our Flutter iOS app is ready for comparison.
Analysis: Onboarding for development
While comparing native iOS app development and iOS app development with Flutter, the onboarding process for native iOS development seems to be less painful and involve less configuration.
It requires just Xcode and a macOS machine to get started. There are many resources and books available online for learning Swift and iOS development. Flutter requires Xcode + additional Flutter tools to get started with the development of iOS apps. As Flutter is still new in the market, there is comparatively less development resources available than for native iOS app development.
Build time
Now that we have built an app for comparison, let’s dive into each app and measure the build time for both the native and the Flutter app. We will compare both the clean build by deleting all the derived data and incremental builds.
Clean build of native iOS (Swift) app
The build time of native iOS apps can be easily measured with Xcode or the xcodebuild command line tool. In Xcode, we can enable the build timing summary by running the following command.
$ defaults write com.apple.dt.Xcode ShowBuildOperationDuration -bool YES
We will also delete the derived data or clean the build folder to measure the build time for clean builds. In Xcode, we can delete the derived data by selecting Product > Clean Build Folder. Once we run the Build command from the Product menu in Xcode, it will show the build time in Xcode.


As we can see, a clean build tool took 13.334s, while a subsequent build took less than a second in Xcode.
We can do a similar experiment from the command line using the xcodebuild command.
xcodebuild -project Flutter-Compare-iOS.xcodeproj/
-scheme Flutter-Compare-iOS -destination 'platform=iOS
Simulator,OS=12.1,name=iPhone XR' clean build CODE_SIGN_IDENTITY=""
CODE_SIGNING_REQUIRED=NO -showBuildTimingSummary
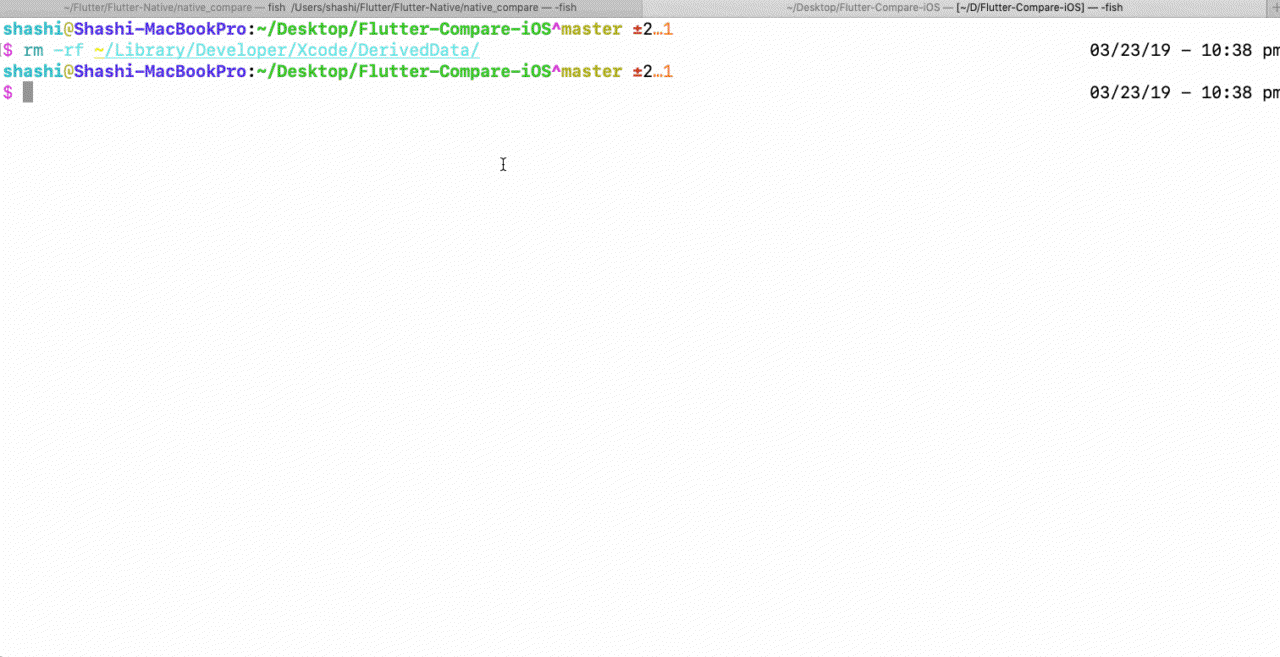
You can see in the GIF that the `xcodebuild` command takes 13s for the clean build and subsequent builds take approximately 3s.
Clean build of Flutter apps
Flutter apps can be built for both iOS and Android. In this post, we are comparing the iOS part of the Flutter app against native iOS app development. We can build the Flutter apps just for iOS in debug mode using the following command.
$ flutter build ios –debug –no-codesign –simulator
We can also delete the derived data from the build directory and execute the above command to get the clean build time.

As we can see in the first example, it took 33s for the clean build of the Flutter iOS app, and then 10s, 8s etc for subsequent builds. Taking into account the second example, a clean build of our Flutter demo app takes approximately 30-45 seconds.
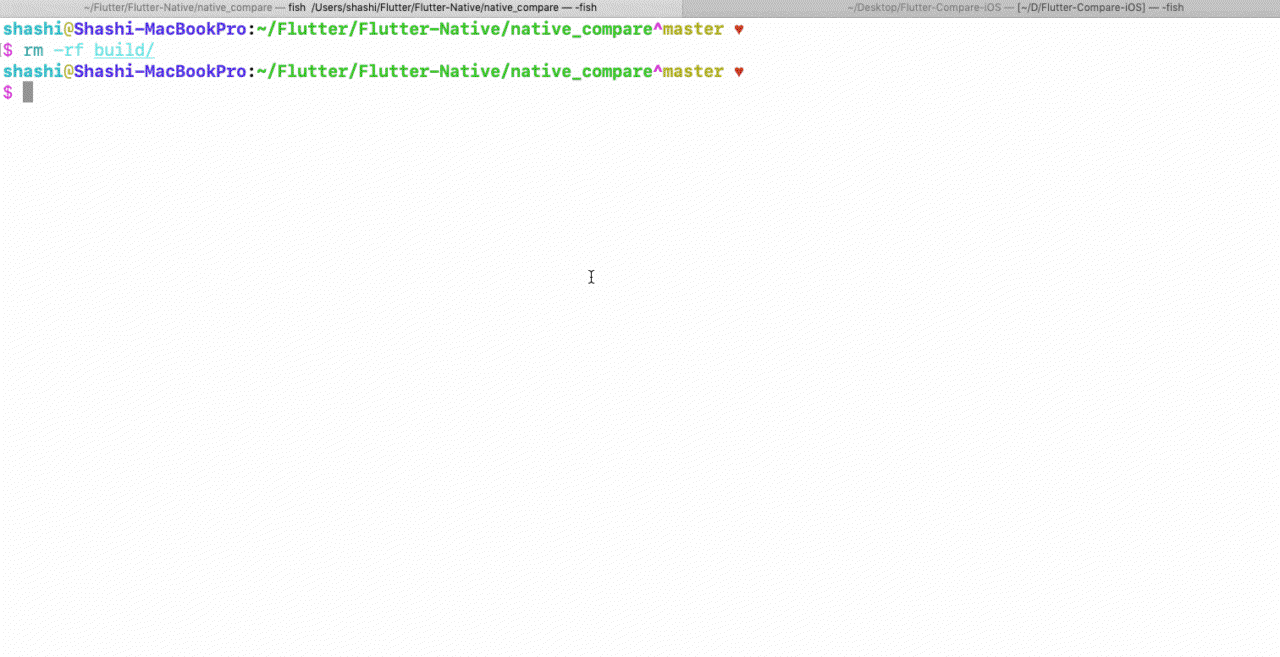
Builds of Flutter iOS app – example 2
Analysis: Build time
By comparing the build time for the native app and the Flutter app, Flutter apps appear to take a bit longer for clean builds.
However, Flutter gets the speed up when building incrementally. The build time for incremental builds in Xcode is superfast.
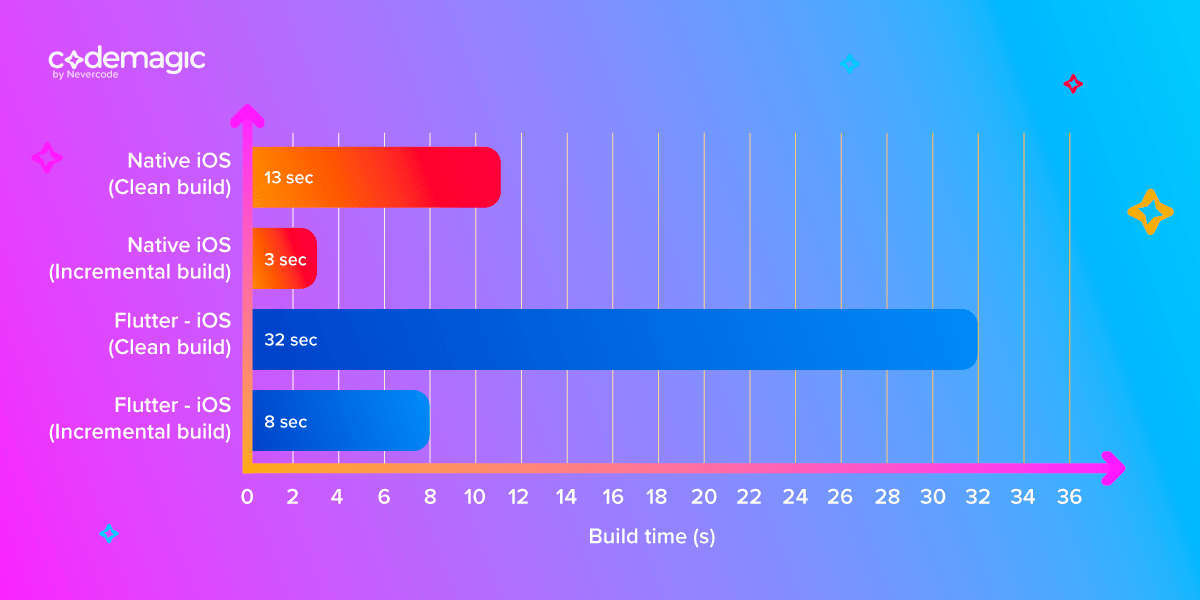
In our case, we can conclude that the build time of Swift in a local machine is faster than that of Dart.
Reloading app
While developing an iOS app, it’s always required to make code changes and test in the simulator or on devices. This process is also known as reloading the app, which is one of the key features for mobile app development.
In order to compare both apps, let’s make changes to our app. Instead of the “Press Me” button, let’s change it to “Click Me”. Let’s assume that both apps are already installed and running in the simulator.
Native iOS (Swift)
In order to change the button name, we have to rename the user interface element from the storyboard, probably needs to change Accessibility information too. Once the element is renamed, we have to rebuild the app to see if the changes made are reflected in the simulator.

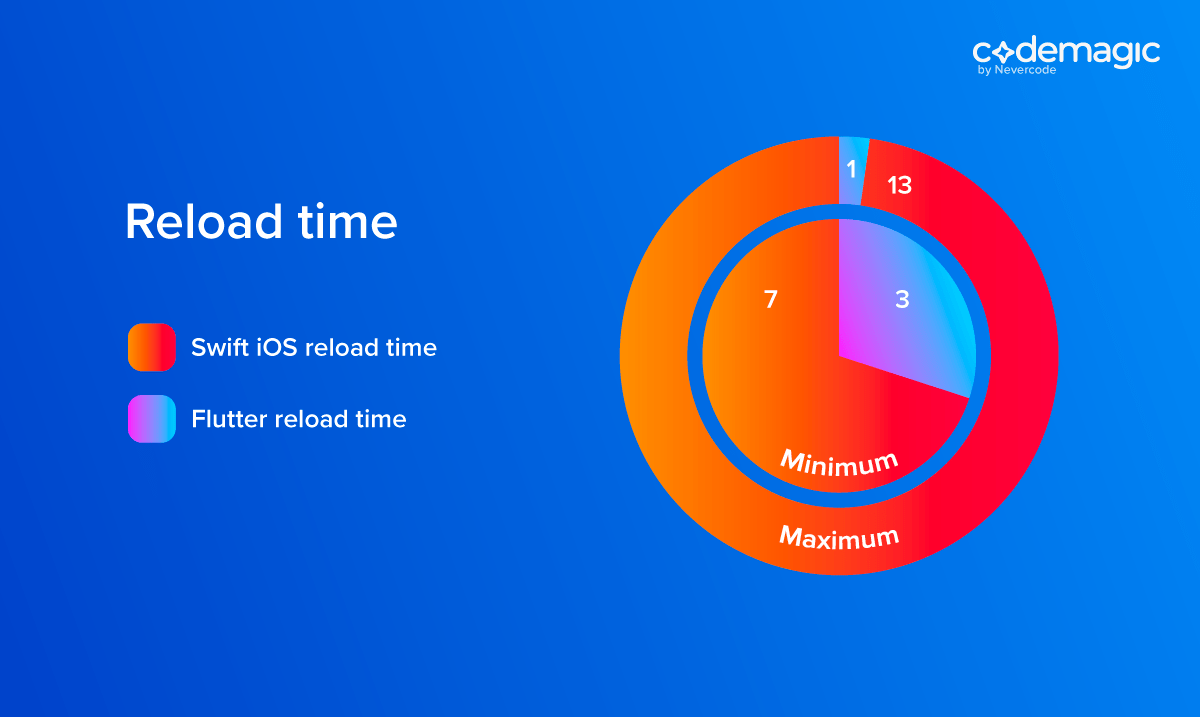
The time taken by Xcode to build and run the iOS app when all code changes were done was approximately 7-12 seconds.
Flutter iOS
Flutter has the hot reload feature which means that when we make the changes in the code and reload the app, the changes are reflected in a second. In our case, we just need to update the text in the `raisedButton` widget from “Press Me” to “Click Me” and reload the app.

As you can see, Flutter reloaded the entire app in 3 seconds.
Analysis: Reloading
Comparing both native and Flutter iOS app, reloading is way faster in Flutter. The native app took approximately 10 sec, while the Flutter app reloads in approximately 3 seconds.
Profiling
Profiling is a process of dynamic analysis which measures memory, resources, CPU, and other performance factors of the app. Both Flutter and native tools have great support for profiling the apps.
Native iOS (Swift)
In Xcode, we can profile an app using instruments. From Xcode, we have the option to profile an app using Product > Profile. This will launch an instruments app where we can analyse the app by different criteria. We can choose any template for profiling.

We can select the Time Profiler to measure the CPU threads when we click the button multiple times. Once the Time Profiler is launched, we start recording and click on the button multiple times.
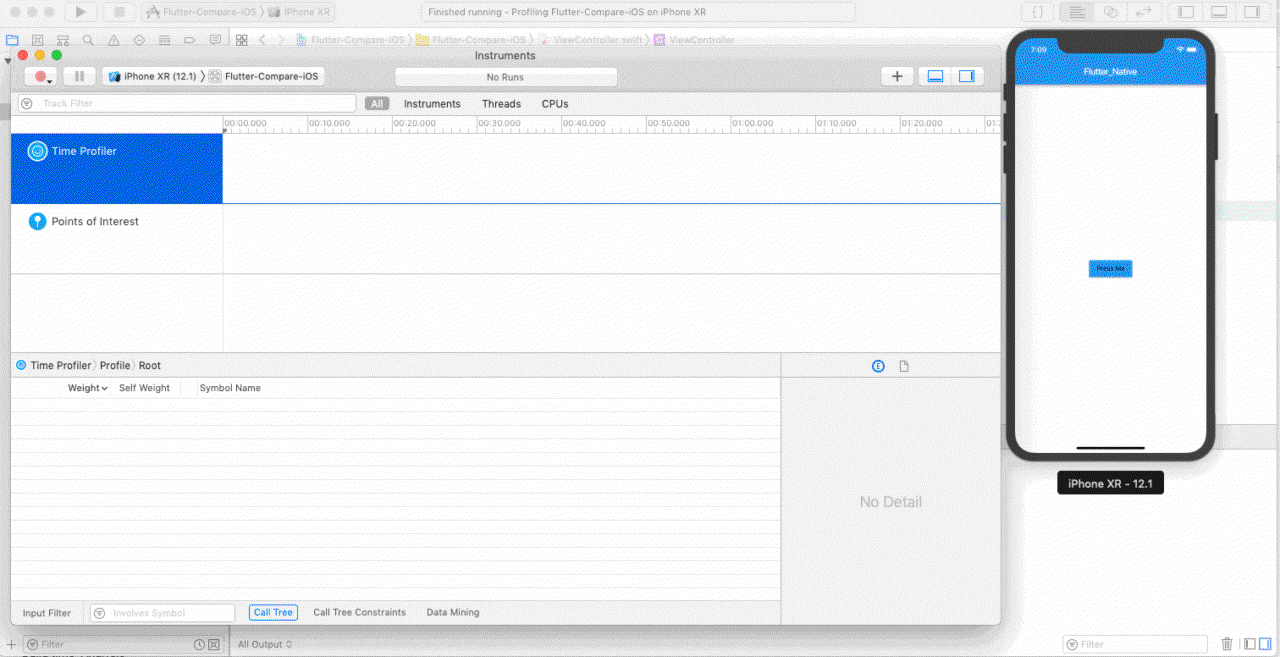
Let’s consider the time taken for building the app in profile mode and the CPU performance when the button is clicked 13 times. You can always use other flavours of profiling.
Xcode time when build for profiling:
At the moment, Xcode does not display the build time for the “Profile” action, but we can use a stopwatch to measure how long a clean build takes. Xcode took 20 seconds to build the app in profile mode.
Flutter iOS
In Flutter, we can profile iOS apps using the IDE or from command line. Flutter documentation has a great guide on profiling Flutter apps. In order to profile apps from command line, we need to run the following command.
$ flutter build ios –profile –no-codesign
This command will calculate the time taken for profiling the Flutter app.

Flutter build time for profiling: approx 149s
Alternatively, we can run the Flutter app from the command line and visit the local host URL, e.g. http://127.0.0.1:49399/ for Dart VM to profile the Flutter app.

We can select the CPU profile tab to check the details.

You can dig deeper for CPU performance data or other profiling metrics.
Analysis: Profiling
Profiling is vast and there are various flavours available to benchmark the native and Flutter iOS apps. However, it really depends on the machines and individual apps. In terms of the build time for profiling, we can see the following information:
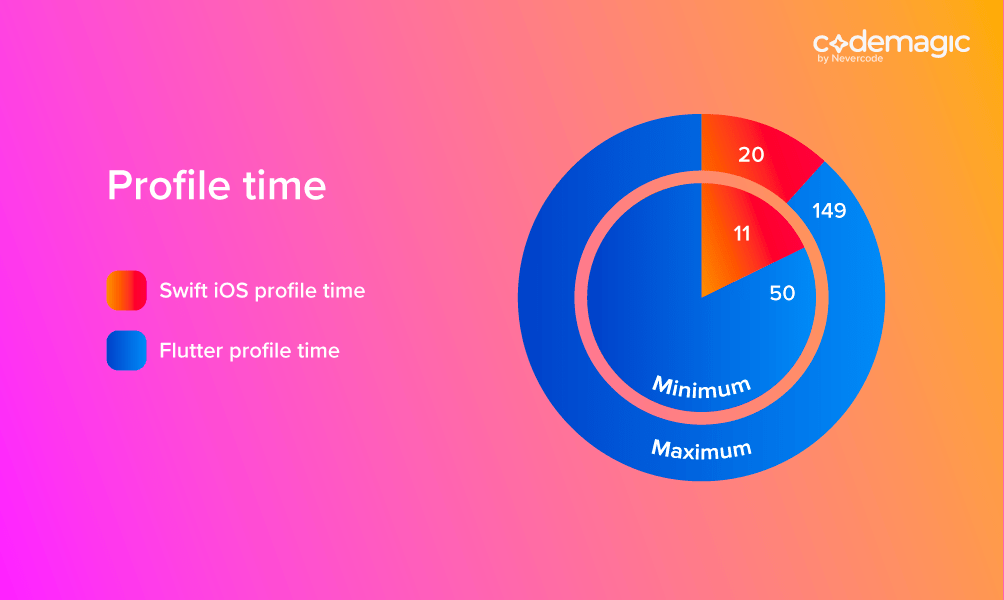
Both Xcode and Flutter have cool support for debugging and profiling iOS apps. However, Xcode has a dedicated app (instrument) and Flutter has a lightweight way to profile apps using the browser.
Accessibility
Accessibility features in the app enhance the user experience of people with disabilities. As an iOS application developer, we should also contribute to their lives with little efforts by making iOS apps accessible to everyone. Let’s compare how easy it is to add accessibility features in native and Flutter apps.
Native iOS (Swift)
Apple’s native tools has accessibility baked in the UIKit framework so there is no need to import another framework to enable accessibility support in native apps. There is the Accessibility API provided by Apple, but developers have to provide the correct accessibility information for every UI element in the iOS app using the UIAccessibility protocol. In our app, we can add the accessibility identifiers, labels and traits using the code
pressmeButton.accessibilityIdentifier = "Press Me"
pressmeButton.accessibilityLabel = "Press Me"
Another way to provide the accessibility data to the user is using StoryBoard and interface builder.

By providing this information to the user, they can access these elements using assistive technologies like VoiceOver.
Flutter iOS
Flutter iOS apps don’t have any mature support to add accessibility; Flutter documentation suggests to audit iOS apps using Xcode’s Accessibility inspector tool. There is an open issue to add accessibility identifiers for testing purposes, but it’s still in progress.
Analysis: Accessibility
In terms of accessibility support, Flutters needs an improvement to make betters apps for people with disabilities. There must be something on the Flutter roadmap to enhance the accessibility of Flutter apps.
Building on continuous integration server
Building iOS apps on local machines can be different and depends on the local machine configuration, e.g. RAM, disk size, etc. It would be great to compare the performance of iOS apps on the continuous integration server, too. Nevercode gives a free trial to set up the builds for iOS apps and Codemagic is a free dedicated CI/CD tool for Flutter apps. Let’s set up both projects on Nevercode and also set up the Flutter iOS app on Codemagic.
We will compare just build and publish time for debug builds, so we have disabled all other settings, like testing, etc.
Native iOS (Swift) on Nevercode
As our native demo app is available on GitHub, we just need to log in to Nevercode using our GitHub credentials. You can follow the getting started documentation of Nevercode to set up the project. In our build, we have disabled the testing phase and run the build. This build will also generate the build artifacts.

You can see that in a minute, Nevercode has built and published our demo app. You can download the build artifacts or check the full build logs.
Build time: 1m 1s
Flutter iOS on Nevercode and Codemagic
Codemagic is the official and dedicated CI/CD solution for Flutter apps, so users should choose this for building Flutter apps. However, we have built the native iOS app on Nevercode, so we will build the Flutter app on both Nevercode and Codemagic for comparison.
As our Flutter demo app is available on Github, we will first build the Flutter app on Nevercode with tests disabled.

As you can see, the Flutter app for iOS was also built and app artifacts were generated, but it took 4 minutes 3 seconds on Nevercode.
Build time: 4m 3s
Now, we will build the same app on Codemagic. You can easily set up Flutter apps on Codemagic by following the getting started guide. In the app settings, just disable the test phase and only build for iOS debug.

Now, we are all set for running our demo app on Codemagic. Start the new build.
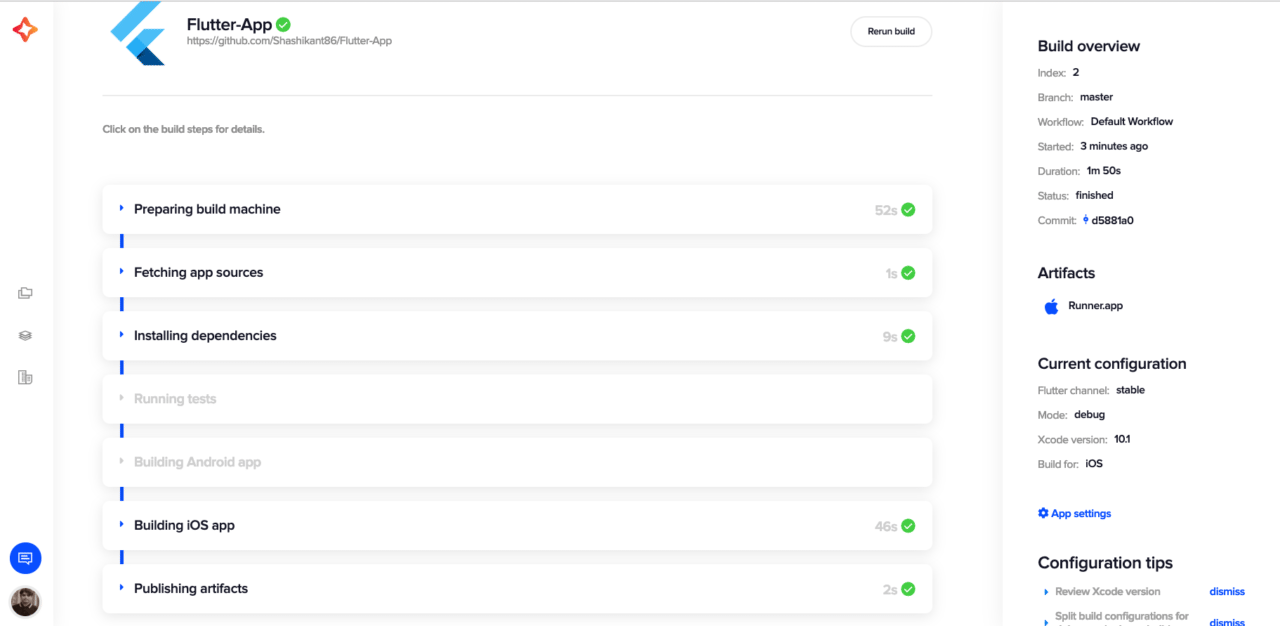
Once the build is finished, we have build artifacts available.
Build time on Codemagic: 1m 50s
We can see that the build took 1 minutes 50 seconds on Codemagic which is definitely faster than Nevercode. That’s the benefit of a fully dedicated CI/CD platform for Flutter apps.
Analysis: Build time on CI server
Looking at the build time on continuous integration server, we can see that the native app builds a bit faster than the Flutter app, but the difference is not that big when the Flutter app is built on Codemagic.
Native app build time on CI: 1m 1s
Flutter app build time on CI: 1m 50s
Application size
Now that we have compared all the aspects of native and Flutter apps, it’s time to compare the size of both apps generated by the native Xcode and Flutter.
Native iOS ( Swift)
You can get the app artifact from the Xcode derived data or from the CI server. The app is in the .app format. In the case of our app, the file is in the derived data directory.

As you can see, the size of our native application’s binary is 23.2 MB.
Flutter iOS
The build artifacts of Flutter apps are generated in the build/ios/Debug-iphonesimulator directory of the Flutter project.

The file size of the app generated locally is 52.4 MB. It’s a bit bigger than the native app but Flutter app has some app icons and other assets embedded.
Analysis: App size
After comparing the size of the native and the Flutter app, Flutter apps appear to be heavier in size. The Flutter team has acknowledged this fact and you can read the FAQ here to know why Flutter apps are big in Size.
Source code
The source code of the app used for this comparison is available on GitHub. Feel free to try it on your own and compare some other interesting factors, like security, configuration management, etc.
Native iOS app: https://github.com/Shashikant86/Native-iOS-App
Flutter app : https://github.com/Shashikant86/Flutter-App
Conclusion
As a result of the comparison, it seems that native iOS development has some significant advantages over Flutter and clearly gets a higher score in this comparison. However, we should consider that Flutter also supports other platforms like Android with the same source code. Flutter apps looks very close to actual native apps and there is a big opportunity for Flutter to grow in the future to offer competition to the native tools. We can’t predict the future, but Flutter has entered the cross-platform mobile development space with a big bang and might be the go-to choice for companies who don’t have the budget to build native apps.
![Swift vs Flutter [Infographic]](https://blog.codemagic.io/uploads/CM_Swift-vs-Flutter_Infographic2.png)


![Swift vs Flutter – A side by side comparison for iOS development [Infographic] Swift vs Flutter – A side by side comparison for iOS development [Infographic]](https://blog.codemagic.io/uploads/CM_Swift-vs-Flutter-2-2.png)



%20(2)%20(1).jpg)


Discussion about this post