Written by Souvik Biswas
As your app’s codebase expands, testing becomes crucial for verifying whether all the app components are working as expected and for improving user satisfaction.
The most difficult part of automated testing on mobile is performing end-to-end (E2E) tests. These involve testing the app from the user’s perspective by running it on a device (or emulator/simulator).
In this article, we will take a look at one of the most popular end-to-end testing libraries for React Native, called Detox, and we will also set it up to run on Codemagic.
One of the major issues with other black-box testing libraries is that tests are usually non-deterministic and flaky. Detox solves this by taking a gray box end-to-end testing approach.
Getting started
Let’s build a small React Native sample app called Hello Detox and then set it up for Detox testing.
You can use the following command to create a new React Native app:
npx react-native init hello_detox
If you do not have the React Native CLI installed on your system, follow this guide here.
Now, open the project on the IDE. To open it using VS Code, use:
To run the sample app on your Android device or emulator, use the command:
npx react-native run-android
To run the sample app on your iOS device or Simulator, use the command:
Setting up Detox
Now, you need to set up Detox for your React Native project in order to start writing Detox tests.
-
Install Detox dependencies:
brew tap wix/brew brew install applesimutils -
Install Detox CLI:
-
Navigate to your React Native root project directory, and run the following:
npm install detox --save-devThis will add the
detoxdependency to your React Native project’spackage.jsonfile.
Configuring for Android
You need to add some Android-specific dependencies and configure Detox for building and running tests on an Android device or emulator.
-
Go to your Android
build.gradle (project), and the update theminSdkVersionto 18: -
Add the following to the same file:
allprojects { repositories { maven { // All of the Detox artifacts are provided via the npm module url "$rootDir/../node_modules/detox/Detox-android" } } } -
Go to Android
build.gradle (app), and add the following underandroid.defaultConfig:android { defaultConfig { // Added these for running tests testBuildType System.getProperty('testBuildType', 'debug') testInstrumentationRunner 'androidx.test.runner.AndroidJUnitRunner' } } -
Add these dependencies to the same file:
dependencies { // Added testing dependencies androidTestImplementation('com.wix:detox:+') { transitive = true } androidTestImplementation 'junit:junit:4.12' } -
Now, create a file called
DetoxTest.javain the pathandroid/app/src/androidTest/java/com/[your_package]/ -
Add the following to it:
package [your_package];

import com.wix.detox.Detox;
import com.wix.detox.config.DetoxConfig;

import org.junit.Rule;
import org.junit.Test;
import org.junit.runner.RunWith;

import androidx.test.ext.junit.runners.AndroidJUnit4;
import androidx.test.filters.LargeTest;
import androidx.test.rule.ActivityTestRule;

@RunWith(AndroidJUnit4.class)
@LargeTest
public class DetoxTest {
    @Rule
    public ActivityTestRule<MainActivity> mActivityRule = new ActivityTestRule<>(MainActivity.class, false, false);

    @Test
    public void runDetoxTests() {
        DetoxConfig detoxConfig = new DetoxConfig();
        detoxConfig.idlePolicyConfig.masterTimeoutSec = 90;
        detoxConfig.idlePolicyConfig.idleResourceTimeoutSec = 60;
        detoxConfig.rnContextLoadTimeoutSec = (com.[your_package].BuildConfig.DEBUG ? 180 : 60);

        Detox.runTests(mActivityRule, detoxConfig);
    }
}
Replace
[your_package]with your app package name.
Adding release build support
To add release build support to your Android app, follow the steps below:
-
First of all, you need to have a keystore. If you don’t have that already, you can generate it using:
keytool -genkey -v -keystore keystore_name.keystore -alias alias_name -keyalg RSA -keysize 2048 -validity 10000 -
Inside
android/, create a new file calledkey.properties, and add the following to it:storePassword=<enter keystore password> keyPassword=<enter key alias password> keyAlias=<enter key alias name> storeFile=<enter .keystore file path>Replace the angle brackets and their content with the appropriate values.
-
Save this file, but don’t commit it to your version control. Add this file to
.gitignoreso that you don’t commit it by mistake. -
Go to
build.gradle (app).Replace the following:
With the keystore information from your properties file:
def keystorePropertiesFile= rootProject.file("key.properties") def keystoreProperties = new Properties() keystoreProperties.load(new FileInputStream(keystorePropertiesFile)) android { -
Add the signingConfigs:
signingConfigs { release { keyAlias keystoreProperties['keyAlias'] keyPassword keystoreProperties['keyPassword'] storeFile file(keystoreProperties['storeFile']) storePassword keystoreProperties['storePassword'] } } -
Inside buildTypes release, use the
releasesigningConfig:buildTypes { release { //... signingConfig signingConfigs.release } }
Adding Detox configurations
You have to add configurations for using the detox-cli commands for building and testing the app.
Add the following to the .detoxrc.json file:
{
  "testRunner": "jest",
  "runnerConfig": "e2e/config.json",
  "configurations": {
    "android.emu.debug": {
      "type": "android.emulator",
      "binaryPath": "android/app/build/outputs/apk/debug/app-debug.apk",
      "build": "cd android && ./gradlew assembleDebug assembleAndroidTest -DtestBuildType=debug && cd ..",
      "device": {
        "avdName": "Pixel_API_29"
      }
    },
    "android.emu.release": {
      "binaryPath": "android/app/build/outputs/apk/release/app-release.apk",
      "build": "cd android && ./gradlew assembleRelease assembleAndroidTest -DtestBuildType=release && cd ..",
      "type": "android.emulator",
      "device": {
        "avdName": "Pixel_API_29"
      }
    }
  }
}
In the above JSON, replace the
avdNamewith the proper emulator or device name that you are using.
Configuring for iOS
You do not need to add additional dependencies for iOS, so it is pretty straightforward.
Just add the Detox configurations to the .detoxrc.json file:
{
  "testRunner": "jest",
  "runnerConfig": "e2e/config.json",
  "configurations": {
    "ios.sim.debug": {
      "type": "ios.simulator",
      "binaryPath": "ios/build/Build/Products/Debug-iphonesimulator/hello_detox.app",
      "build": "xcodebuild -workspace ios/hello_detox.xcworkspace -scheme hello_detox -configuration Debug -sdk iphonesimulator -derivedDataPath ios/build",
      "device": {
        "type": "iPhone 11"
      }
    },
    "ios.sim.release": {
      "binaryPath": "ios/build/Build/Products/Release-iphonesimulator/hello_detox.app",
      "build": "export RCT_NO_LAUNCH_PACKAGER=true && xcodebuild -workspace ios/hello_detox.xcworkspace -UseNewBuildSystem=YES -scheme hello_detox -configuration Release -sdk iphonesimulator -derivedDataPath ios/build",
      "type": "ios.simulator",
      "device": {
        "type": "iPhone 11"
      }
    }
  }
}
In order to generate an iOS release build, you need to have the iOS Certificate and Provisioning Profile configured through Xcode.
Adding Detox tests
Jest is a recommended test runner for React Native, and we will use it for setting up the Detox tests in our React Native app.
Use the following CLI command provided by Detox for initializing Jest:
This command will create an “e2e” folder in the root project directory with sample test code.
We will add a very simple test for checking whether a Text component is present on the screen.
-
Add a
testIDproperty to the component that you want to find, like this:<Text testID="edit-text" style={styles.sectionDescription}> Edit <Text style={styles.highlight}>App.js</Text> to change this screen and then come back to see your edits. </Text> -
Navigate to
e2e/firstTest.e2e.js, and replace its content with the following:describe('Example', () => { beforeEach(async () => { await device.reloadReactNative() }) it('should have edit text on welcome screen', async () => { await expect(element(by.id('edit-text'))).toBeVisible() }) })
Running test on device
With the Detox test environment properly configured, now you are ready to run the test on your device (or emulator/simulator).
First, you have to perform a build of the app before running the test.
For testing on Android
For testing on iOS
-
Build the iOS app using:
detox build -c ios.sim.release -
Start the test using:
detox test -c ios.sim.release
Configuring for Codemagic
You can set up Detox testing of your React Native app on Codemagic using the codemagic.yaml file.
But before moving on to the YAML file, you need to make some changes to your Android app for generating the release build using Codemagic.
Get started with the following template (which contains both the Android and iOS workflow):
workflows:
  android-workflow:
    name: Android Detox
    environment:
      vars:
        # Android Keystore environment variables
        CM_KEYSTORE: Encrypted(...) # <-- Put your encrypted keystore file here
        CM_KEYSTORE_PASSWORD: Encrypted(...) # <-- Put your encrypted keystore password here
        CM_KEY_ALIAS_PASSWORD: Encrypted(...) # <-- Put your encrypted keystore alias password here
        CM_KEY_ALIAS_USERNAME: Encrypted(...) # <-- Put your encrypted keystore alias username here
      node: latest
    scripts:
      - name: Install npm dependencies
        script: |
                    npm install
      - name: Install detox dependencies
        script: |
                    brew tap wix/brew
      - name: Install detox-cli
        script: |
          npm install -g detox-cli
          cd $CM_BUILD_DIR && npm install detox --save-dev
      - name: Set Android SDK location
        script: |
                    echo "sdk.dir=$ANDROID_SDK_ROOT" > "$CM_BUILD_DIR/android/local.properties"
      - name: Set up keystore
        script: |
          echo $CM_KEYSTORE | base64 --decode > /tmp/keystore.keystore
          cat >> "$CM_BUILD_DIR/android/key.properties" <<EOF
          storePassword=$CM_KEYSTORE_PASSWORD
          keyPassword=$CM_KEY_ALIAS_PASSWORD
          keyAlias=$CM_KEY_ALIAS_USERNAME
          storeFile=/tmp/keystore.keystore
          EOF
      - name: Build with Detox
        script: |
                    detox build -c android.emu.release
      - name: Test with Detox
        script: |
                    detox test -c android.emu.release
      - name: Build Android release
        script: |
          cd android
          ./gradlew assembleRelease
    artifacts:
      - android/app/build/outputs/**/*.apk
    publishing:
      email:
        recipients:
          - user@example.com # enter your email
  ios-workflow:
    name: iOS Detox
    environment:
      vars:
        XCODE_WORKSPACE: '<xcode_workspace_name>.xcworkspace' # <-- Put the name of your Xcode workspace here
        XCODE_SCHEME: '<scheme_name>' # <-- Put the name of your Xcode scheme here
        # For manual code signing
        # More info about code signing here:
        # https://docs.codemagic.io/code-signing-yaml/signing-ios/
        CM_CERTIFICATE: Encrypted(...) # <-- Put your encrypted certificate here
        CM_CERTIFICATE_PASSWORD: Encrypted(...) # <-- Put your encrypted certificate password here
        CM_PROVISIONING_PROFILE: Encrypted(...) # <-- Put your encrypted provisioning profile here
      node: latest
      xcode: 11.7
      cocoapods: default
    scripts:
      - name: Install npm dependencies
        script: |
                    npm install
      - name: Install detox dependencies
        script: |
          brew tap wix/brew
          brew install applesimutils
      - name: Install detox-cli
        script: |
                    npm install -g detox-cli
      - name: Install CocoaPods dependencies
        script: |
                    cd ios && pod install
      - name: Set up keychain
        script: |
                    keychain initialize
      - name: Set up provisioning profiles
        script: |
          PROFILES_HOME="$HOME/Library/MobileDevice/Provisioning Profiles"
          mkdir -p "$PROFILES_HOME"
          PROFILE_PATH="$(mktemp "$PROFILES_HOME"/$(uuidgen).mobileprovision)"
          echo ${CM_PROVISIONING_PROFILE} | base64 --decode > $PROFILE_PATH
          echo "Saved provisioning profile $PROFILE_PATH"
      - name: Set up signing certificate
        script: |
          echo $CM_CERTIFICATE | base64 --decode > /tmp/certificate.p12
          keychain add-certificates --certificate /tmp/certificate.p12 --certificate-password $CM_CERTIFICATE_PASSWORD
      - name: Set up code signing settings on Xcode project
        script: |
                    xcode-project use-profiles
      - name: Build with Detox
        script: |
                    detox build -c ios.sim.release
      - name: Test with Detox
        script: |
                    detox test -c ios.sim.release
      - name: Build ipa for distribution
        script: |
                    xcode-project build-ipa --workspace "$CM_BUILD_DIR/ios/$XCODE_WORKSPACE" --scheme "$XCODE_SCHEME"
    artifacts:
      - build/ios/ipa/*.ipa
      - /tmp/xcodebuild_logs/*.log
      - $HOME/Library/Developer/Xcode/DerivedData/**/Build/**/*.app
      - $HOME/Library/Developer/Xcode/DerivedData/**/Build/**/*.dSYM
    publishing:
      email:
        recipients:
          - user@example.com # enter your email
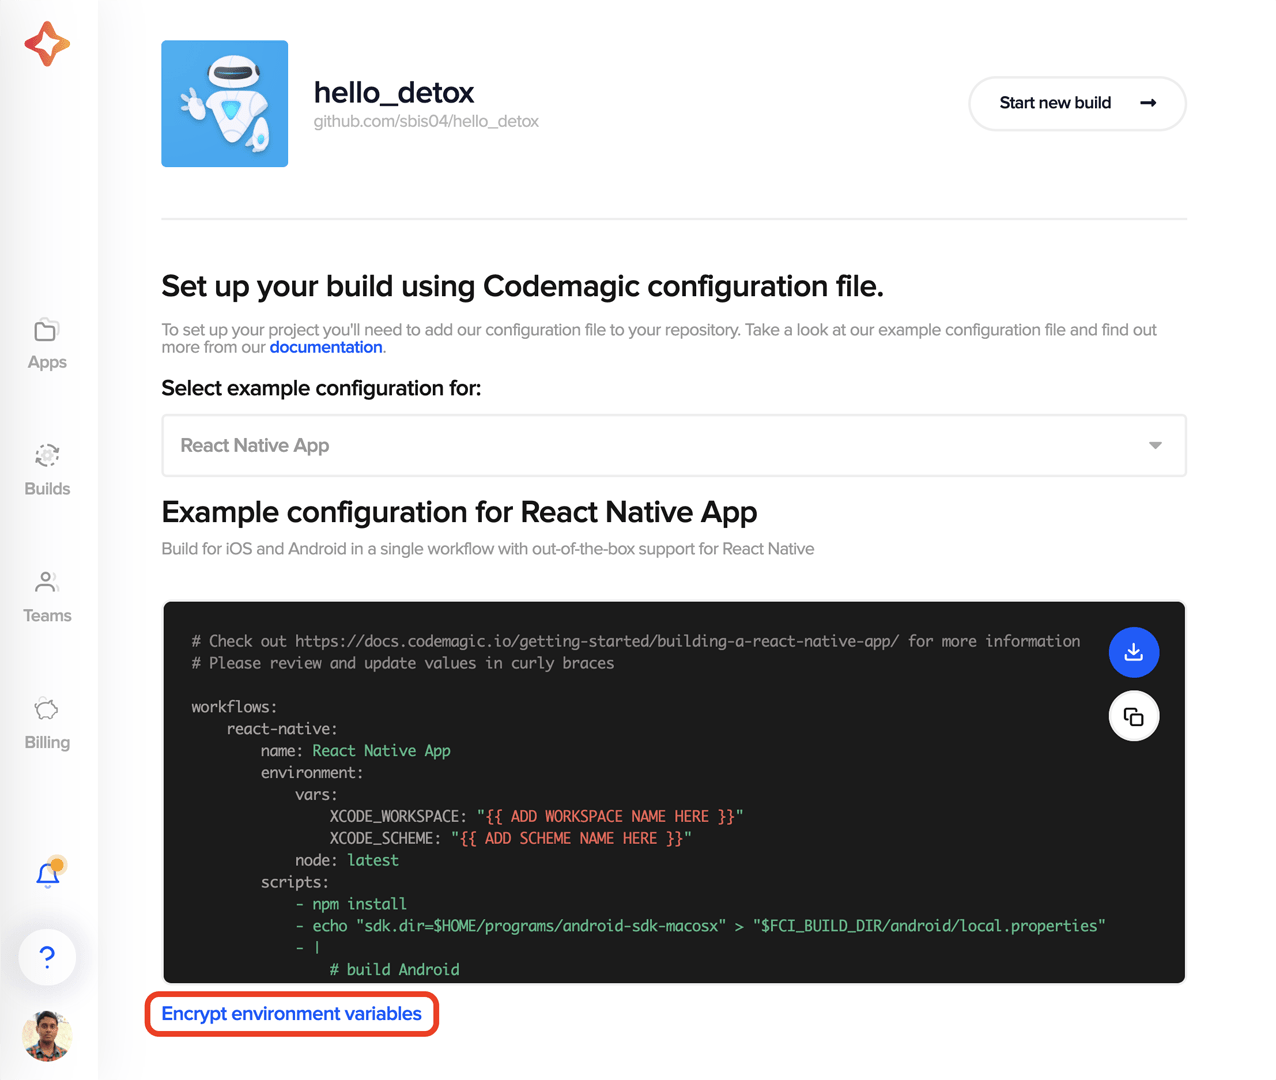
Modify the above YAML file as per your build pipeline, and don’t forget to add your encrypted credentials and your publishing email.
You can encrypt your credentials by going to the Codemagic project settings and clicking on Encrypt environment variables.
Building on Codemagic
Add the codemagic.yaml file to your root React Native project directory, and commit it to your cloud repository (GitHub, GitLab, Bitbucket, etc.).
Follow the steps below to start the build:
-
Go to the Codemagic Applications dashboard.
-
Search for your project, and go to its settings.
-
Click on Start new build.

-
Select the workflow from
codemagic.yaml, and click on Start new build.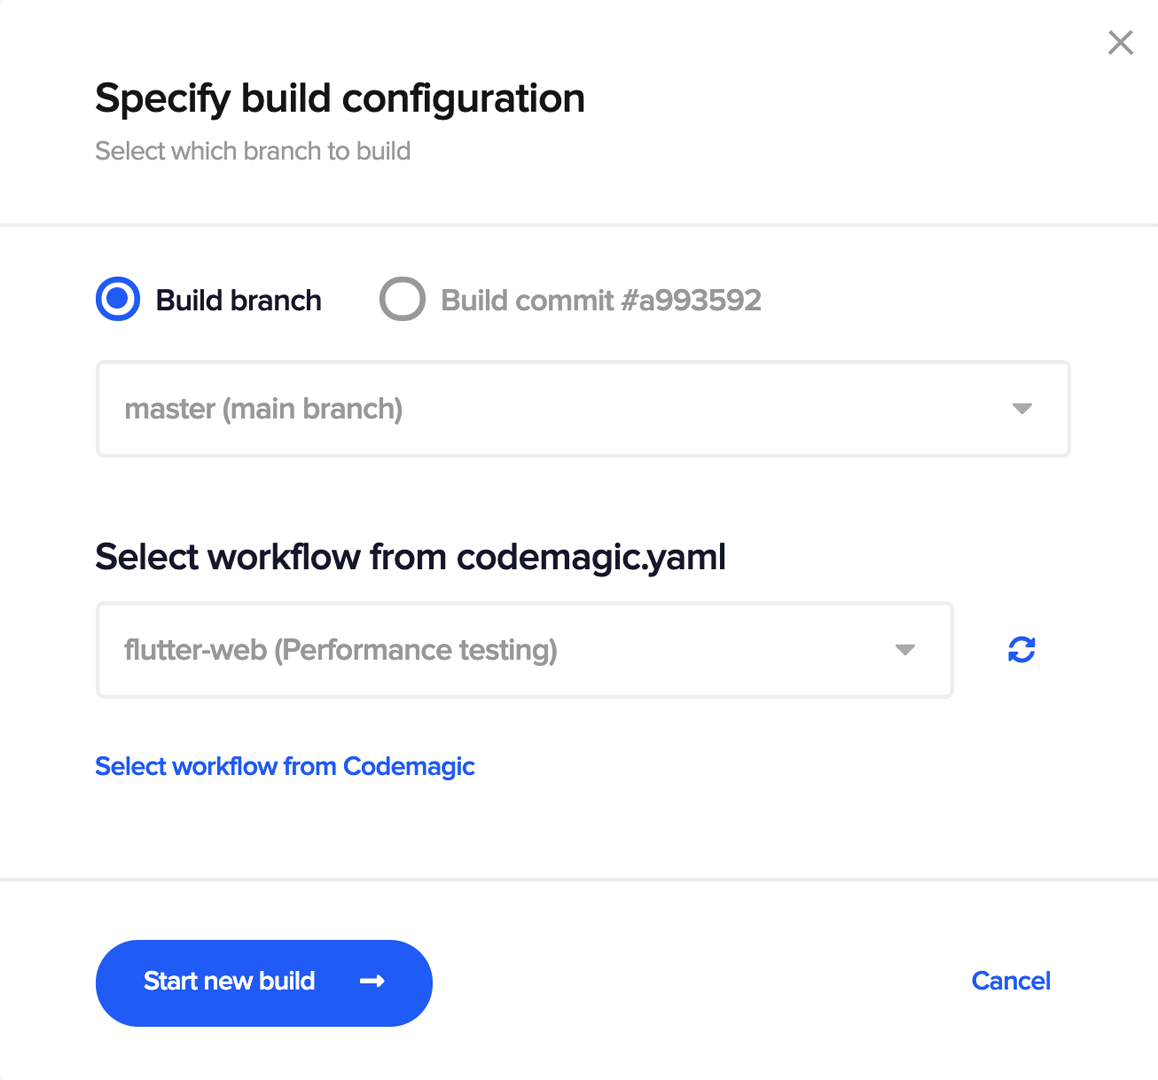
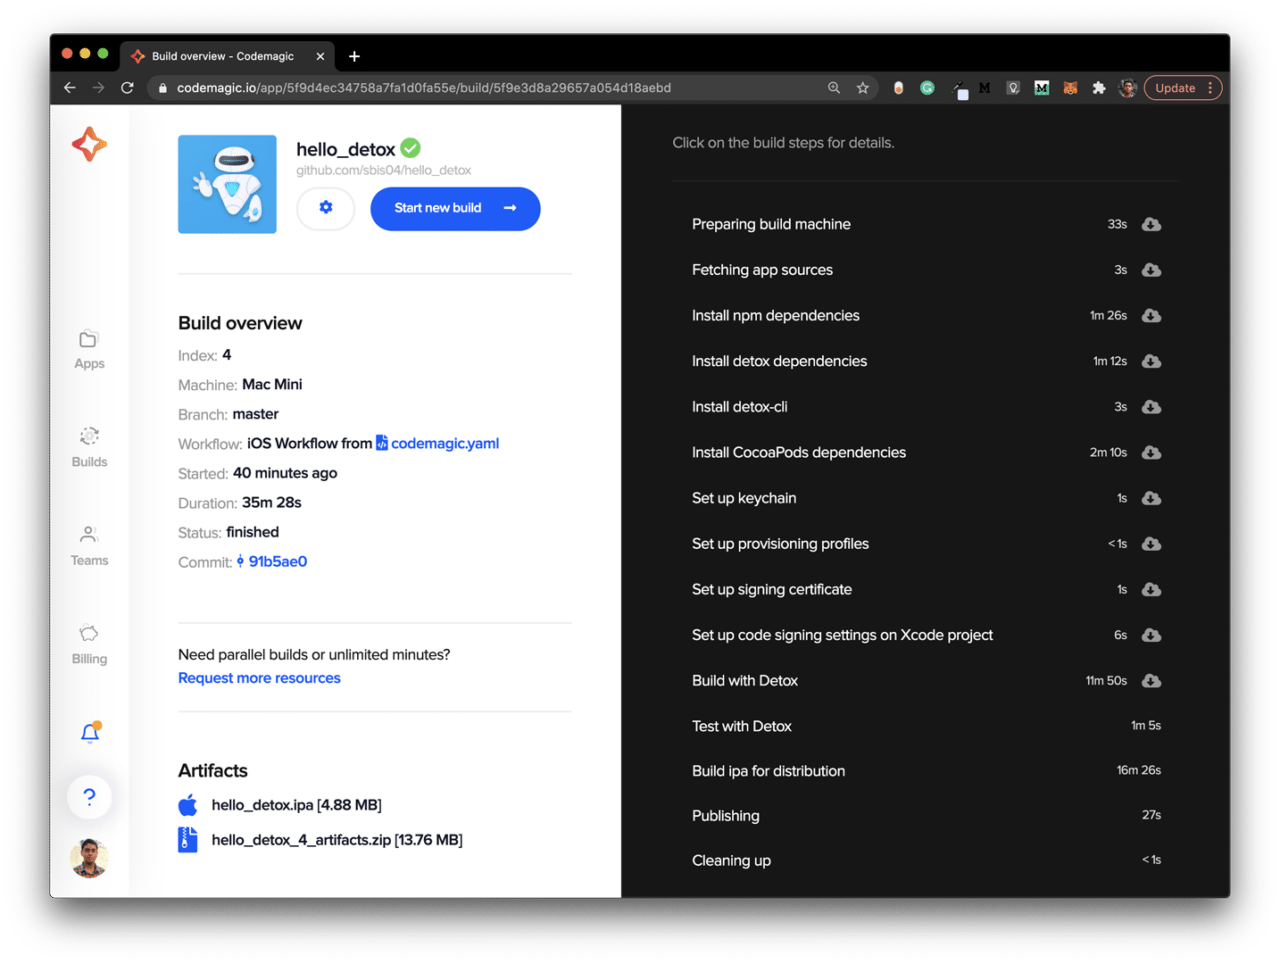
This will start a new build of the selected workflow on Codemagic.
Conclusion
React Native Detox tests are really easy to set up in a CI environment, and Codemagic YAML makes this even easier (where you just have to provide the normal CLI commands).
Some useful resources
Souvik Biswas is a passionate Mobile App Developer (Android and Flutter). He has worked on a number of mobile apps throughout his journey. Loves open source contribution on GitHub. He is currently pursuing a B.Tech degree in Computer Science and Engineering from Indian Institute of Information Technology Kalyani. He also writes Flutter articles on Medium – Flutter Community.







Discussion about this post