









Written by Souvik Biswas
In this article, I will show how you can use the Google Calendar API to schedule and manage Google Meet video conference events in Flutter. Using this API, you can also add attendees for an event and even send email notifications to them.
For the sample app, I will be using Firebase for performing the CRUD operations to store the event details of those created from our app.
Create a new Firebase project
To get started, let’s create a new Firebase project for our app.
-
Go to the Firebase console, and click on Create a project.
-
Enter the Project name and click Continue.
-
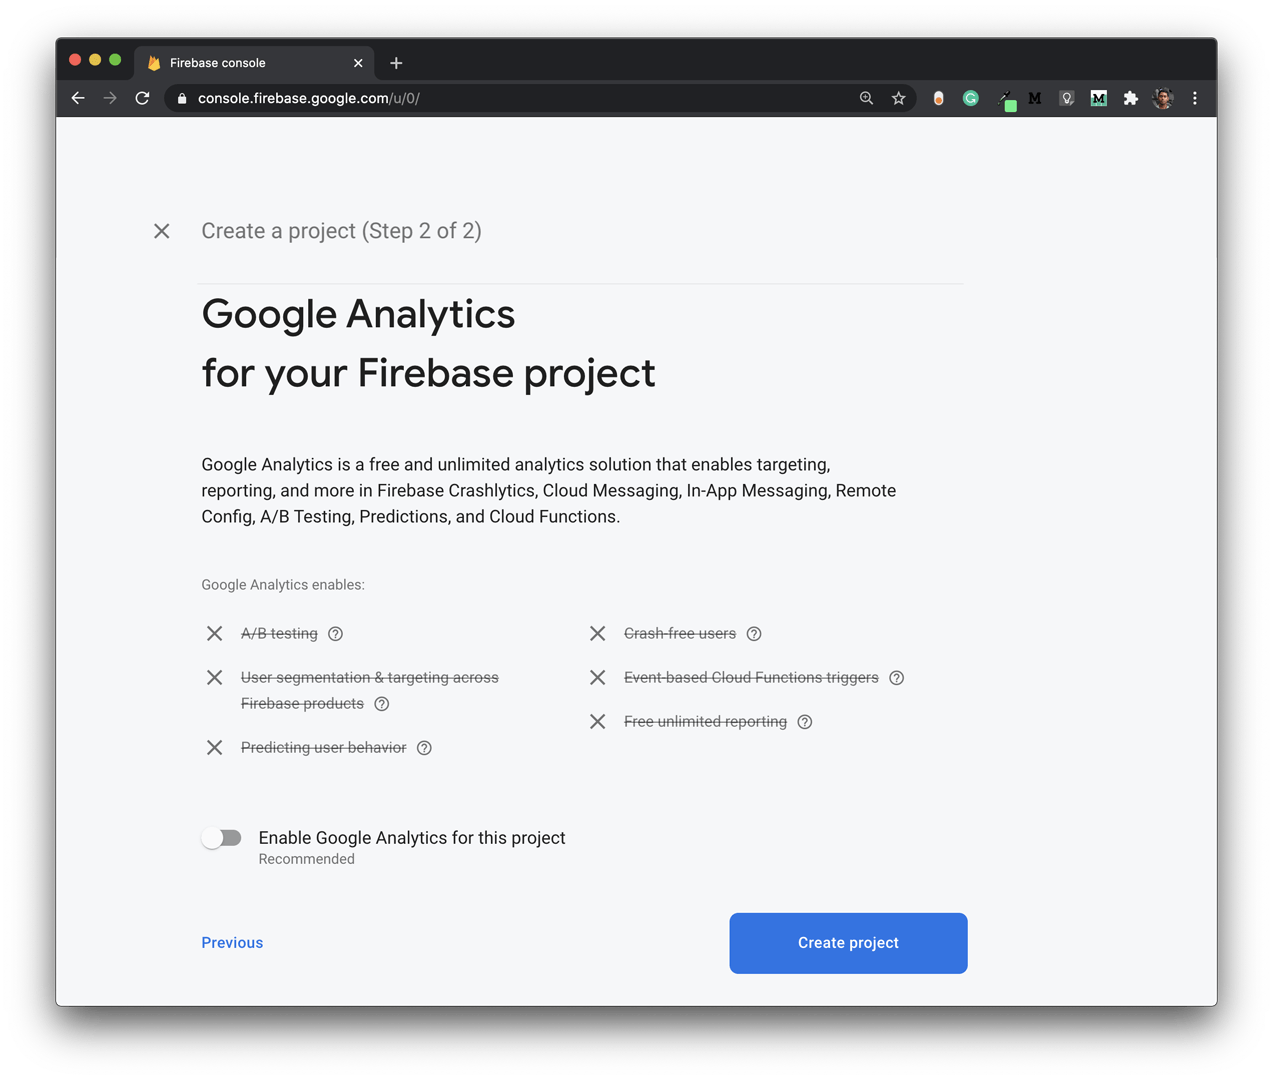
Disable Google Analytics, as this is just a sample project. Click on Create project.
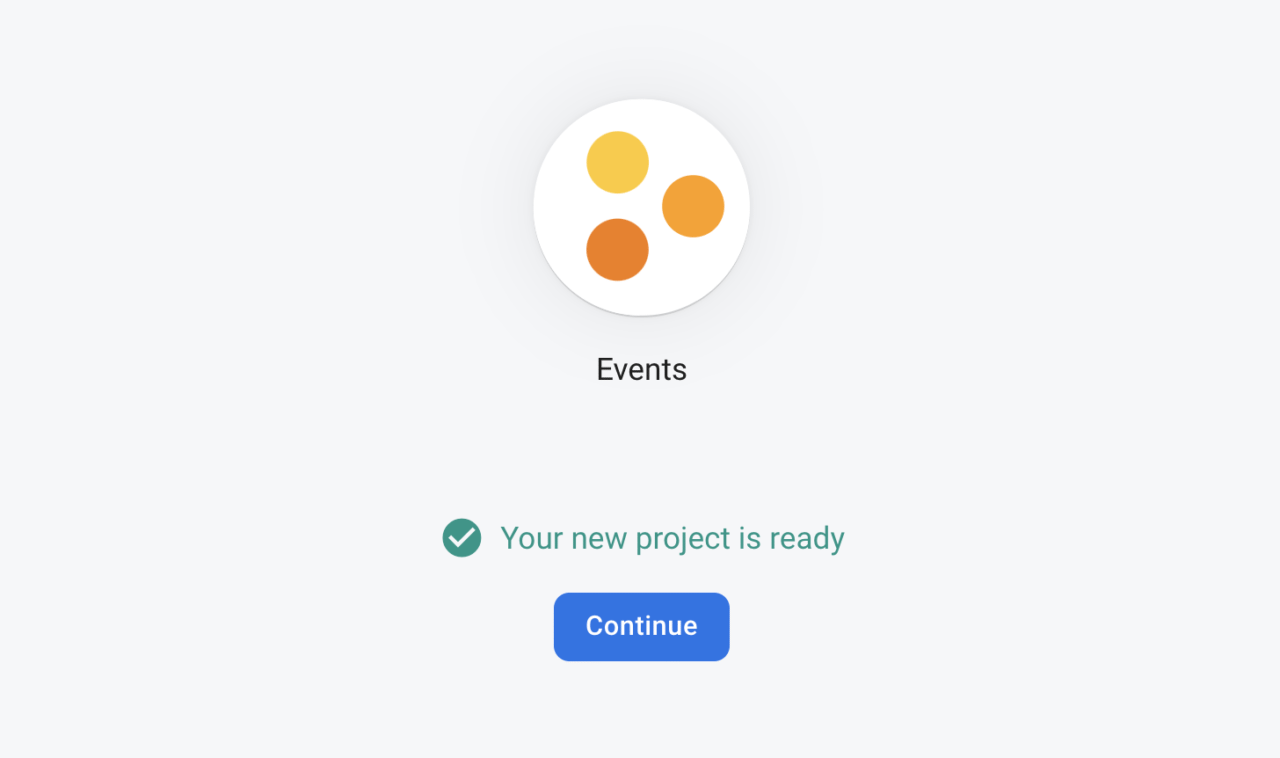
Wait a bit, and your Firebase project will be ready to use.
Android setup
Follow the steps below to add Firebase to your Android app:
-
Click on the Android icon on the Firebase dashboard.
-
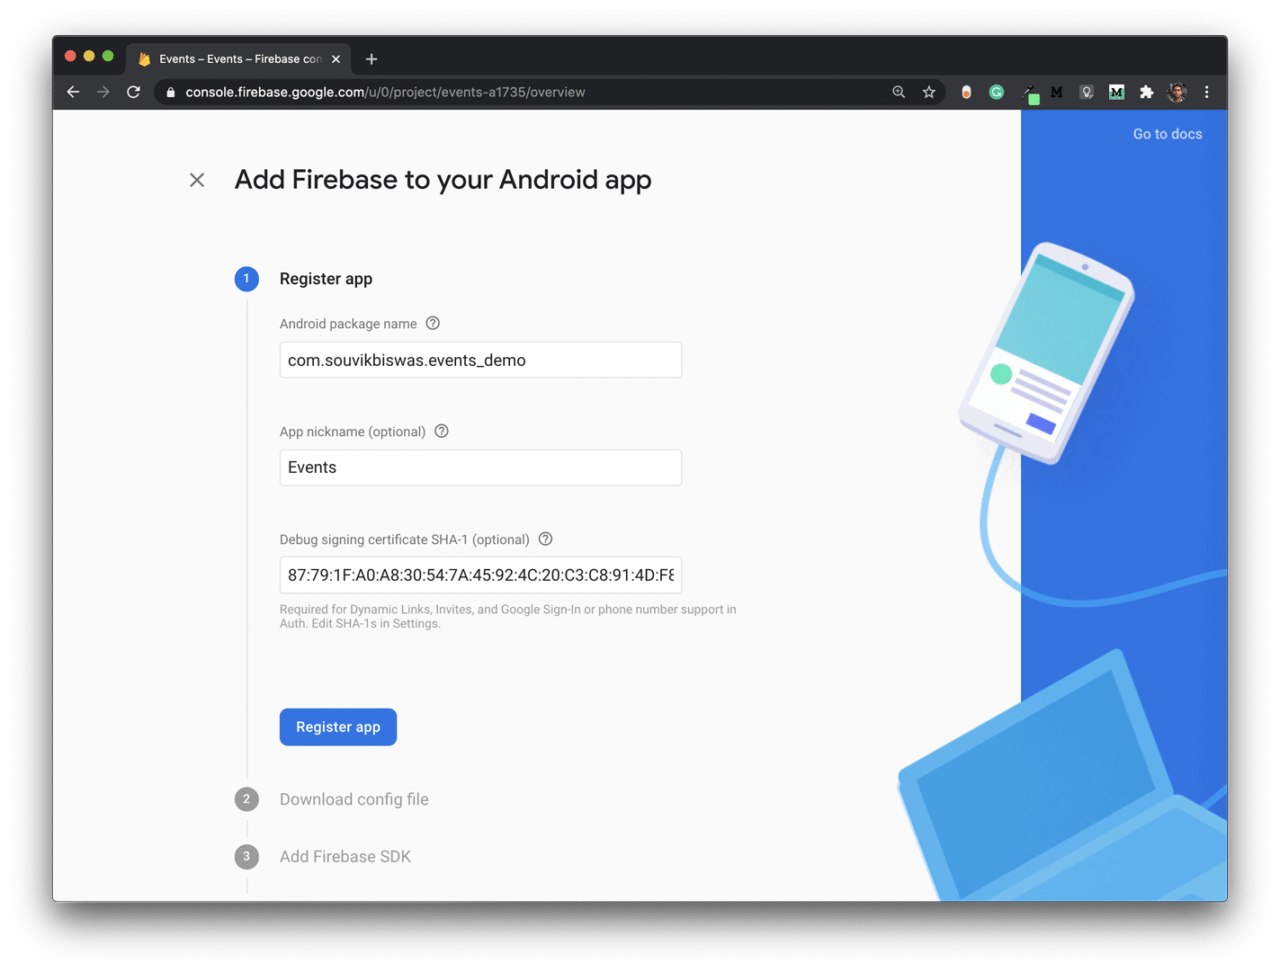
Fill in the details on the form, and click on Register app.
-
Download the
google-services.jsonfile, and just drag and drop it in your project directory → android → app. Then, click Next.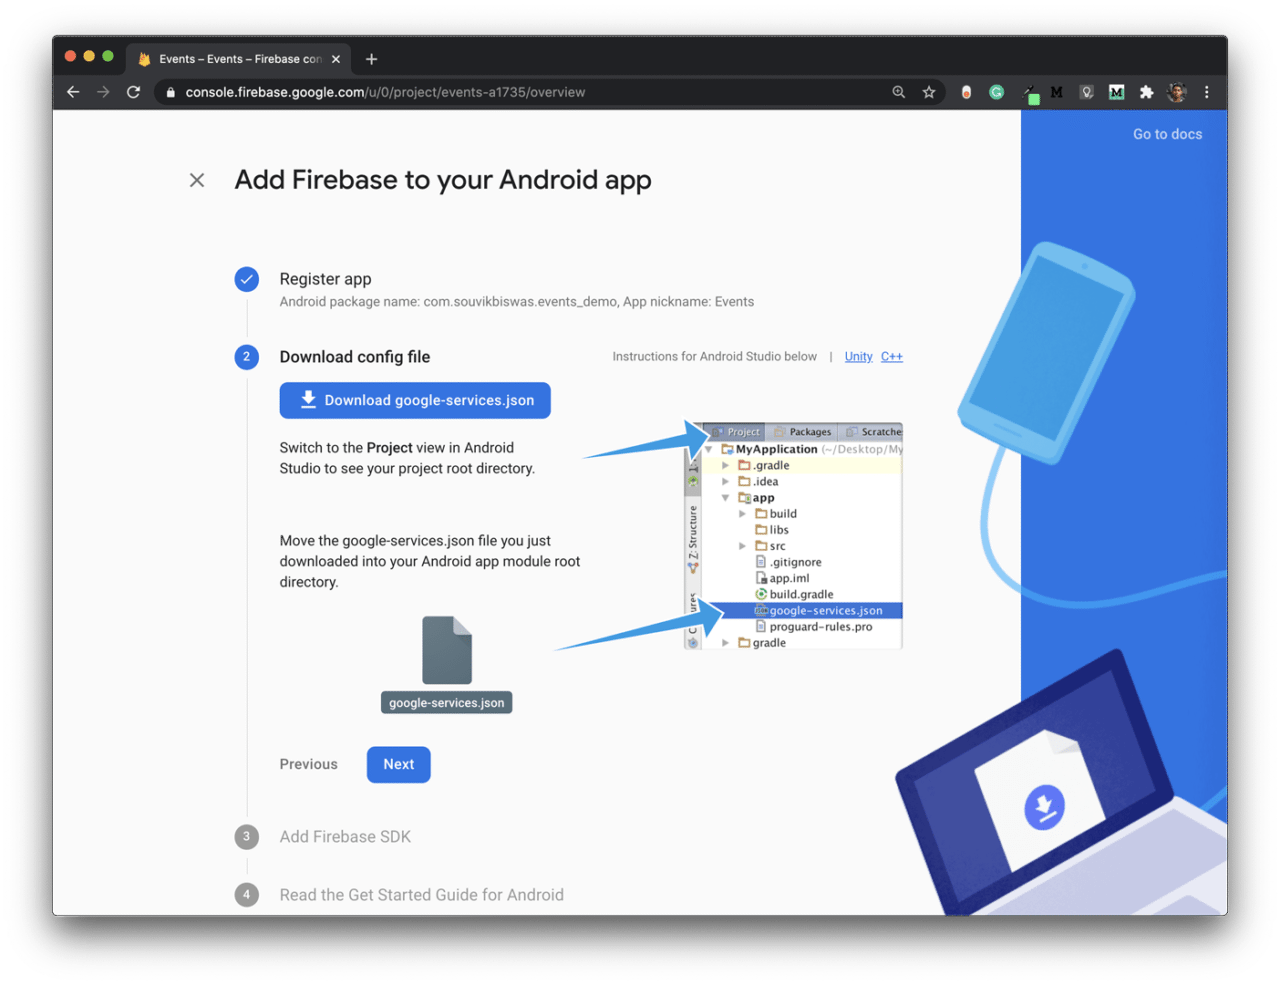
-
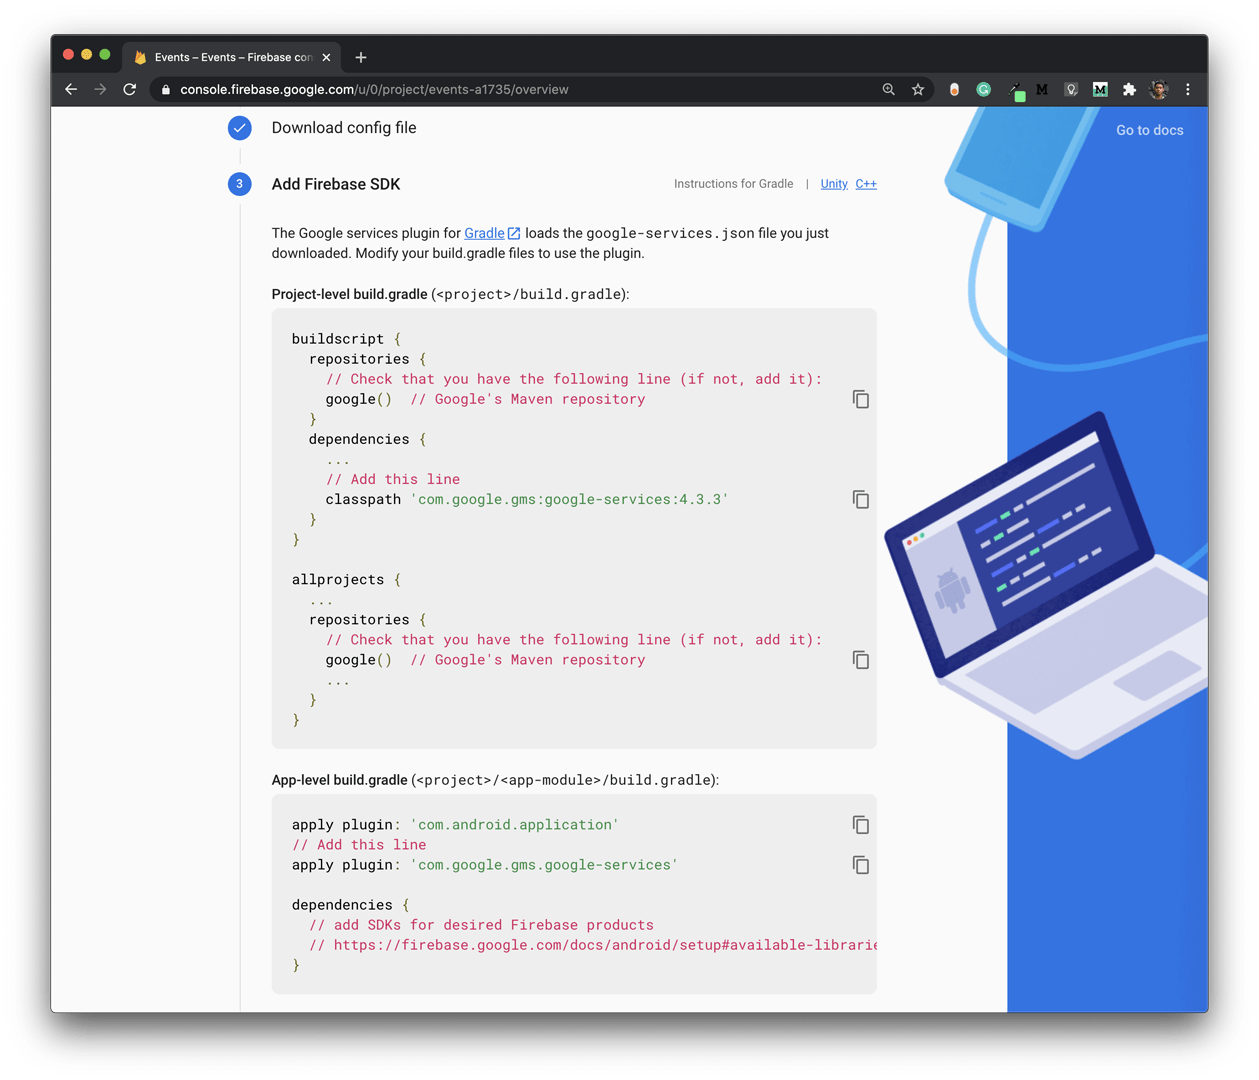
Follow the instructions and add the code snippets to your project. Click Next.
-
As the final step, Continue to Console.
iOS setup
Follow the steps below to add Firebase to your iOS app:
-
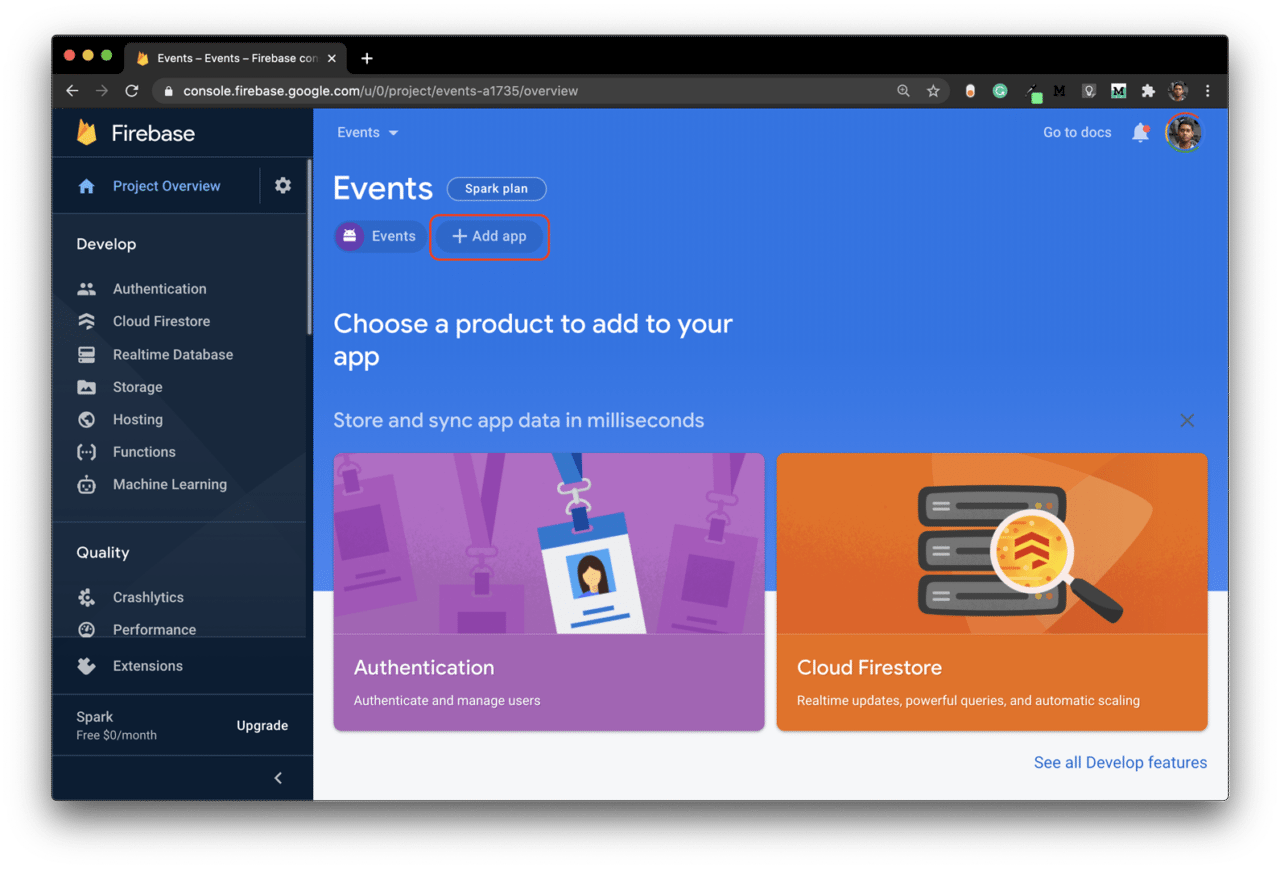
Click Add app and select iOS.
-
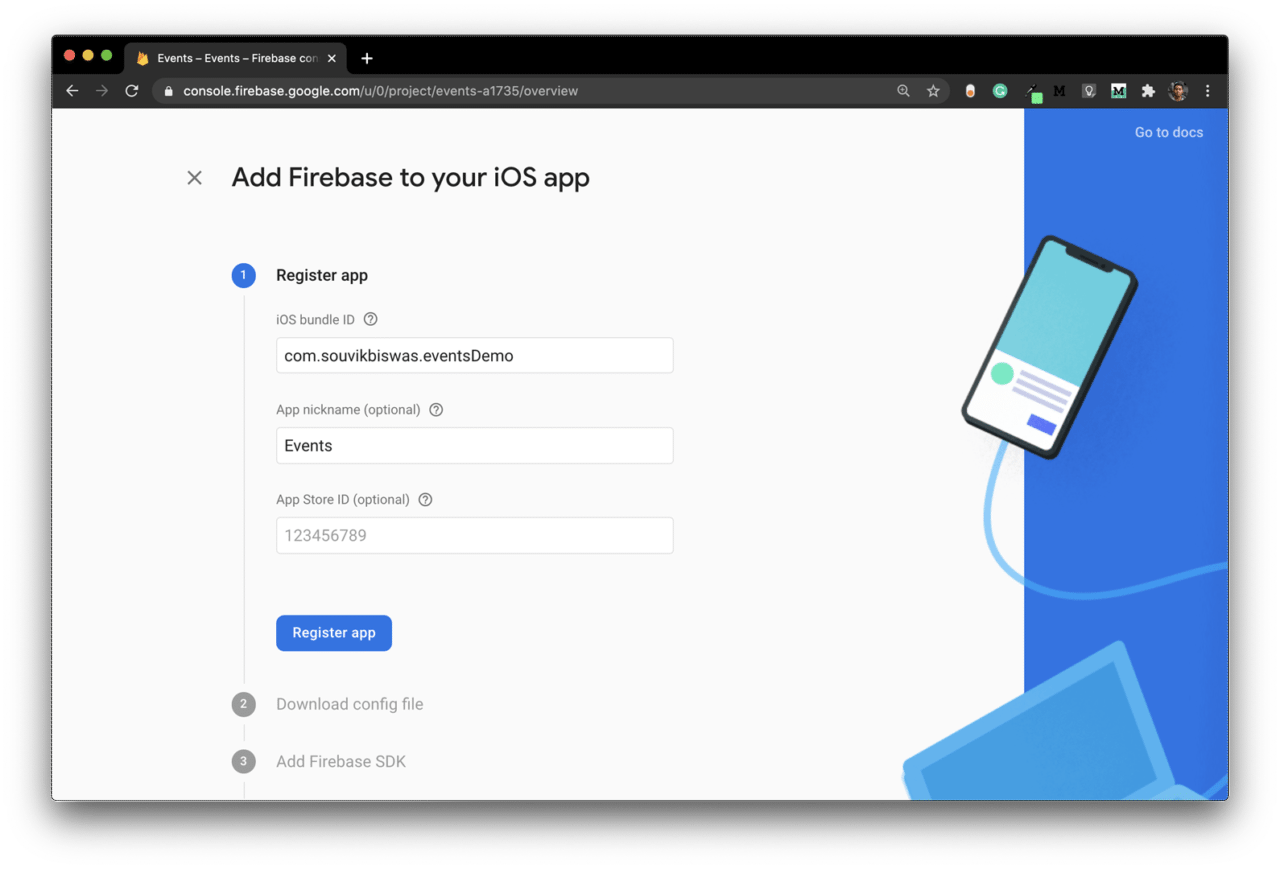
Fill in the details on the form, and click on Register app.
-
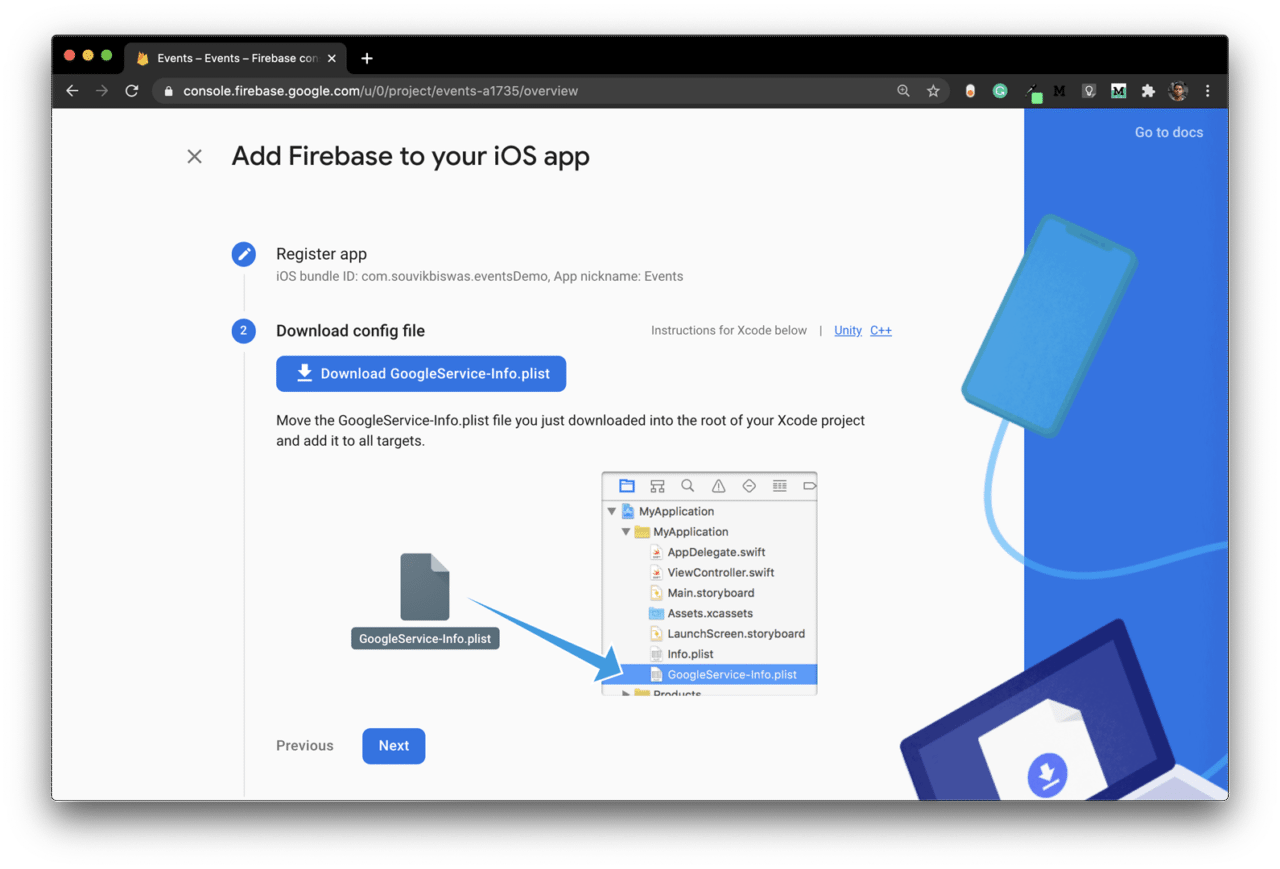
Download the
GoogleService-Info.plistfile and place it in the appropriate folder.NOTE: You will need to use Xcode to properly add the file to your iOS project.
-
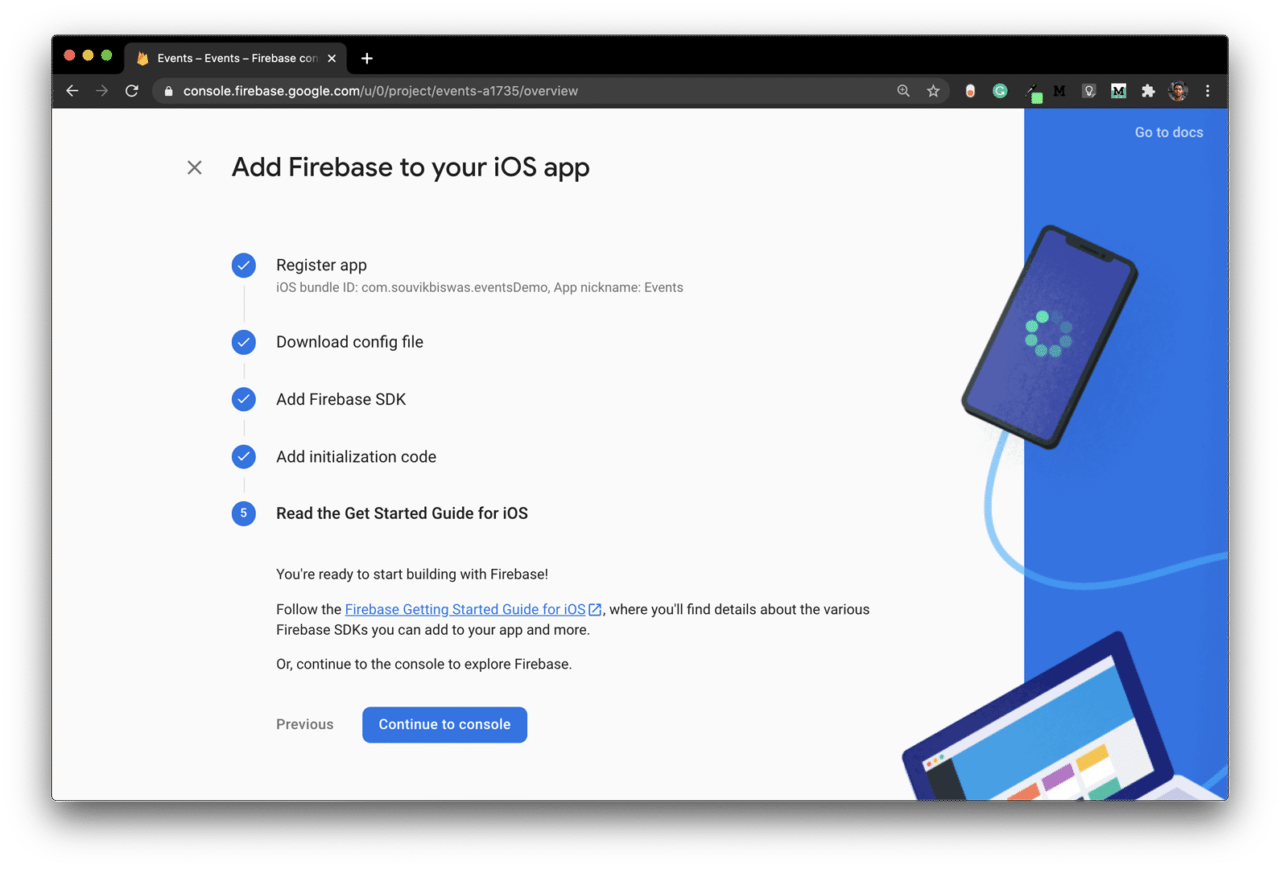
Skip steps 3 and 4, as they are already handled by the Flutter Firebase plugin.
-
As the final step, Continue to Console.
For a more detailed guide on how to add Firebase to a Flutter project, check out the article here.
Set up the Calendar API
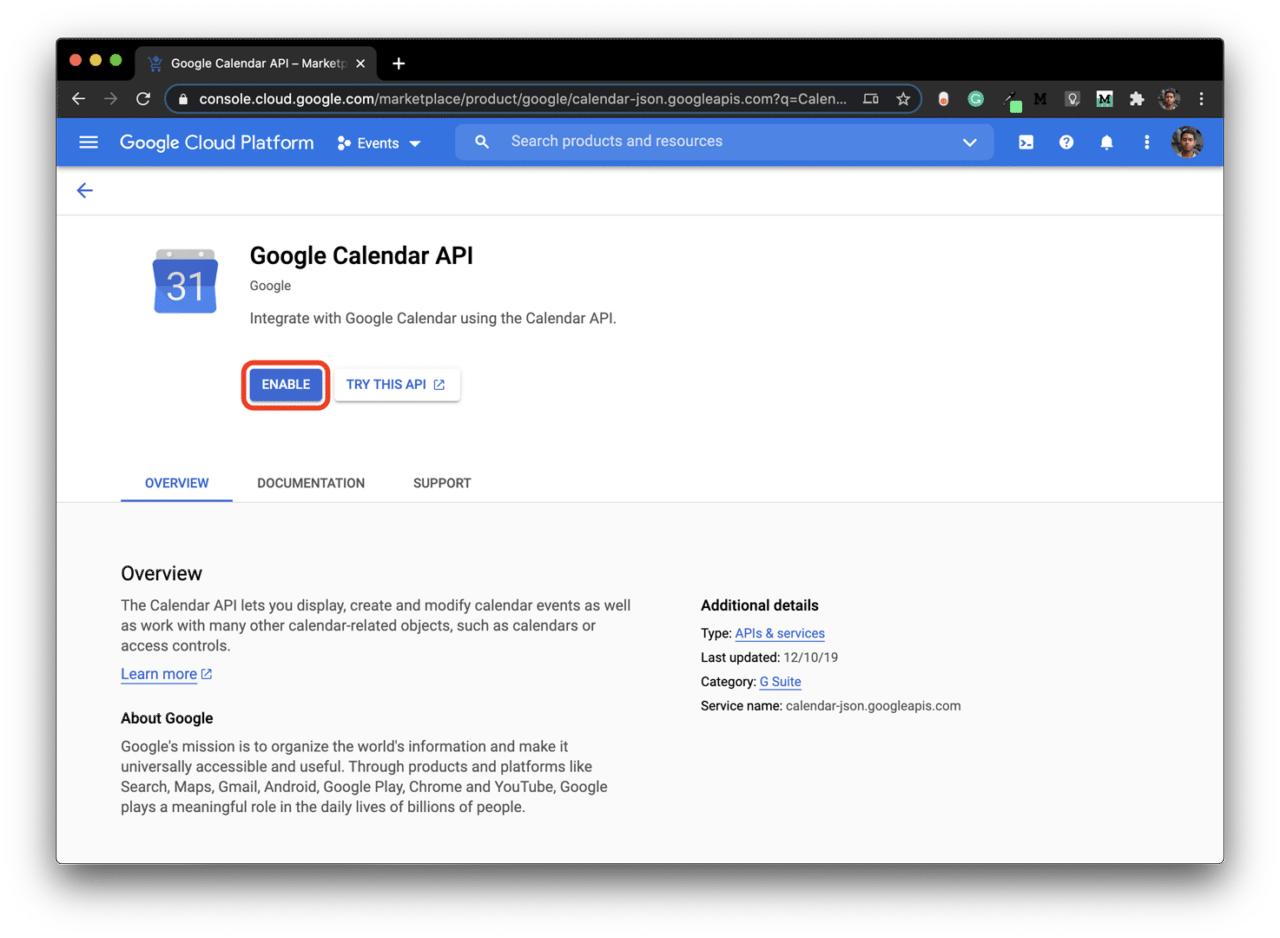
You have to enable the Google Calendar API from the Google Cloud Platform (GCP) console to get access to it from the app.
-
Go to the GCP console.
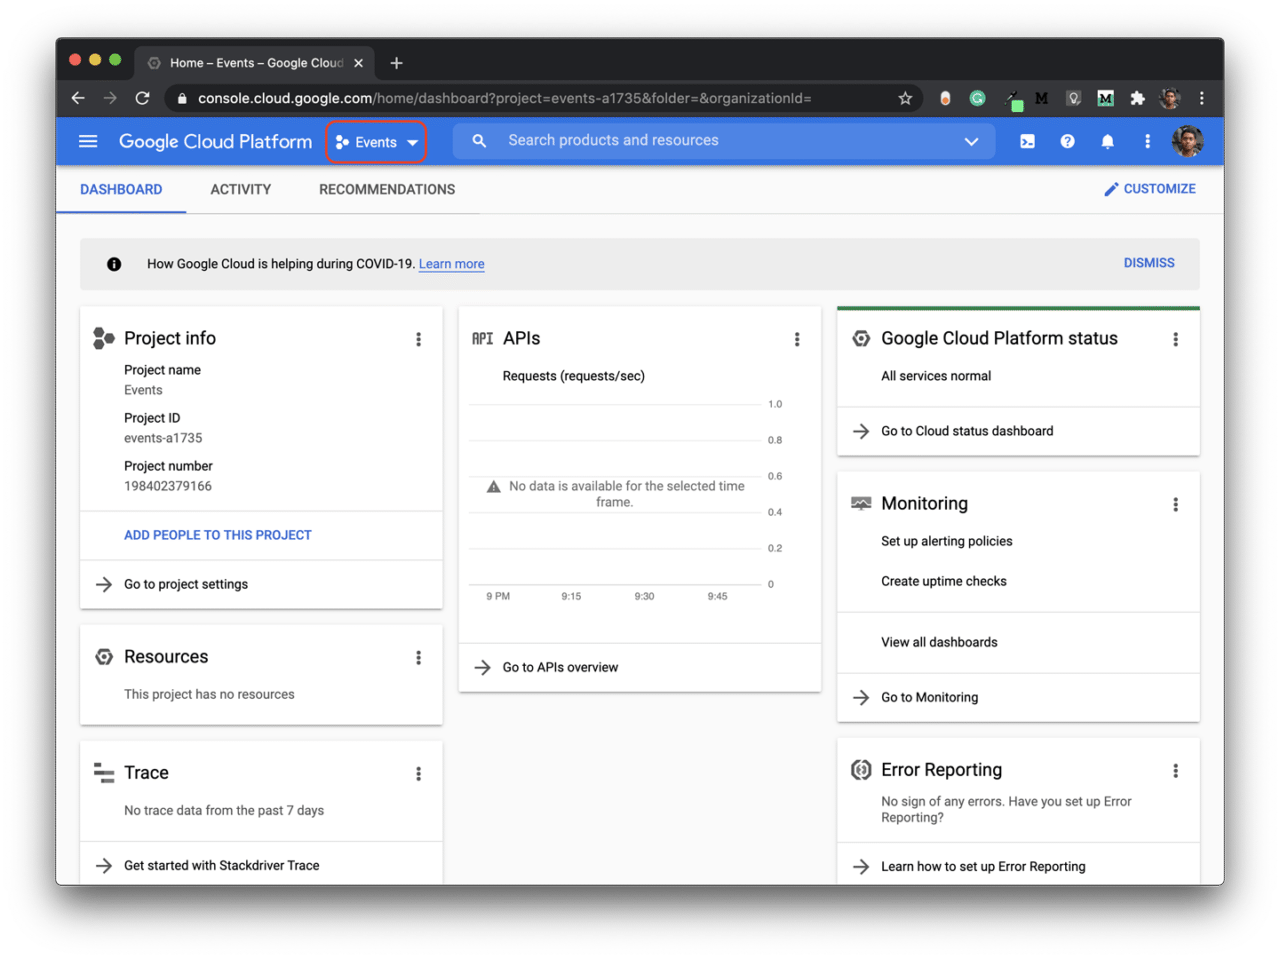
Make sure the correct project is selected in the top bar. Otherwise, select the project that you just created from Firebase.
-
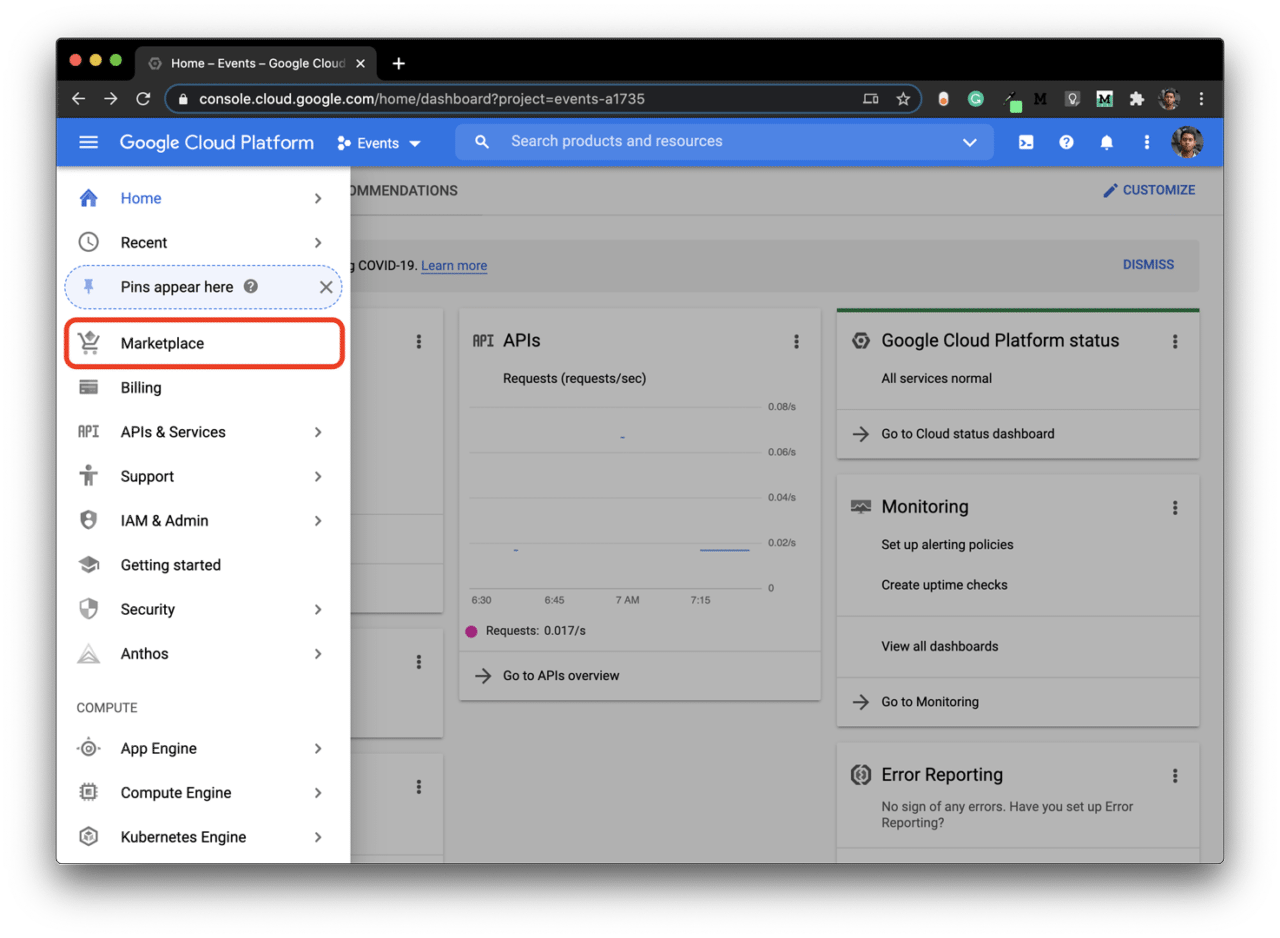
Click on the menu icon (top-left corner), and go to Marketplace.
-
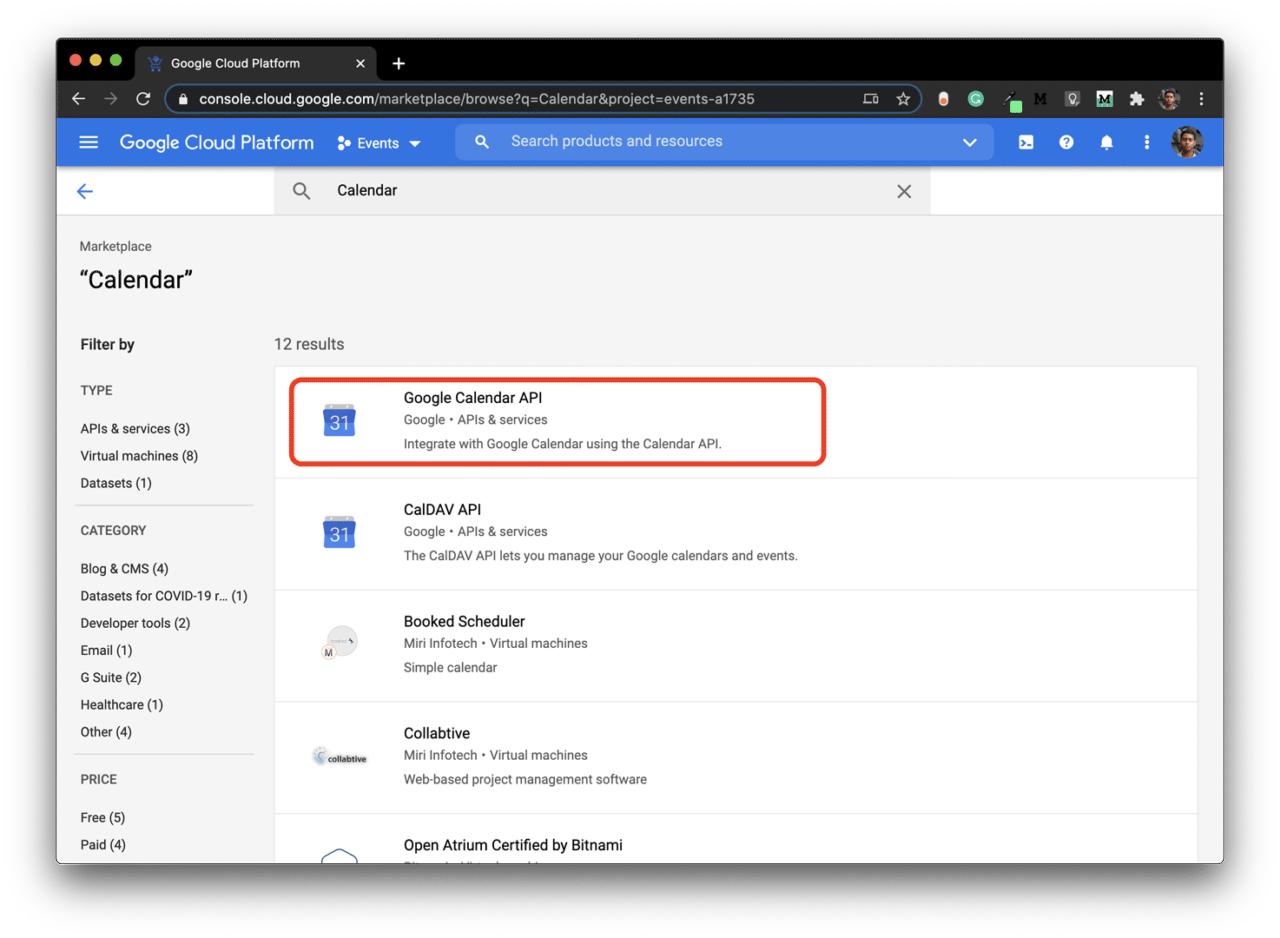
Search for Google Calendar API and click on it.
-
Enable the API.
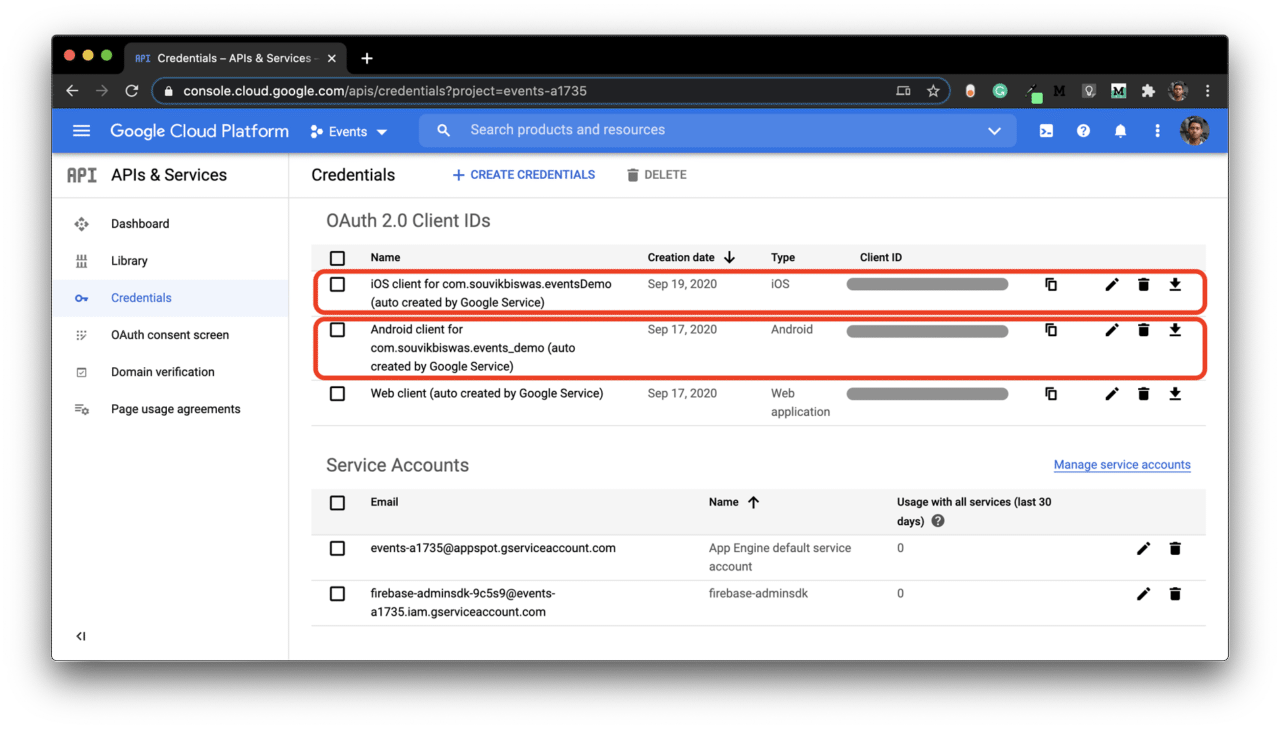
You will need the Client ID (auto-generated by Firebase) for both your Android and iOS app for authenticating using OAuth, which is required to use the Calendar API.
Navigate to APIs and Services → Credentials. Here, you will get the Client IDs for both of the platforms. You will need these later while setting up OAuth in the app.
Enable Cloud Firestore
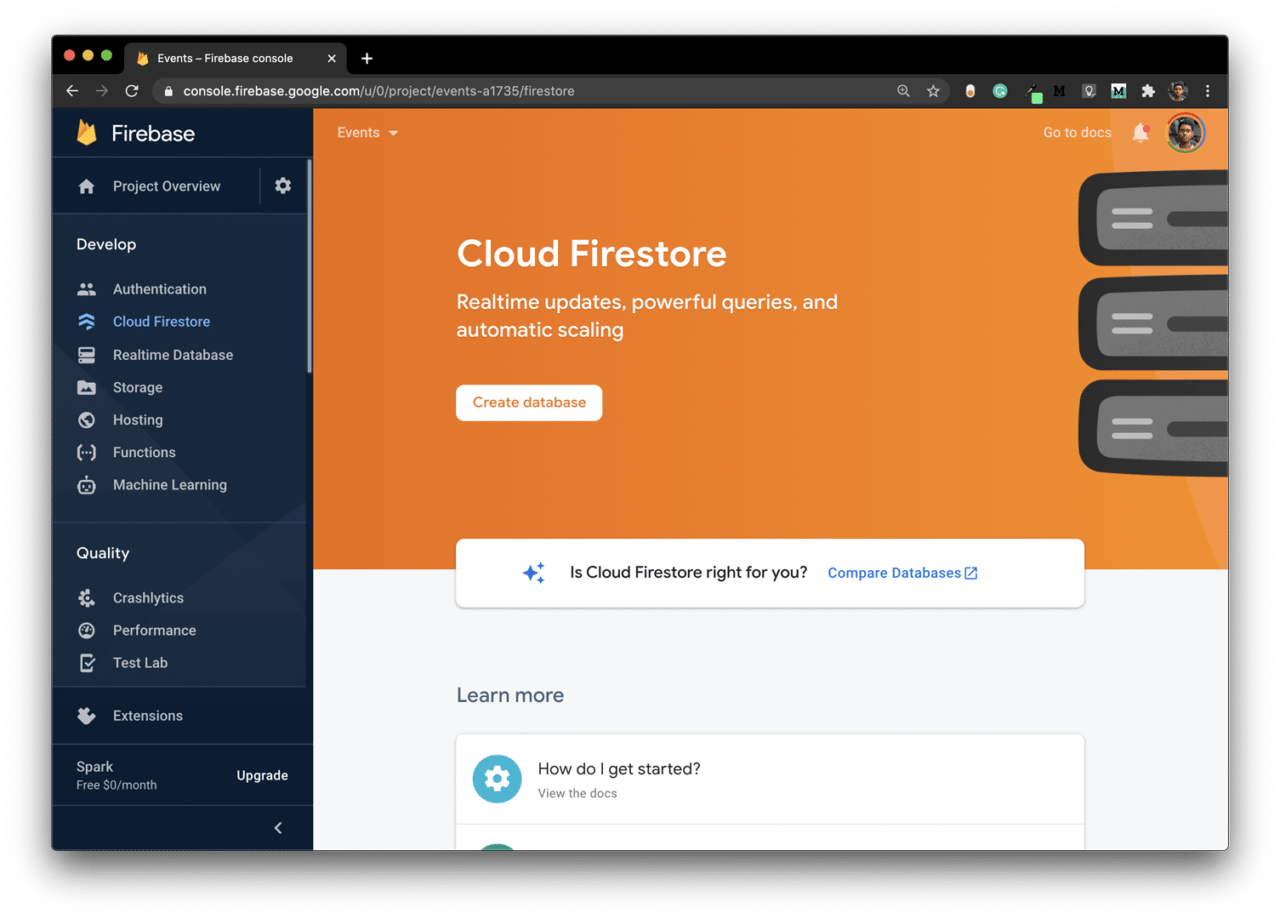
We will be using Cloud Firestore for storing the event data. Follow the steps below to enable it:
-
Select Cloud Firestore from the Firebase dashboard menu, then click on Create database.
-
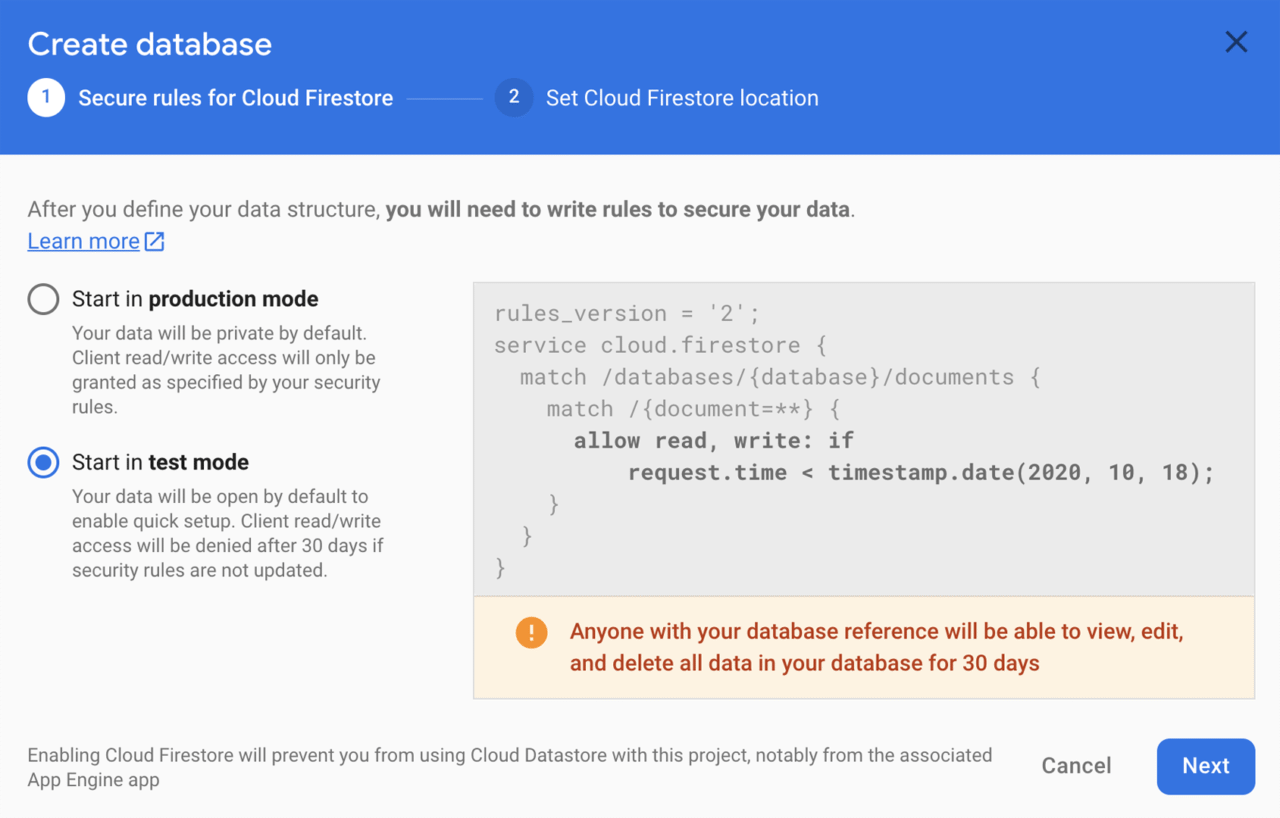
Select Start in test mode for the Security Rules. Click Next.
Here, we are using test mode, as this app is only for demonstration purposes, and we will not set up any authentication. But for any production app, it is a must to define a proper security rule.
-
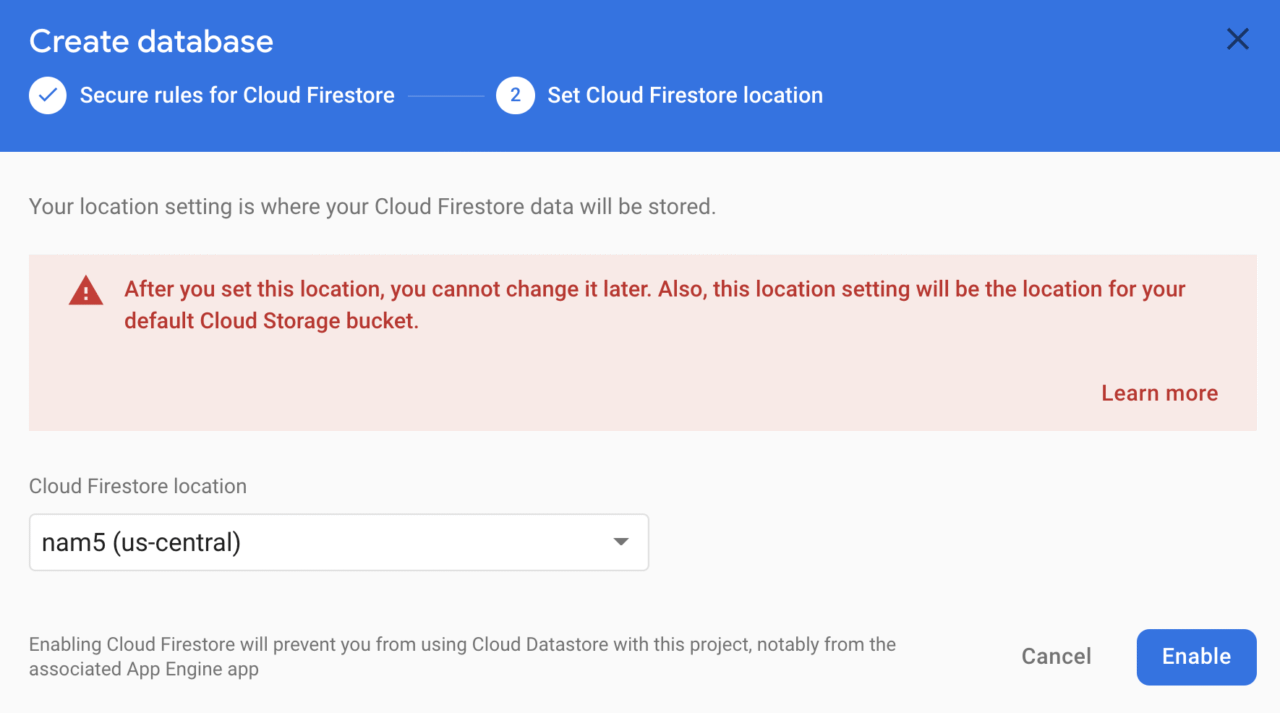
Select a location for Firestore and click Enable.
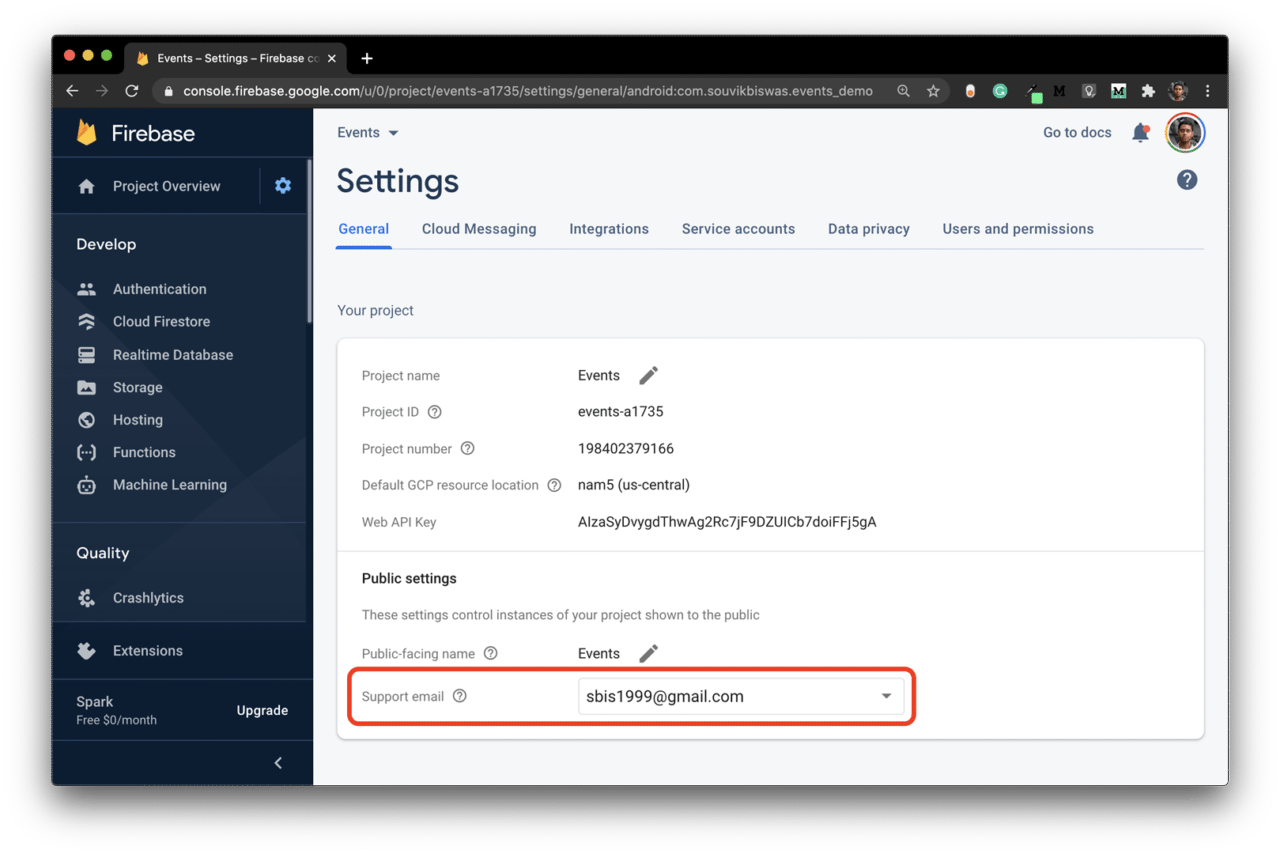
Before starting to use the Firestore database, you need to do one more thing. Go to Project settings and specify the Support email.
If you do not set the Support email, you will get an OAuth error while interacting with the database or the Calendar API.
Now, let’s start creating the Flutter app.
Create a new Flutter project
You can use the following command to create a new Flutter project:
flutter create events_demo
Open the project using your IDE. You can use the following command to open it using VS Code:
We will be using the following packages:
Import these packages:
dependencies:
  firebase_core: ^0.5.0
  cloud_firestore: ^0.14.0+2
  intl: ^0.16.1
  googleapis: ^0.55.0
  googleapis_auth: ^0.2.12
  url_launcher: ^5.5.0
Integrate Calendar API
As I said before, to access the Google Calendar API, you will need the OAuth verification.
First of all, add the two Client IDs for both the platforms in a file called secrets.dart inside your lib folder. Create a method to retrieve the proper Client ID according to the Platform.
import 'dart:io' show Platform;

class Secret {
  static const ANDROID_CLIENT_ID = "<enter your Android client secret>";
  static const IOS_CLIENT_ID = "<enter your iOS client secret>";
  static String getId() => Platform.isAndroid ? Secret.ANDROID_CLIENT_ID : Secret.IOS_CLIENT_ID;
}
Create a file called calendar_client.dart. Here, we will define all the operations (namely, insert, modify, and delete) to be performed using the Google Calendar API.
class CalendarClient {
  // For storing the CalendarApi object, this can be used
  // for performing all the operations
  static var calendar;

  // For creating a new calendar event
  Future<Map<String, String>> insert({
    @required String title,
    @required String description,
    @required String location,
    @required List<EventAttendee> attendeeEmailList,
    @required bool shouldNotifyAttendees,
    @required bool hasConferenceSupport,
    @required DateTime startTime,
    @required DateTime endTime,
  }) async {}

  // For patching an already-created calendar event
  Future<Map<String, String>> modify({
    @required String id,
    @required String title,
    @required String description,
    @required String location,
    @required List<EventAttendee> attendeeEmailList,
    @required bool shouldNotifyAttendees,
    @required bool hasConferenceSupport,
    @required DateTime startTime,
    @required DateTime endTime,
  }) async {}

  // For deleting a calendar event
  Future<void> delete(String eventId, bool shouldNotify) async {}
We will fill these methods in the next step.
Now, inside the main() method of the main.dart file, you can initialize the Firebase app and the get the OAuth permission for accessing the Google Calendar of an account.
import 'package:url_launcher/url_launcher.dart';
import 'package:firebase_core/firebase_core.dart';
import 'package:googleapis_auth/auth_io.dart';
import 'package:googleapis/calendar/v3.dart' as cal;

Future<void> main() async {
  WidgetsFlutterBinding.ensureInitialized();
  await Firebase.initializeApp();

  var _clientID = new ClientId(Secret.getId(), "");
  const _scopes = const [cal.CalendarApi.CalendarScope];
  await clientViaUserConsent(_clientID, _scopes, prompt).then((AuthClient client) async {
    CalendarClient.calendar = cal.CalendarApi(client);
  });

  runApp(MyApp());
}

void prompt(String url) async {
  if (await canLaunch(url)) {
    await launch(url);
  } else {
    throw 'Could not launch $url';
  }
}
Event configuration
An Event object is used for defining a calendar event. You can set various properties to it.
Adding some event information:
Event event = Event();

event.summary = title;
event.description = description;
event.attendees = attendeeEmailList;
event.location = location;
Adding the start and end time of the event:
EventDateTime start = new EventDateTime();
start.dateTime = startTime;
start.timeZone = "GMT+05:30";
event.start = start;

EventDateTime end = new EventDateTime();
end.timeZone = "GMT+05:30";
end.dateTime = endTime;
event.end = end;
Adding video conferencing support (this generates a Google Meet link):
ConferenceData conferenceData = ConferenceData();
CreateConferenceRequest conferenceRequest = CreateConferenceRequest();

// A unique ID should be used for every separate video conference event
conferenceRequest.requestId = "${startTime.millisecondsSinceEpoch}-${endTime.millisecondsSinceEpoch}";
conferenceData.createRequest = conferenceRequest;

event.conferenceData = conferenceData;
Defining calendar operations
You can perform various calendar operations using the Google Calendar API. We will be defining the most commonly used ones:
- insert(): For creating a new calendar event.
- patch(): For modifying some of the fields of the calendar event.
- delete(): For deleting a calendar event.
Creating a new event
You can create a new event using the Calendar API by using the insert method as follows:
String calendarId = "primary";

try {
  await calendar.events
      .insert(event, calendarId,
          conferenceDataVersion: hasConferenceSupport ? 1 : 0, sendUpdates: shouldNotifyAttendees ? "all" : "none")
      .then((value) {
    print("Event Status: ${value.status}");
    if (value.status == "confirmed") {
      print('Event added to Google Calendar');
    } else {
      print("Unable to add event to Google Calendar");
    }
  });
} catch (e) {
  print('Error creating event $e');
}
The insert method takes the Event object and a calendar ID to create a new event in Google Calendar. Here, we are using the calendar ID as “primary” to use the primary calendar (in case the account contains multiple calendars) of the logged-in user.
If you want to add video conferencing support, set conferenceDataVersion to “1”. Setting it to “0” assumes no conference data support and ignores conference data in the event’s body.
You can notify the attendees of the event by setting the property sendUpdates to “all”.
A “confirmed” status means that the event has been successfully added to the Google Calendar of the selected account.
To store the Google Meet link anywhere explicitly, you can retrieve it like this:
if (value.status == "confirmed") {
  String joiningLink;

  joiningLink = "https://meet.google.com/${value.conferenceData.conferenceId}";

  print('Event added to Google Calendar');
}
The complete insert method will be as follows:
Future<Map<String, String>> insert({
  @required String title,
  @required String description,
  @required String location,
  @required List<EventAttendee> attendeeEmailList,
  @required bool shouldNotifyAttendees,
  @required bool hasConferenceSupport,
  @required DateTime startTime,
  @required DateTime endTime,
}) async {
  Map<String, String> eventData;

  // If the account has multiple calendars, then select the "primary" one
  String calendarId = "primary";
  Event event = Event();

  event.summary = title;
  event.description = description;
  event.attendees = attendeeEmailList;
  event.location = location;

  if (hasConferenceSupport) {
    ConferenceData conferenceData = ConferenceData();
    CreateConferenceRequest conferenceRequest = CreateConferenceRequest();
    conferenceRequest.requestId = "${startTime.millisecondsSinceEpoch}-${endTime.millisecondsSinceEpoch}";
    conferenceData.createRequest = conferenceRequest;

    event.conferenceData = conferenceData;
  }

  EventDateTime start = new EventDateTime();
  start.dateTime = startTime;
  start.timeZone = "GMT+05:30";
  event.start = start;

  EventDateTime end = new EventDateTime();
  end.timeZone = "GMT+05:30";
  end.dateTime = endTime;
  event.end = end;

 try {
   await calendar.events
       .insert(event, calendarId,
           conferenceDataVersion: hasConferenceSupport ? 1 : 0, sendUpdates: shouldNotifyAttendees ? "all" : "none")
       .then((value) {
     print("Event Status: ${value.status}");
     if (value.status == "confirmed") {
       String joiningLink;
       String eventId;

        eventId = value.id;

        if (hasConferenceSupport) {
          joiningLink = "https://meet.google.com/${value.conferenceData.conferenceId}";
        }

        eventData = {'id': eventId, 'link': joiningLink};

        print('Event added to Google Calendar');
      } else {
        print("Unable to add event to Google Calendar");
      }
    });
  } catch (e) {
    print('Error creating event $e');
  }

  return eventData;
}
Modifying an event
You can modify the fields of the event by using the patch method:
String calendarId = "primary";

try {
  await calendar.events
      .patch(event, calendarId, id,
          conferenceDataVersion: hasConferenceSupport ? 1 : 0, sendUpdates: shouldNotifyAttendees ? "all" : "none")
      .then((value) {
    print("Event Status: ${value.status}");
      print('Event updated in Google Calendar');
    } else {
      print("Unable to update event in Google Calendar");
    }
  });
} catch (e) {
  print('Error updating event $e');
}
In addition to the modified Event object and the calendar ID, you have to provide one more property to it: the id of the event that you want to modify.
Most of the remaining properties are similar to the insert method. The complete modify method is given below:
Future<Map<String, String>> modify({
  @required String id,
  @required String title,
  @required String description,
  @required String location,
  @required List<EventAttendee> attendeeEmailList,
  @required bool shouldNotifyAttendees,
  @required bool hasConferenceSupport,
  @required DateTime startTime,
  @required DateTime endTime,
}) async {
  Map<String, String> eventData;

  String calendarId = "primary";
  Event event = Event();

  event.summary = title;
  event.description = description;
  event.attendees = attendeeEmailList;
  event.location = location;

  EventDateTime start = new EventDateTime();
  start.dateTime = startTime;
  start.timeZone = "GMT+05:30";
  event.start = start;

  EventDateTime end = new EventDateTime();
  end.timeZone = "GMT+05:30";
  end.dateTime = endTime;
  event.end = end;

  try {
    await calendar.events
        .patch(event, calendarId, id,
            conferenceDataVersion: hasConferenceSupport ? 1 : 0, sendUpdates: shouldNotifyAttendees ? "all" : "none")
        .then((value) {
      print("Event Status: ${value.status}");
      if (value.status == "confirmed") {
        String joiningLink;
        String eventId;

        eventId = value.id;

        if (hasConferenceSupport) {
          joiningLink = "https://meet.google.com/${value.conferenceData.conferenceId}";
        }

        eventData = {'id': eventId, 'link': joiningLink};

        print('Event updated in Google Calendar');
      } else {
        print("Unable to update event in Google Calendar");
      }
    });
  } catch (e) {
    print('Error updating event $e');
  }

  return eventData;
}
Deleting an event
You can simply delete an event by using the delete method of the Calendar API. You just have to pass the calendar ID and the id of the event that you want to delete. The method is as follows:
Future<void> delete(String eventId, bool shouldNotify) async {
  String calendarId = "primary";

  try {
    await calendar.events.delete(calendarId, eventId, sendUpdates: shouldNotify ? "all" : "none").then((value) {
      print('Event deleted from Google Calendar');
    });
  } catch (e) {
    print('Error deleting event: $e');
  }
}
Create a model class
You can create a model class for handling the event data. We will create a class called EventInfo containing two methods: fromMap() for retrieving data from the database in a structured format and toJson() for converting the event data to a JSON format that can be easily uploaded to the database.
import 'package:flutter/material.dart';

class EventInfo {
  final String id;
  final String name;
  final String description;
  final String location;
  final String link;
  final List<dynamic> attendeeEmails;
  final bool shouldNotifyAttendees;
  final bool hasConfereningSupport;
  final int startTimeInEpoch;
  final int endTimeInEpoch;

  EventInfo({
    @required this.id,
    @required this.name,
    @required this.description,
    @required this.location,
    @required this.link,
    @required this.attendeeEmails,
    @required this.shouldNotifyAttendees,
    @required this.hasConfereningSupport,
    @required this.startTimeInEpoch,
    @required this.endTimeInEpoch,
  });

  EventInfo.fromMap(Map snapshot)
      : id = snapshot['id'] ?? '',
        name = snapshot['name'] ?? '',
        description = snapshot['desc'],
        location = snapshot['loc'],
        link = snapshot['link'],
        attendeeEmails = snapshot['emails'] ?? '',
        shouldNotifyAttendees = snapshot['should_notify'],
        hasConfereningSupport = snapshot['has_conferencing'],
        startTimeInEpoch = snapshot['start'],
        endTimeInEpoch = snapshot['end'];

  toJson() {
    return {
      'id': id,
      'name': name,
      'desc': description,
      'loc': location,
      'link': link,
      'emails': attendeeEmails,
      'should_notify': shouldNotifyAttendees,
      'has_conferencing': hasConfereningSupport,
      'start': startTimeInEpoch,
      'end': endTimeInEpoch,
    };
  }
}
CRUD operations on Cloud Firestore
Let’s start defining the CRUD operations on the Cloud Firestore database for storing and managing the event information.
First of all, create a new file called storage.dart. Inside it, define a collection and the main document in which all the event data will be stored. Create a class Storage, and define the CRUD operations inside it.
import 'package:cloud_firestore/cloud_firestore.dart';
import 'package:events_demo/models/event_info.dart';
import 'package:flutter/material.dart';

final CollectionReference mainCollection = FirebaseFirestore.instance.collection('event');
final DocumentReference documentReference = mainCollection.doc('test');

class Storage {
  Future<void> storeEventData(EventInfo eventInfo) async {}

  Future<void> updateEventData(EventInfo eventInfo) async {}

  Future<void> deleteEvent({@required String id}) async {}

  Stream<QuerySnapshot> retrieveEvents() {}
}
Create event
This method takes an EventInfo object and stores the event data in the database.
Future<void> storeEventData(EventInfo eventInfo) async {
  DocumentReference documentReferencer = documentReference.collection('events').doc(eventInfo.id);

  Map<String, dynamic> data = eventInfo.toJson();

  print('DATA:n$data');

  await documentReferencer.set(data).whenComplete(() {
    print("Event added to the database, id: {${eventInfo.id}}");
  }).catchError((e) => print(e));
}
Retrieve events
You can use this method for retrieving all the events from the database, sorted according to the start field in ascending order.
Stream<QuerySnapshot> retrieveEvents() {
  Stream<QuerySnapshot> myClasses = documentReference.collection('events').orderBy('start').snapshots();

  return myClasses;
}
Update event
This method takes an EventInfo object and updates the event data in the database.
Future<void> updateEventData(EventInfo eventInfo) async {
  DocumentReference documentReferencer = documentReference.collection('events').doc(eventInfo.id);

  Map<String, dynamic> data = eventInfo.toJson();

  print('DATA:n$data');

  await documentReferencer.update(data).whenComplete(() {
    print("Event updated in the database, id: {${eventInfo.id}}");
  }).catchError((e) => print(e));
}
Delete event
You can use this method for deleting an event from the database by passing the event ID.
Future<void> deleteEvent({@required String id}) async {
  DocumentReference documentReferencer = documentReference.collection('events').doc(id);

  await documentReferencer.delete().catchError((e) => print(e));

  print('Event deleted, id: $id');
}
App in action
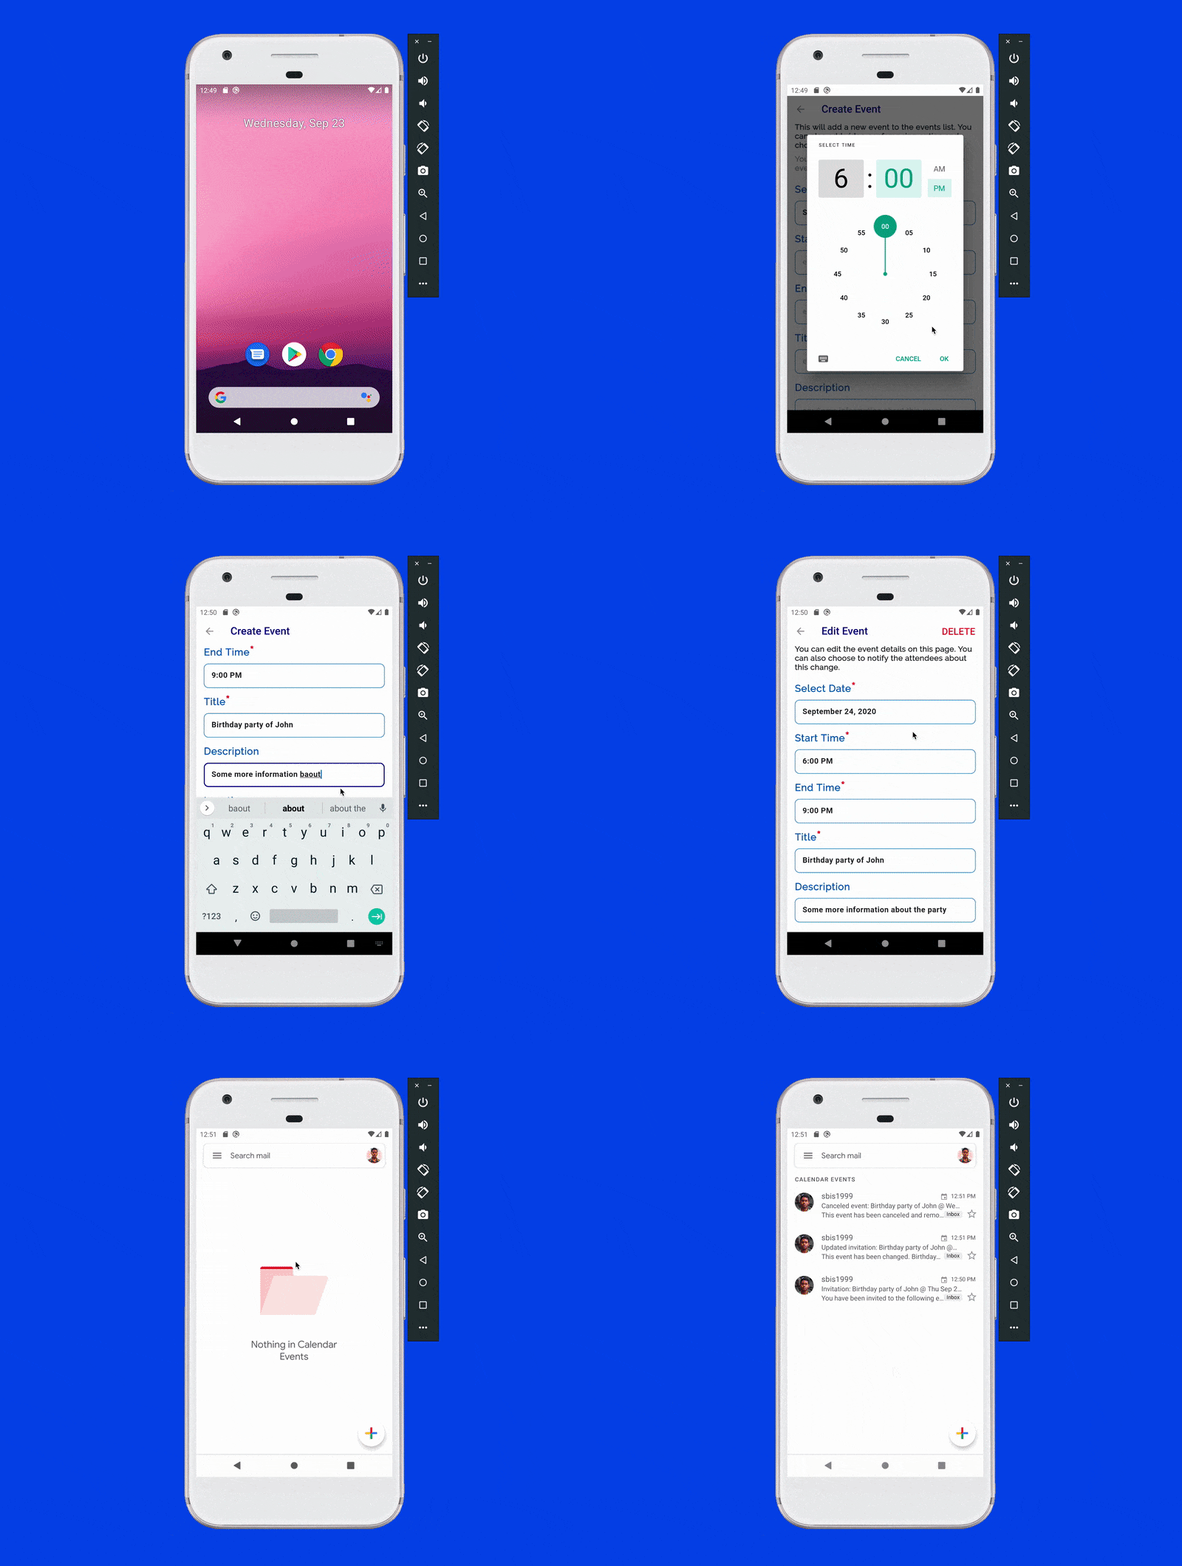
We have successfully created our app for scheduling and managing Google Calendar events. We have added video conferencing support to it and functionality for notifying the attendees using email invites. Finally, we have connected the app to Firebase for keeping track of the events that are generated from our app.
A small demo of the completed app:
Conclusion
Here, I have only focused on the functionalities, but if you want to take a look at the UI code, head over to the GitHub repository of this project, which is linked below.
There are several other properties that you can use while generating a new calendar event: You can create a recurrence event, set a reminder at a specific time, and many more.
Learn more
Souvik Biswas is a passionate Mobile App Developer (Android and Flutter). He has worked on a number of mobile apps throughout his journey. Loves open source contribution on GitHub. He is currently pursuing a B.Tech degree in Computer Science and Engineering from Indian Institute of Information Technology Kalyani. He also writes Flutter articles on Medium – Flutter Community.





Discussion about this post