









This is a getting started guide on building native Android apps with Codemagic CI/CD. Written and updated by Souvik Biswas in June 2021.
In this article, we’ll cover how to configure the codemagic.yaml file for building Native Android projects on Codemagic CI/CD. Since the codemagic.yaml file was introduced, it has been a lot easier to keep your build configurations more organized and manage all your workflows with just a single file. This file can be committed to version control and gets automatically detected during builds from the Codemagic UI.
Though Codemagic does not come with support for building native Android and iOS apps directly from the UI, you can easily configure the codemagic.yaml file for building native apps. In this article, you will learn how to configure the codemagic.yaml file for building native Android projects on Codemagic.
We recommend going through the article to gain a better understanding, but if you already have experience using the
codemagic.yamlfile, you can get the YAML template for a native Android project here.
Now, we will go through the steps to show how easy it is to set up CI/CD for your native Android app using Codemagic CI/CD.
Android continuous integration: Getting started with Codemagic
Make sure that your native Android project is uploaded to a code hosting platform (like GitHub, Bitbucket or GitLab) using a version control system.
- Log in to Codemagic. If you’re not a user, then sign up:
-
On the Applications page, click Add application:
-
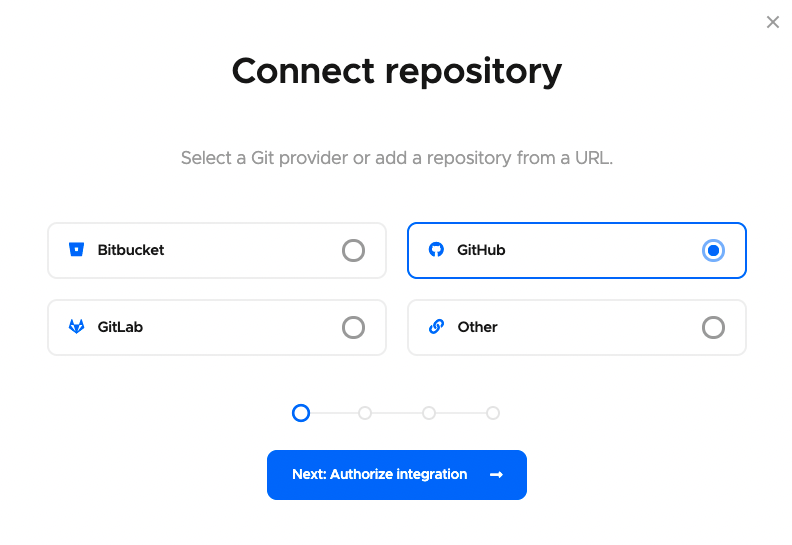
Select a Git provider (or select Other if you want to add using the clone URL of a repository) you want to use:
-
Click Next: Authorize integration to authorize Codemagic. If you have already authorized your selected Git provider, click Next: Select repository instead.
If you are using GitHub as your Git provider then there is one additional step before selecting repository, click Install GitHub App to set up the integration. Know more about configuring GitHub App integration here.
-
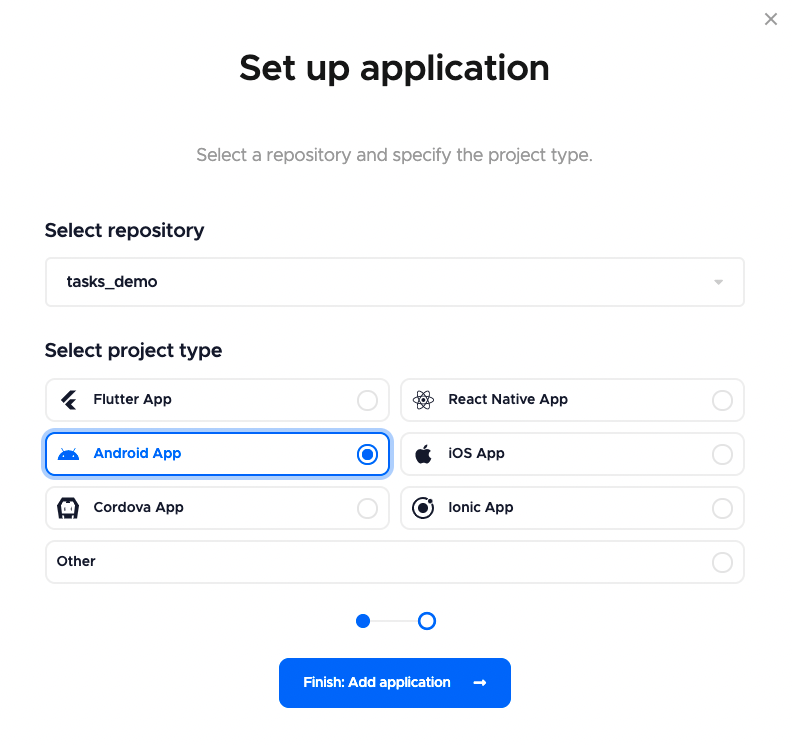
Now, select your repository (or add the clone URL if using Others) and select the project type, click Finish: Add application:
-
You will be taken to the project settings. Here, you will see text saying that there is No configuration file found because we haven’t yet added a
codemagic.yamlfile to the project.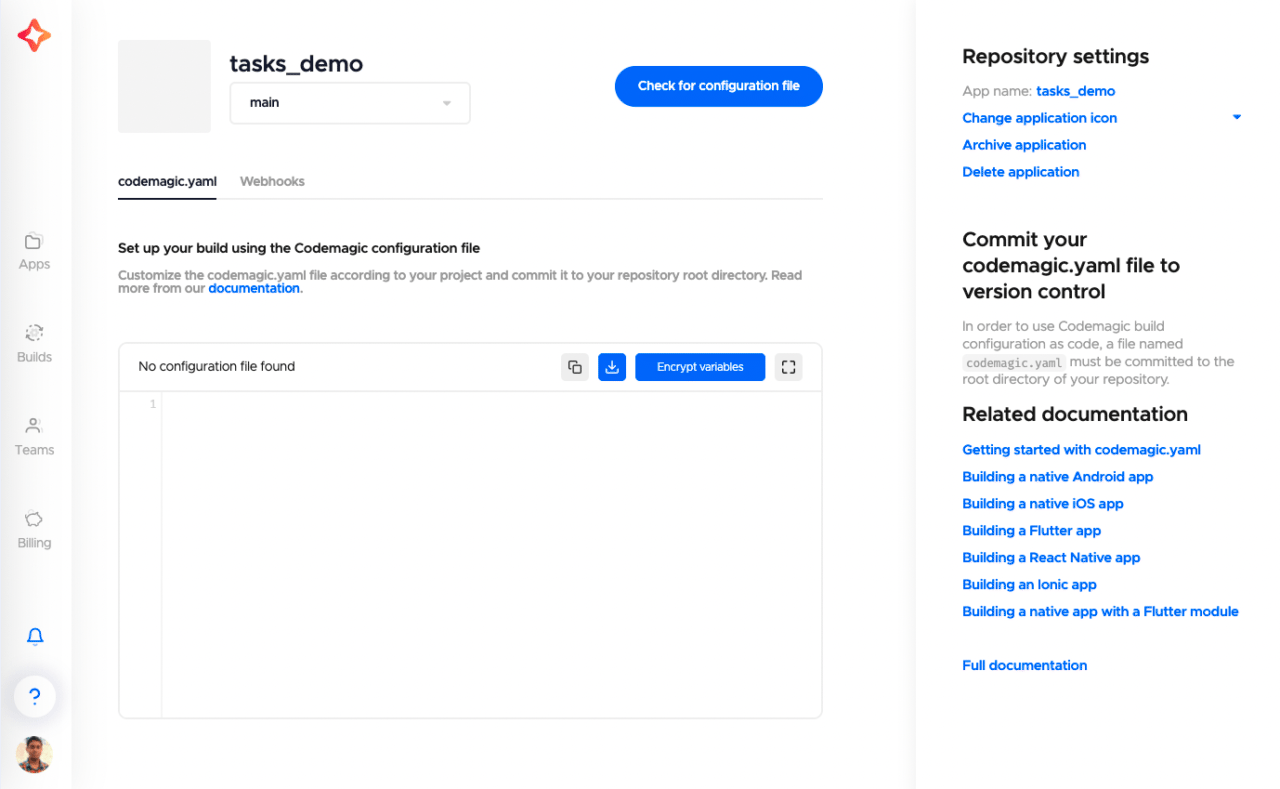
You will also see some links to the documentation, which will help you get started with your Android project using
codemagic.yaml.
Android workflow example
You can get an example codemagic.yaml Android workflow from here. This example YAML file contains a lot of configurations, so feel free to modify this file as per your needs.
The basic structure of a simple Android workflow looks like this:
workflows:
  simple-workflow:
    name: Native Android
    max_build_duration: 60
    scripts:
      - name: Run tests
        script: ./gradlew test
      - name: Build debug apk
        script: ./gradlew assembleDebug
    artifacts:
      - app/build/**/outputs/**/*.apk
    publishing:
      email:
        recipients:
          - sbis1999@gmail.com
In the above example, simple-workflow is the workflow ID, and Native Android is the workflow name. You can change these two names to whatever is suitable for your project.
This simple workflow will help you to generate a debug build of your Android app.
Deep dive into YAML
Let’s take a closer look at the codemagic.yaml file and understand the real power it has.
Scripts
For running local unit tests defined in your Android project, you can add the following to the scripts section of the YAML file:
Running instrumented unit tests:
./gradlew connectedAndroidTest
You will also need to start up an Android emulator in order to run the instrumented unit tests. Add the following command:
emulator -avd emulator > /dev/null 2>&1 &
The & is placed at the end of this command to run the emulator in the background; otherwise, the emulator command blocks the terminal and prevents any further commands from being executed. > /dev/null 2>&1 is used to ignore all outputs of this command.
TIP: It is better to add this command at the beginning of the script, as the emulator takes some time to start up.
Building the app in debug mode:
Artifacts
You can get the generated .apk file by adding its path under the artifacts. Normally, the path looks like this:
artifacts:
  - app/build/**/outputs/**/*.apk
Publishing
To get a report of the build along with the generated artifacts in your email, specify the following:
publishing:
  email:
    recipients:
      - name@example.com # enter your email id here
For more information about publishing, refer to this link.
Setting up your Android project for a release build
First of all, you have to set up code signing for generating a release build.
Generating a keystore
If you haven’t already created a keystore, you can use the following command from your terminal to generate one.
keytool -genkey -v -keystore keystore_name.keystore -alias alias_name -keyalg RSA -keysize 2048 -validity 10000
Please run this command in the directory where you want to store this keystore file. This is a very important file for your app, as you will need it in order to publish your future app updates to the Google Play Store.
Configuring your project
Follow the steps below to prepare your project for a release build:
-
Open your project using Android Studio.
-
Switch to the Project View.
-
Inside the root project folder, create a new file called
key.properties. -
Add the following to this file:
storePassword=<enter keystore password>
keyPassword=<enter key alias password>
keyAlias=<enter key alias name>
storeFile=<enter .keystore file path>
Replace the angle brackets and their content with the appropriate values.
-
Save the file and add it to
.gitignoreso that you do not commit this file by mistake. -
Now, switch to the Android View, and go to the app-level
build.gradle. -
Add the following to this file:
def keystorePropertiesFile= rootProject.file("key.properties") def keystoreProperties = new Properties() keystoreProperties.load(new FileInputStream(keystorePropertiesFile)) // Add above this line android { -
Add the signingConfigs:
signingConfigs { config { keyAlias keystoreProperties['keyAlias'] keyPassword keystoreProperties['keyPassword'] storeFile file(keystoreProperties['storeFile']) storePassword keystoreProperties['storePassword'] } } -
Inside buildTypes release, add the following:
buildTypes {
    release {
        //...
        signingConfig signingConfigs.config
    }
}
Modifying YAML for code signing
You will need the keystore file to sign your build. To get access to it, you will also need the key.properties file.
As you have added the key.properties file to .gitignore, it won’t be available during a build on Codemagic. So you can encrypt all the sensitive information and add it to the codemagic.yaml file for generating the key.properties file, which, in turn, can be used to unlock the .keystore file.
Follow the steps below to encrypt your sensitive information:
Now, create a new workflow called release-workflow for the release build and add the following:
release-workflow:
  name: Native Android
  max_build_duration: 60
  environment:
    vars:
      CM_KEYSTORE: # Add encrypted keystore file
      CM_KEYSTORE_PASSWORD: # Add encrypted keystore password
      CM_KEY_ALIAS_PASSWORD: # Add encrypted alias password
      CM_KEY_ALIAS_USERNAME: # Add alias name
  scripts: # Add the build configurations here
  artifacts:
    - app/build/**/outputs/**/*.apk
  publishing:
    email:
      recipients:
        - sbis1999@gmail.com
Generate the encrypted version of the file and the variables, and add them to the appropriate keys of the environment variables.
Let’s define the build script now.
First of all, you have to decrypt the .keystore file and generate the key.properties file.
scripts:
  # ...
  - |
    # set up release keystore
    echo $CM_KEYSTORE | base64 --decode > /tmp/keystore.keystore
    cat >> "$CM_BUILD_DIR/key.properties" <<EOF
    storePassword=$CM_KEYSTORE_PASSWORD
    keyPassword=$CM_KEY_ALIAS_PASSWORD
    keyAlias=$CM_KEY_ALIAS_USERNAME
    storeFile=/tmp/keystore.keystore
    EOF
Then, you can add tests as usual and use the following command to generate a release build:
./gradlew assembleRelease
You have successfully completed the setup for generating a release build of your app.
Releasing to the Google Play Store
If you want to allow Codemagic to publish your apps directly to the Google Play Store, you have to set up access using the Google Play API.
NOTE: You have to manually upload the very first version of the app to the Google Play Store. You can download the
app-release.apkfile from the artifacts generated by Codemagic and upload it to the Play Store.
Create a service account
You will need to set up a service account in order to access the API using Codemagic without providing your personal user credentials.
-
Go to Google Play Console.
-
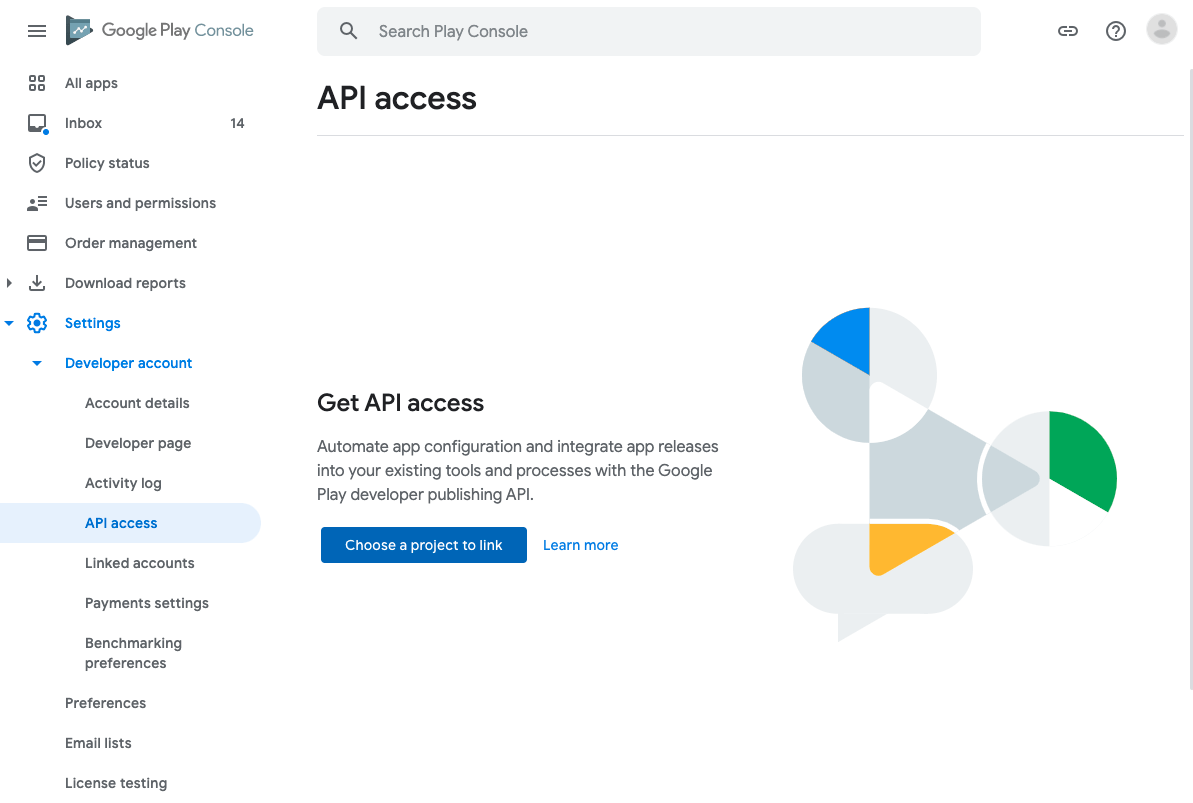
Navigate to Settings > Developer account > API access, and click on Choose a project to link.
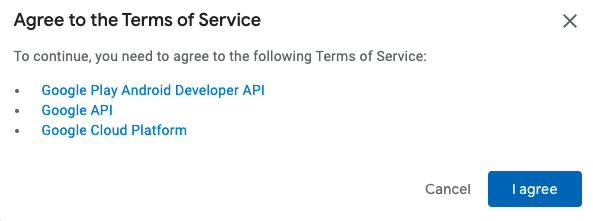
- Click I agree on the Terms of Service dialog box.
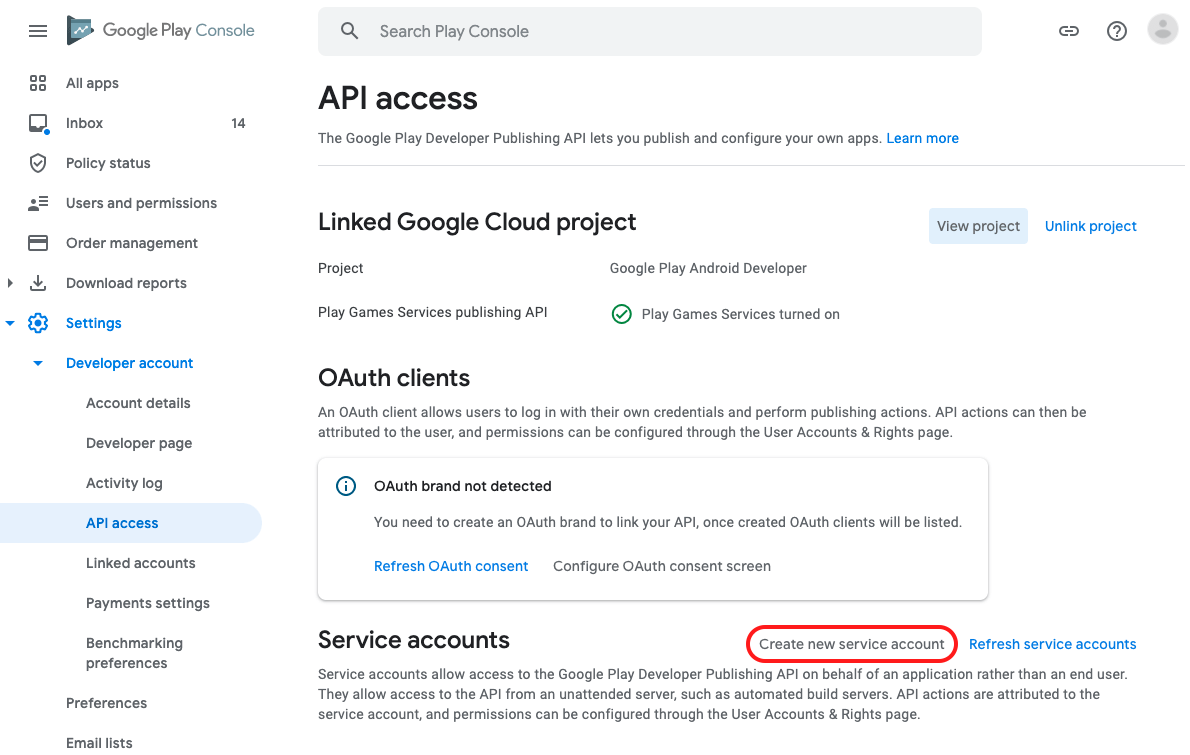
- On the API access page, click on Create new service account in the Service accounts section.
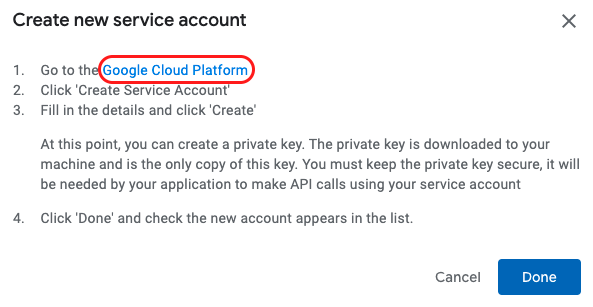
- You will see a dialog box pop up. Click on the link to the Google Cloud Platform given in the first step.
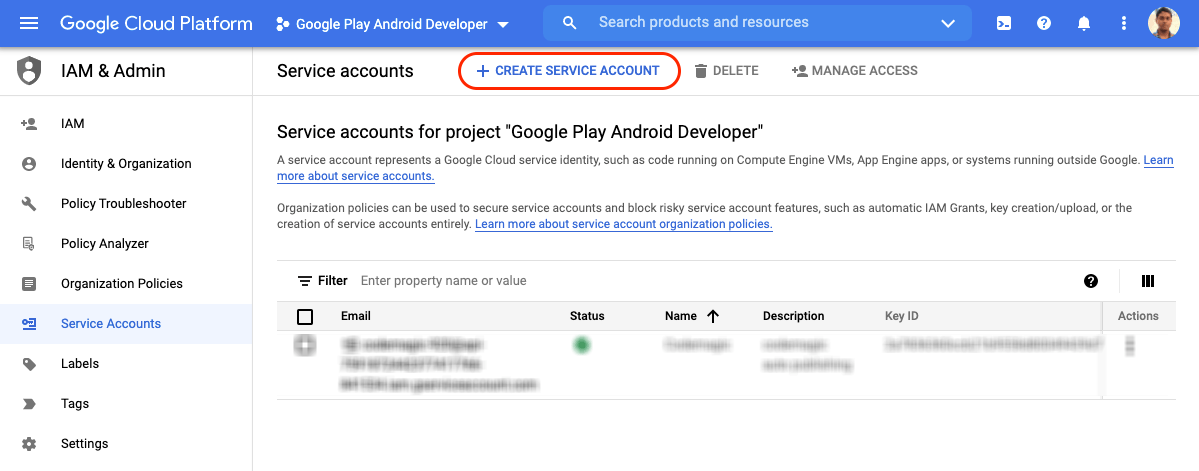
- This will lead you to the Google Cloud Platform in Service accounts. Make sure that you have
Google Play Android Developerselected within the dropdown menu at the top of the screen. Then click on CREATE SERVICE ACCOUNT.
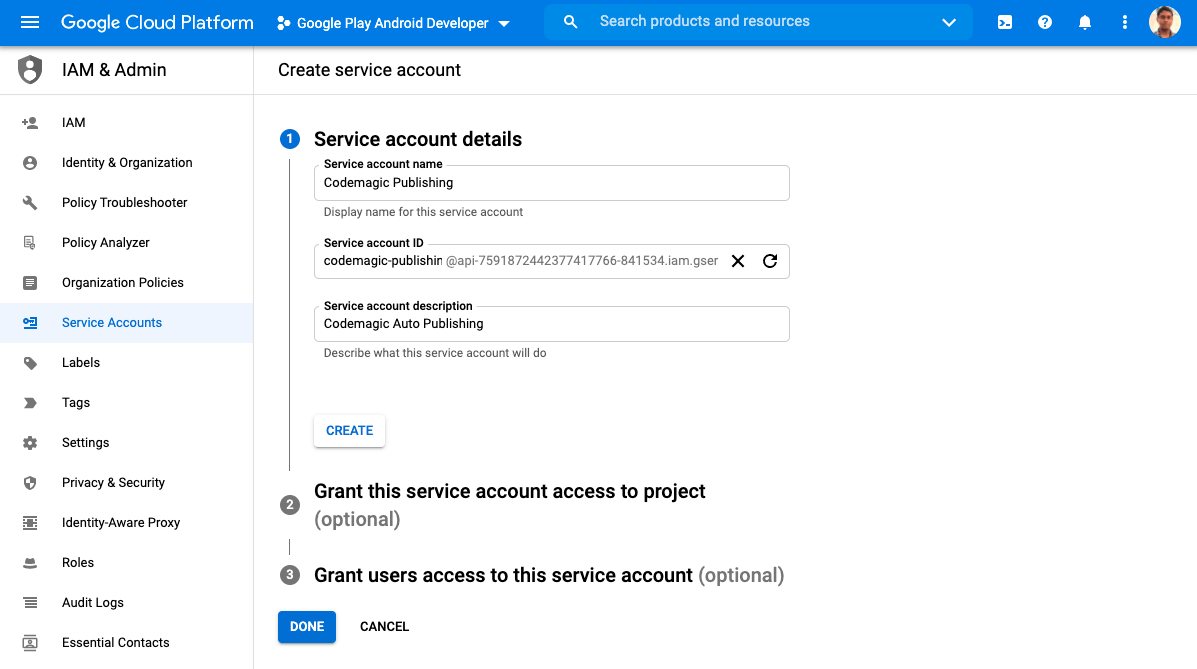
- In step 1, you have to enter a Service account name and description. Then, click on CREATE.
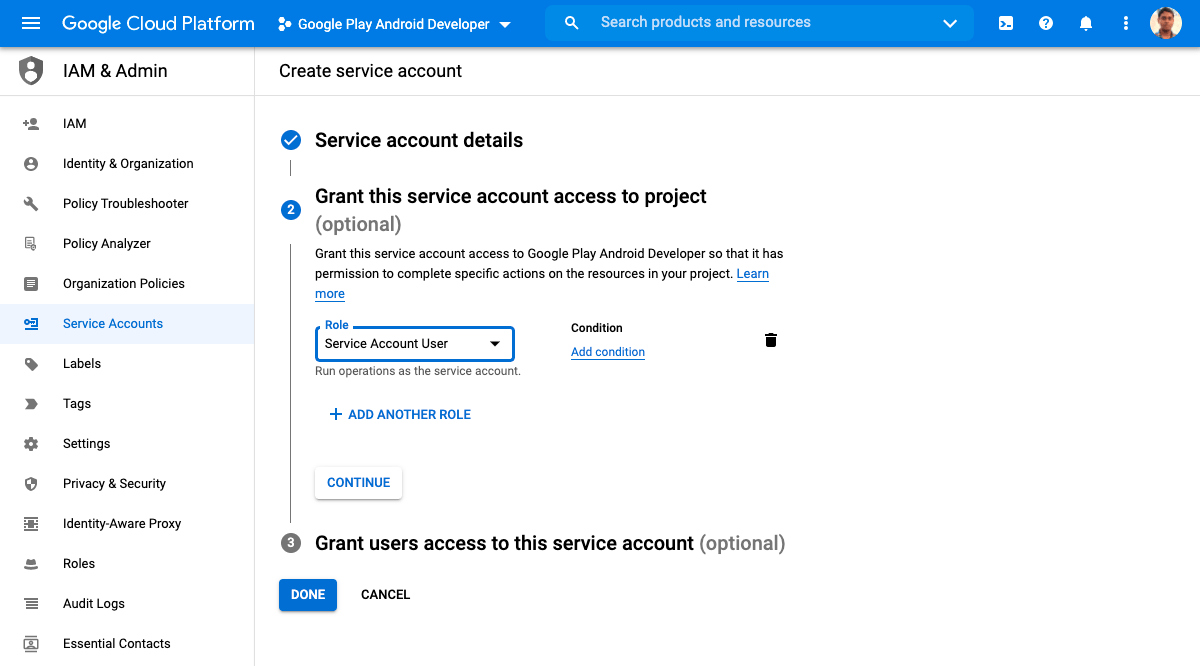
- In step 2, you have to select Role from the dropdown menu. Choose Service Account > Service Account User. Then, click on CONTINUE.
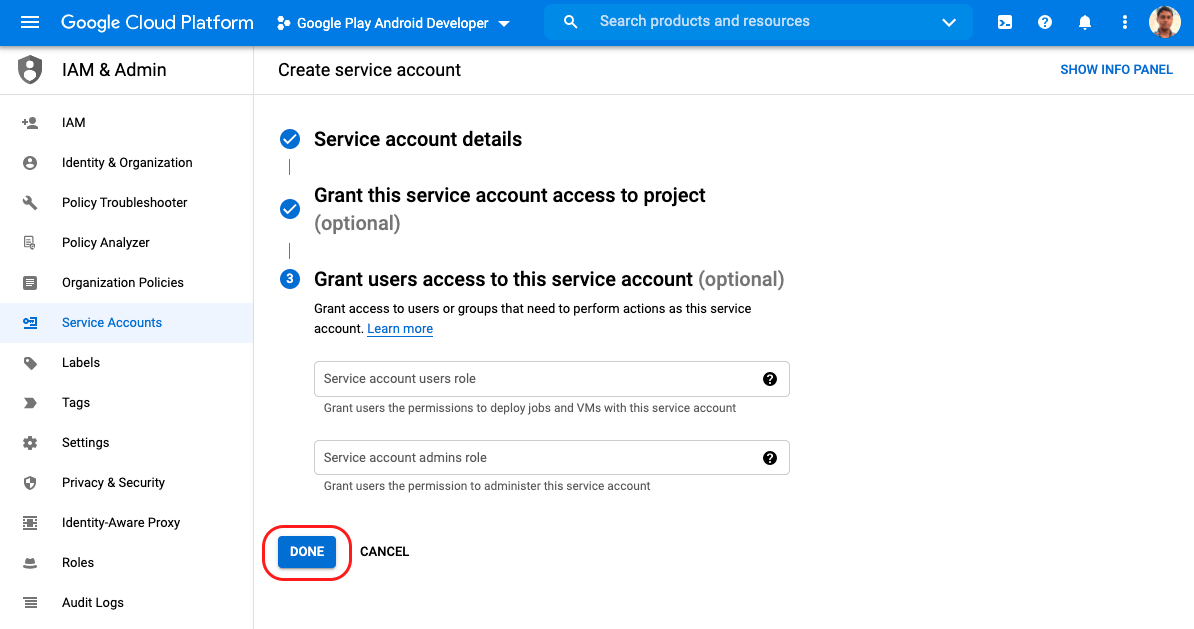
- You don’t need to enter anything in step 3. Just click on DONE at the bottom.
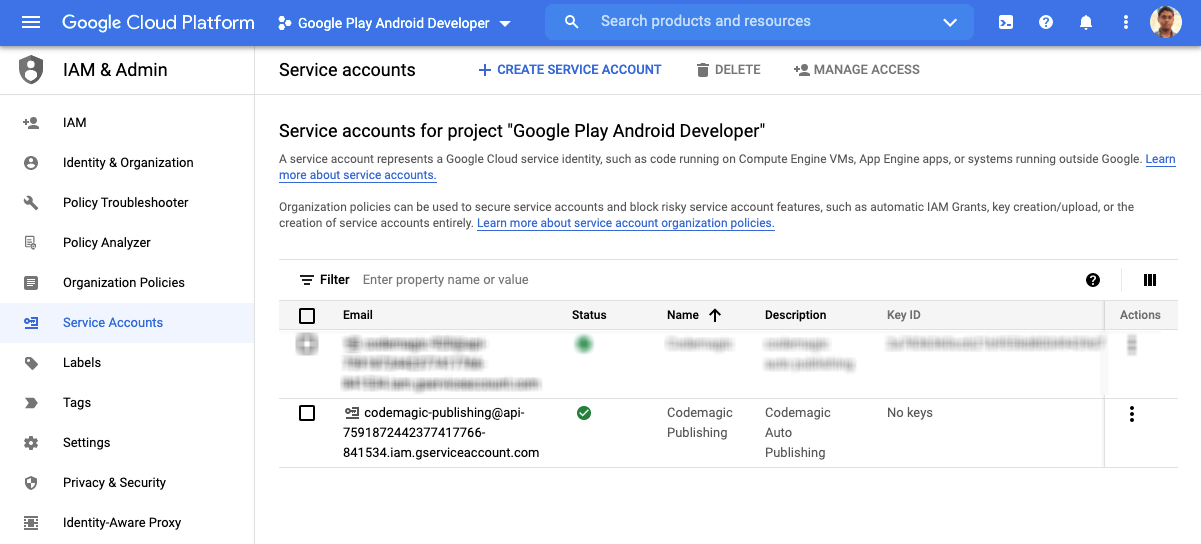
- You will notice a new service account appear inside your Google Cloud Platform, but there is no key associated with it.
-
To generate a new key, under the Actions section, click on the three dots and select Manage keys.
-
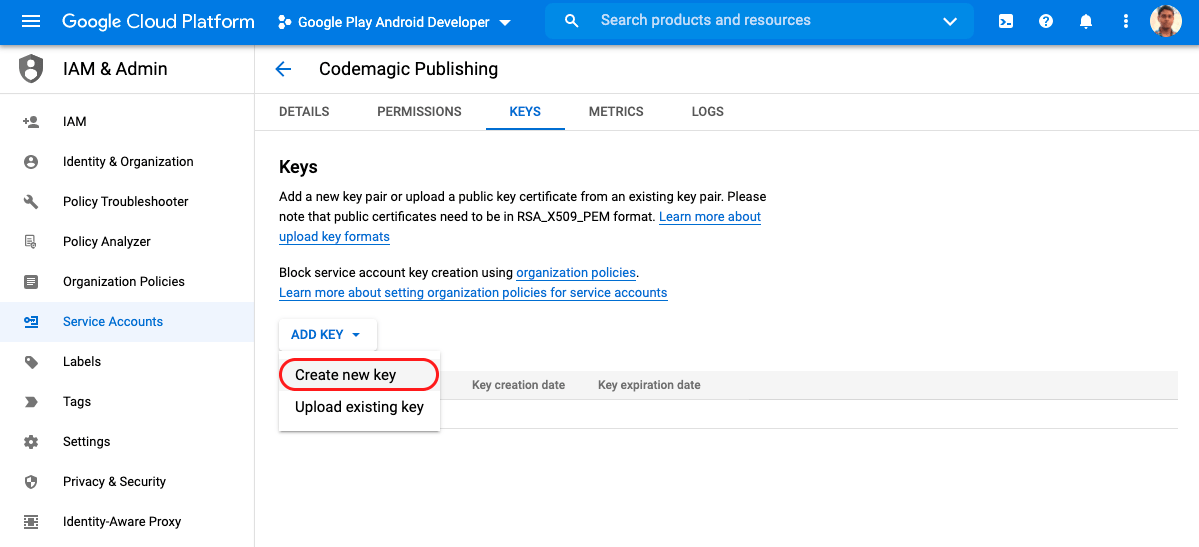
On the Keys page, click on ADD KEY and select Create new key.
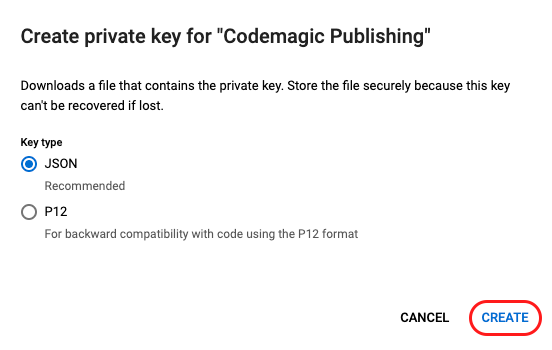
- Keep the Key type as
JSON. Click on CREATE.
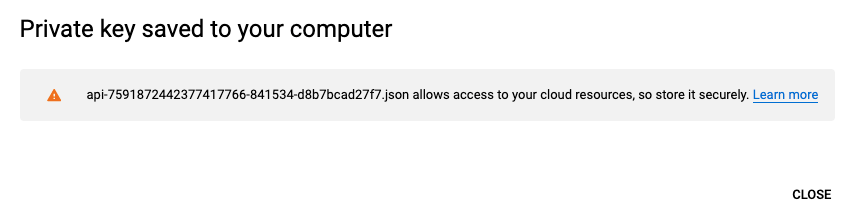
- This will download a private key for this service account. Keep it in a safe place. You will also need this key to configure auto-publishing from Codemagic.
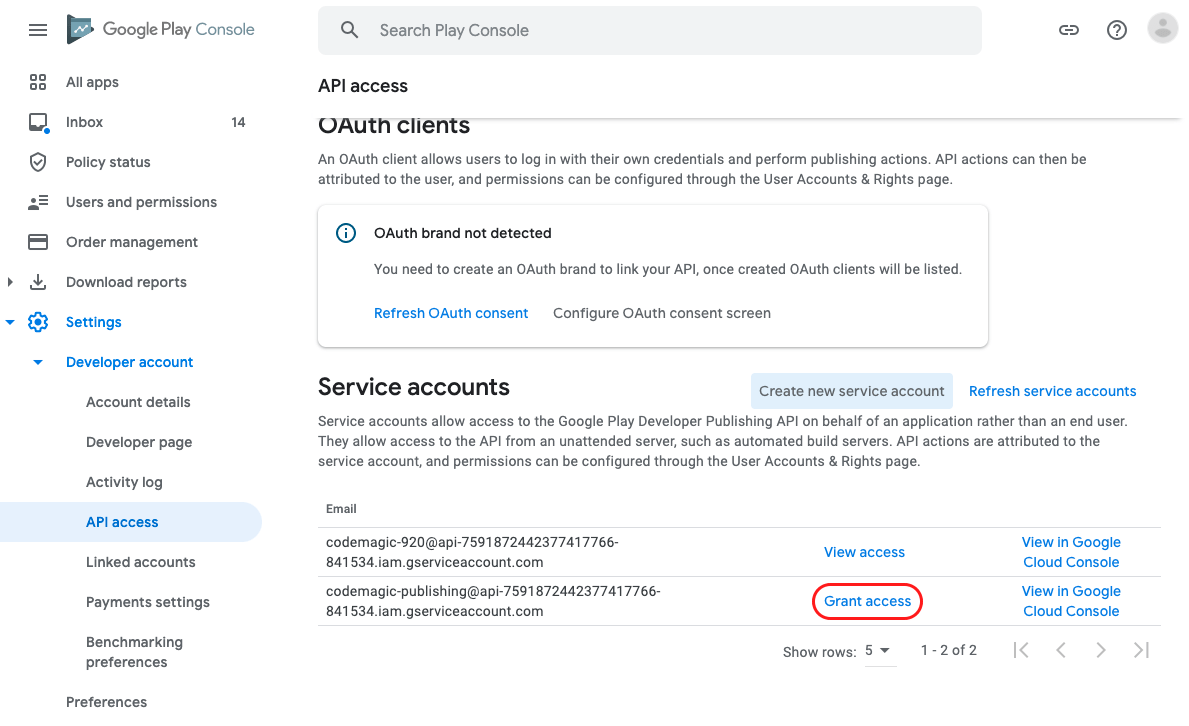
- Go back to the Google Play Console in Service Accounts. You will see that a new service account is listed with the name that you created. Click on Grant access.
- On the App permissions tab, add the applications you wish to grant access to. Go with the default settings for app permissions and click Apply. On the Account permissions tab, leave the default selections, and click on Invite user.
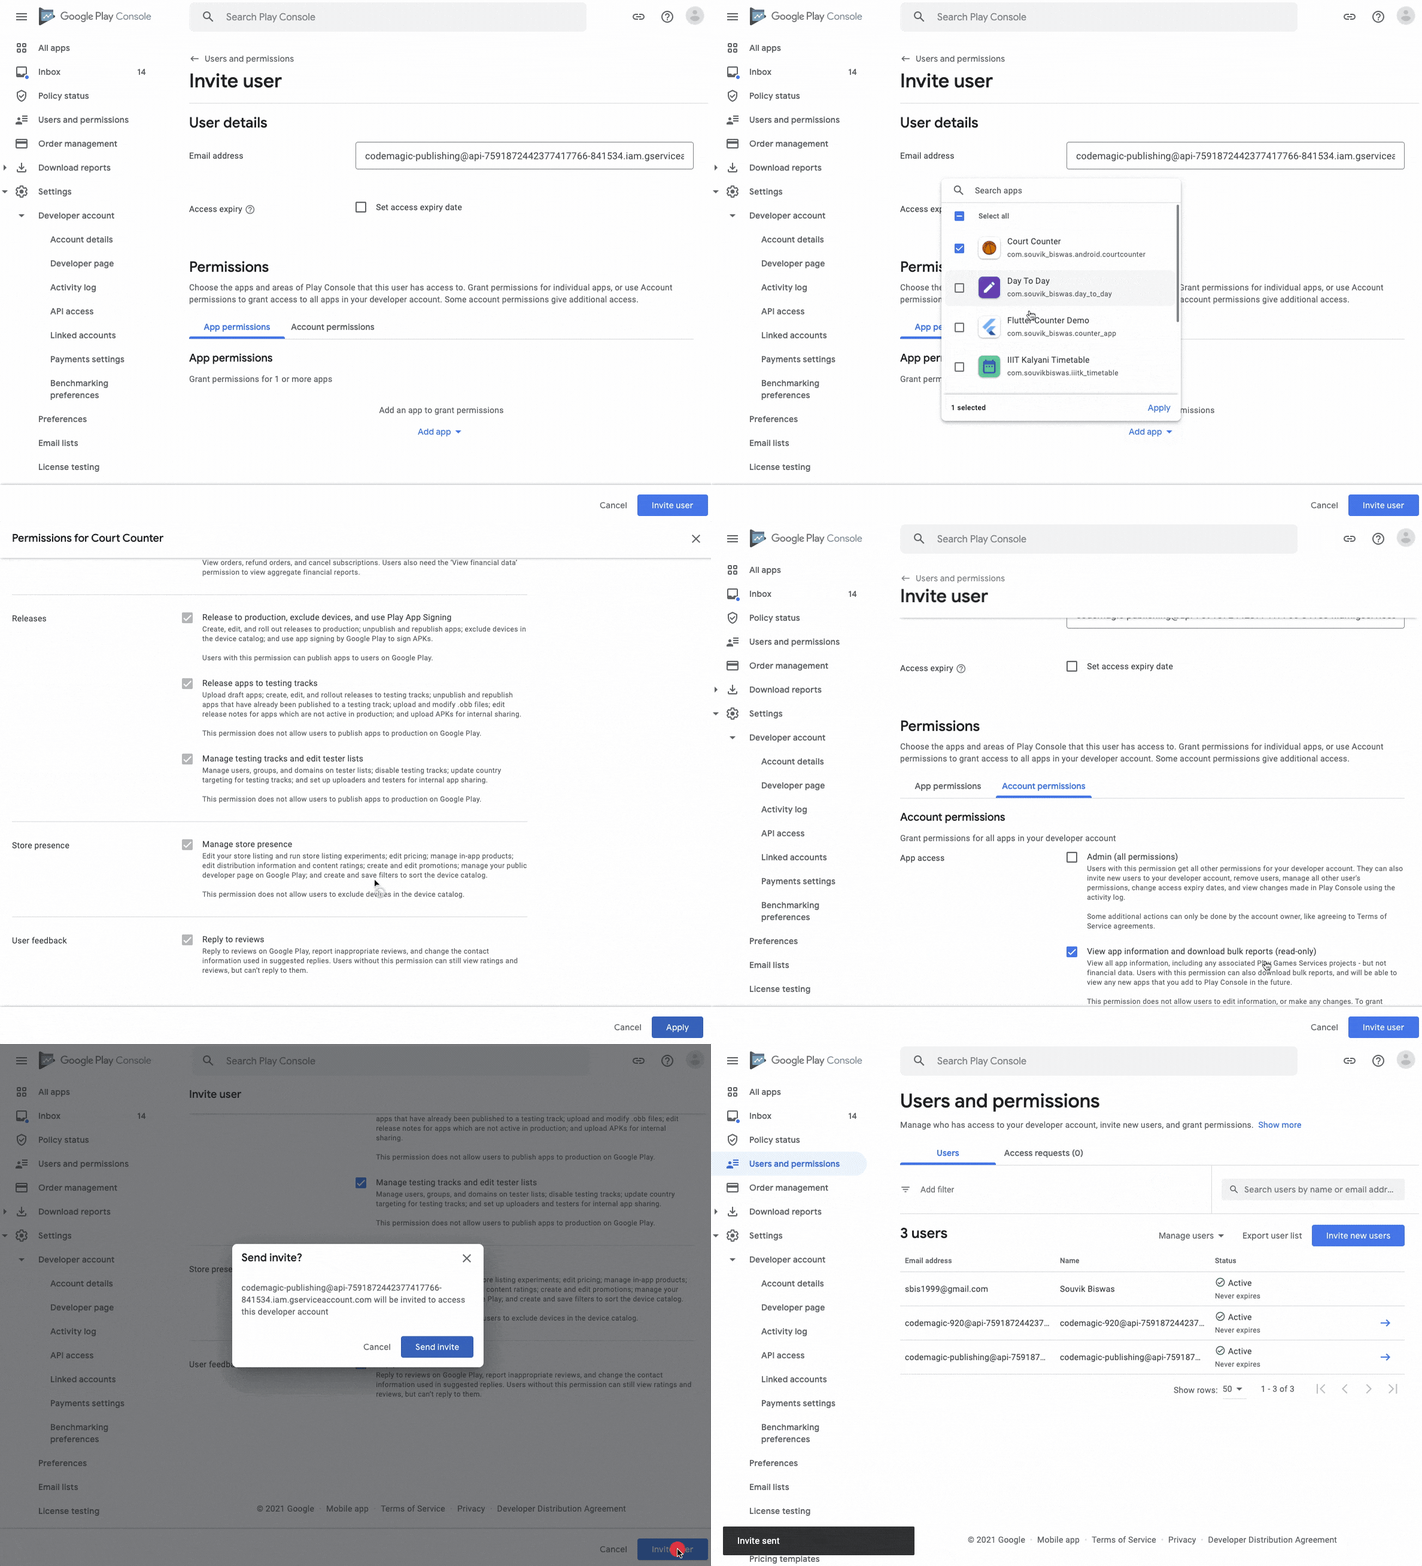
This completes the setup of your service account on Google Play Console.
Configuring auto-publishing on Codemagic
In order to automate the publishing of your app to Google Play using Codemagic, you have to connect the service account.
-
Go to the
codemagic.yamlfile inside your project directory. -
Inside the
publishingsection of the YAML file, you can add Google Play support using the following:publishing: email: recipients: - name@example.com # Add the following to the script: google_play: credentials: <Encrypted file> track: <Name of the track> -
You have to encrypt the JSON file that you downloaded previously and set it to the
credentialsvariable. You can encrypt the file by going to the project settings from the Codemagic UI. Then, click Encrypt variables button, and simply drag and drop the file.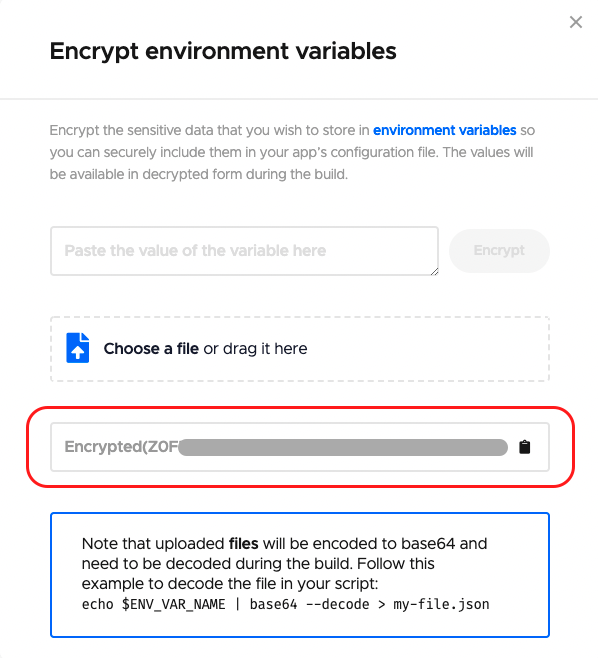
Copy the generated encrypted string, and set it to the
credentialsvariable. -
Set the
trackvariable to the Google Play destination track under which you want to publish the app.
Now, you are ready to publish your app to the Google Play Store using Codemagic. To learn how to start the build, move on to the next section.
Building an Android project on Codemagic
Before starting a build on Codemagic, make sure that you have committed the codemagic.yaml file to the version control system.
Follow the steps below to start a build:
-
Go to your project settings, and click on Start your first build.
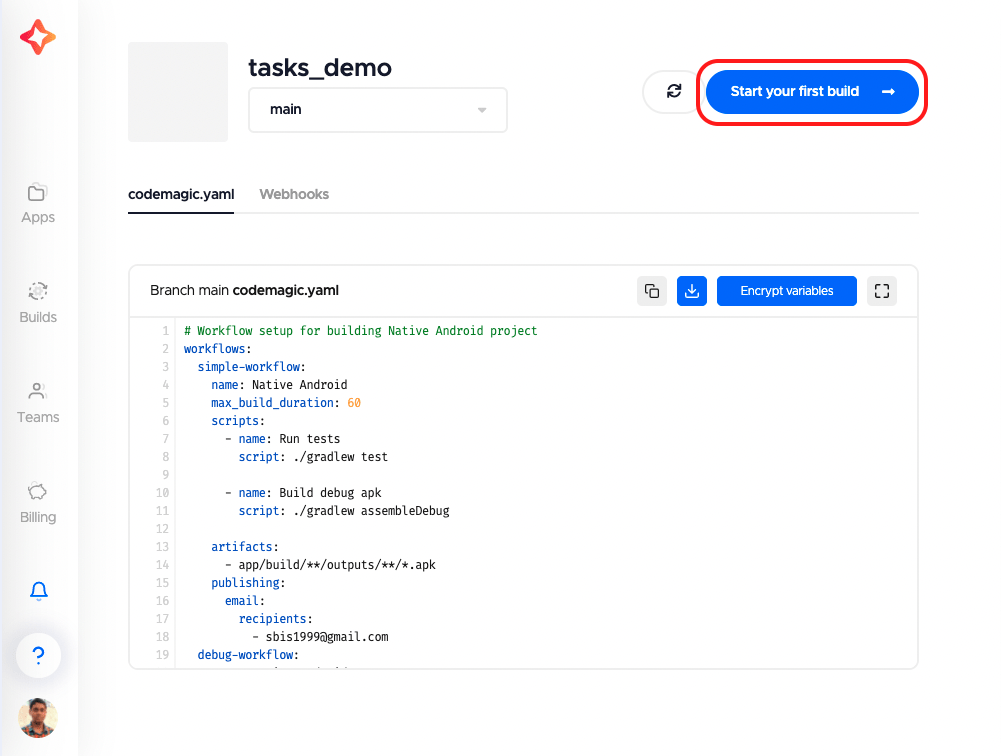
-
Select a workflow, and click on Start new build.
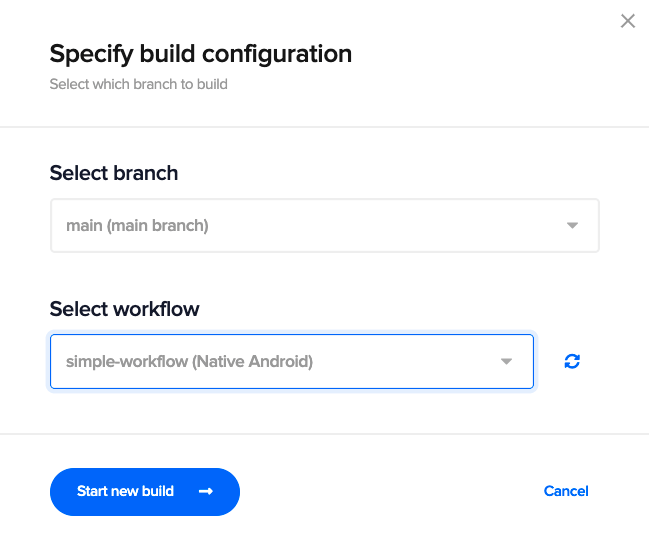
This will start a new build for your native Android project.
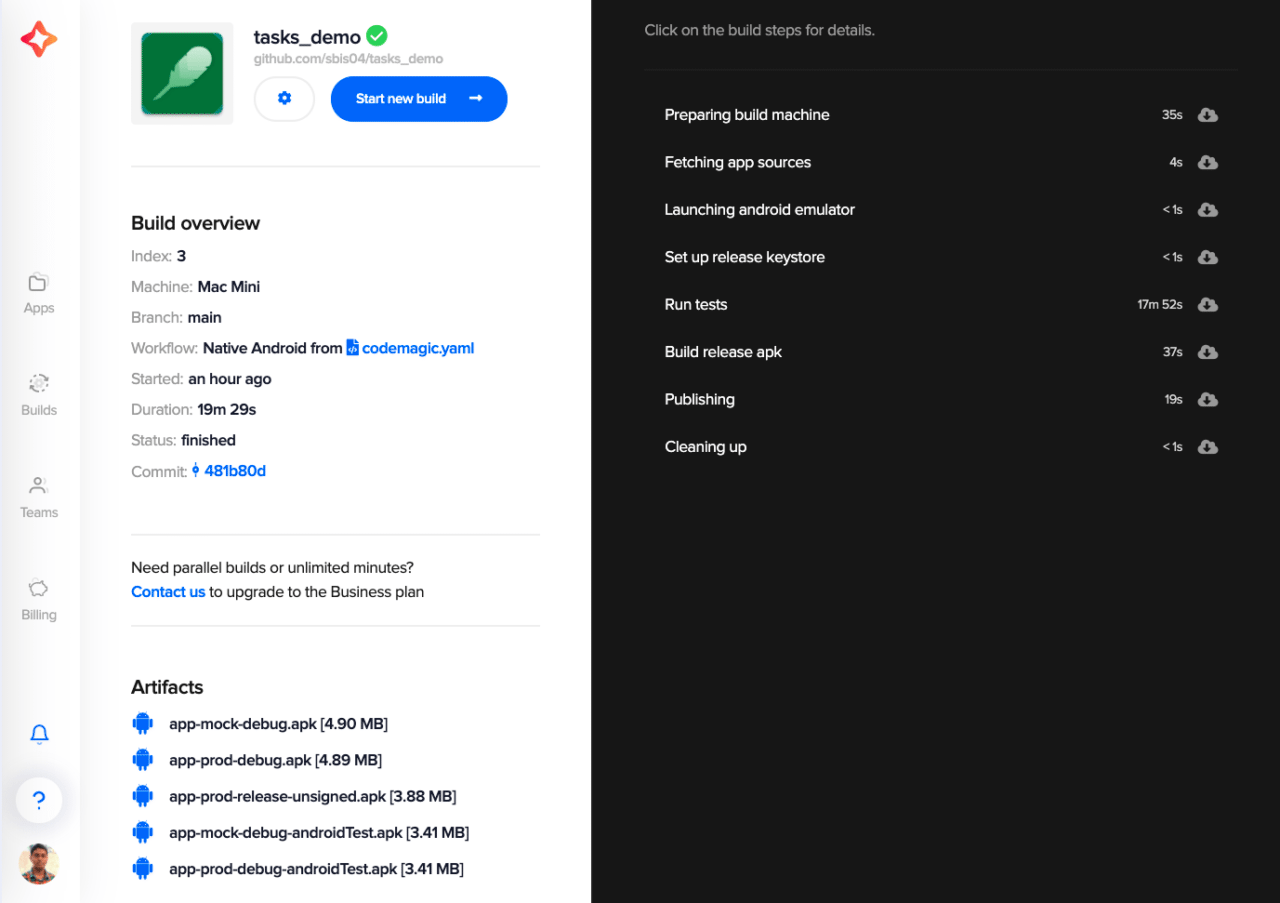
Congratulations, your first Android build with Codemagic CI/CD is complete! ?
Conclusion
Although Codemagic started as an official CI/CD solution dedicated solely to Flutter apps, it now welcomes all mobile projects to the fastest CI/CD. You can easily build, test and publish your Android, iOS, React Native and Flutter apps with Codemagic CI/CD.
As you can see, building native Android apps on Codemagic using the codemagic.yaml file is really simple. There is also an added advantage, as YAML makes it a lot easier to manage your workflows and keep your build configurations more organized. Also, it gets automatically detected from the version control system when starting any build on Codemagic.
Useful links and references
Souvik Biswas is a passionate Mobile App Developer (Android and Flutter). He has worked on a number of mobile apps throughout his journey. He loves open-source contribution on GitHub. He is currently pursuing a B.Tech degree in Computer Science and Engineering from Indian Institute of Information Technology Kalyani. He also writes Flutter articles on Medium – Flutter Community.







Discussion about this post