

This article is written by Kolawole Mangabo
In this tutorial, you’ll learn how to use React Native, the mobile framework, the Mux Video API, and Codemagic for better CI/CD pipelines to build a video streaming application.
If you are familiar with applications such as Instagram, TikTok, or YouTube, you already know about video streaming.
Such applications can be quite complex to make. That’s why we’ll be using the Mux Video API to abstract the complexities of video streaming and write the logic of the API directly.
Mux API configuration
To use the Mux API, we’ll need API secrets from Mux. We’ll be adding assets and then retrieving API keys. Let’s begin!
Log in and go to the dashboard.
Click on Add a video file.
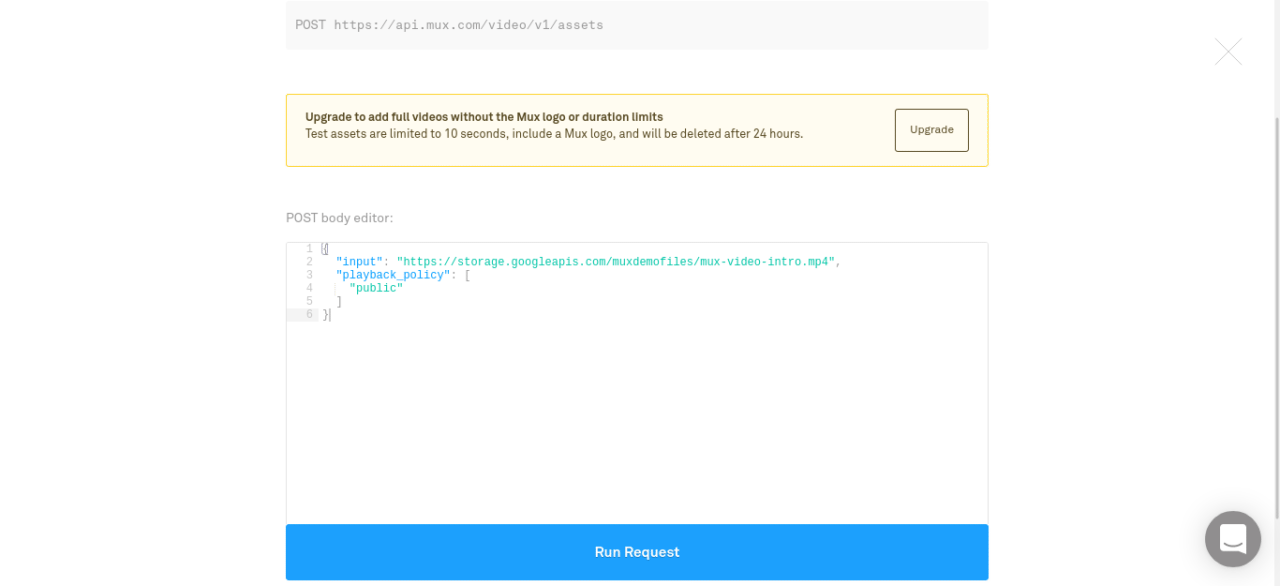
Once it’s done, click on Run Request. We can now generate the API tokens we’ll use to make requests to the API.
Go to the settings, and click on Generate new token.
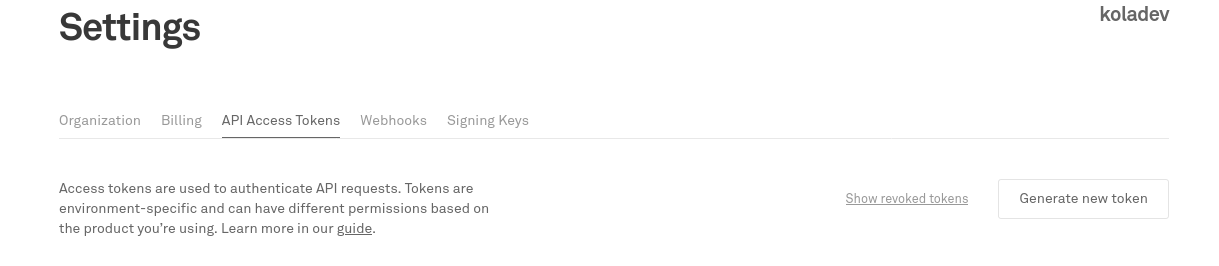
Fill in the required details and generate the tokens.
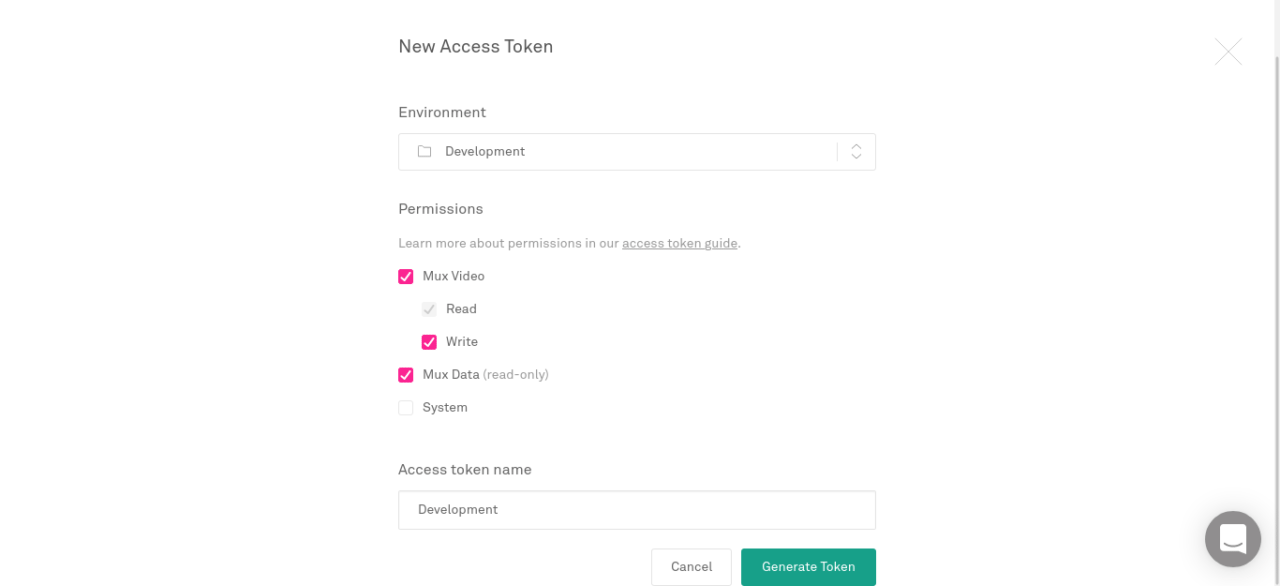
Your tokens will be generated now.
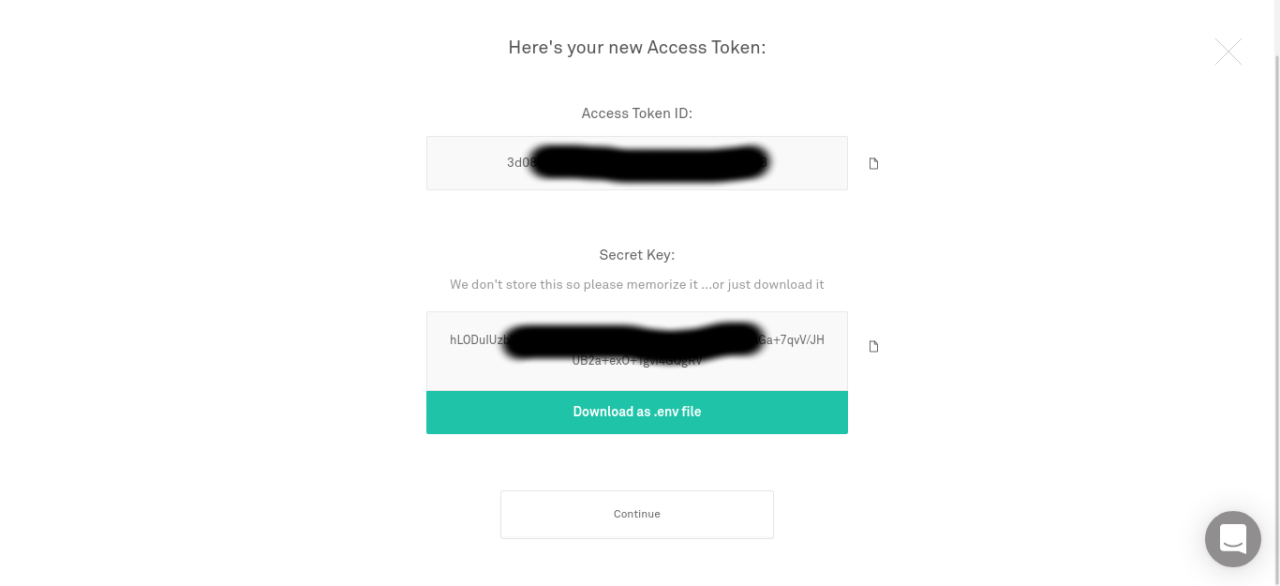
We’ll be using these keys in a .env file, which will be ignored by .gitignore.
The project: What our app will look like
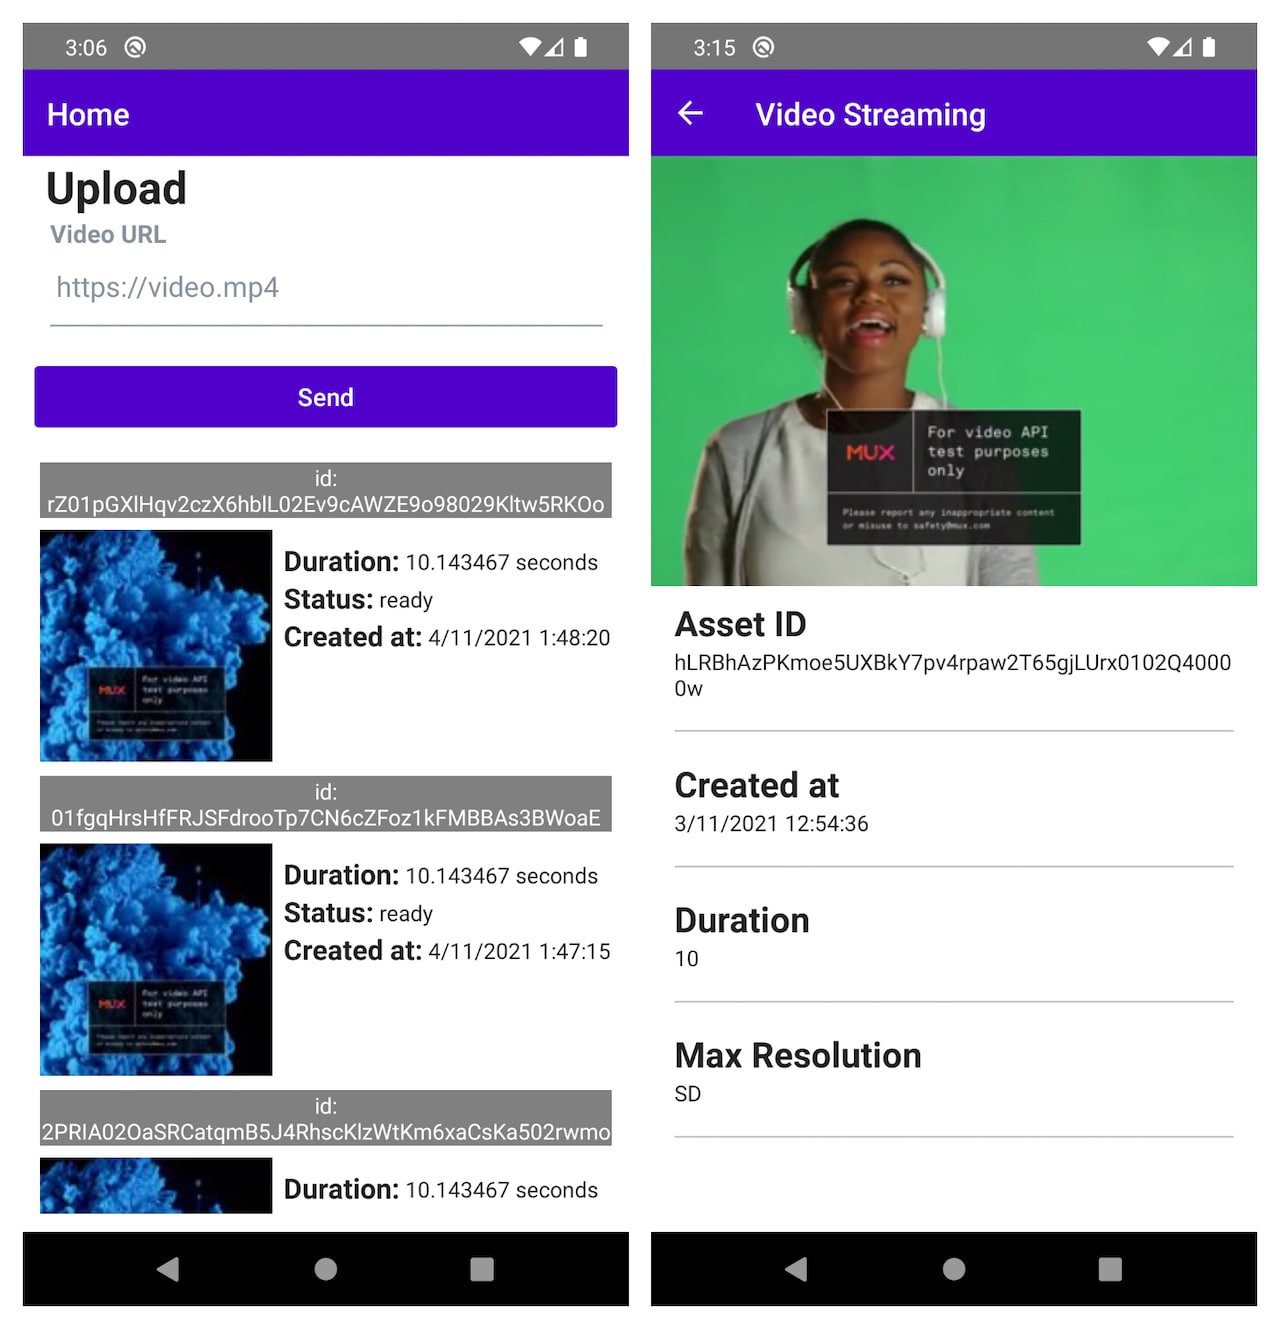
For this tutorial, we’ll be building a simple React Native application with two screens.
- The first screen will be used to register a video and list all our assets from the Mux API;
- The second screen will play the content and show information about the video.
Building the back end: Setting up a mini server with Flask
But first, we’ll need to set up some back end — a server. We’ll be creating this server using Flask — a lightweight and fast Python framework for building web applications or APIs. As we’ll only need a few endpoints here, Flask is definitely a great solution for our project. We could also have used Django, for example, but it comes with a lot of tools we won’t be using.
But why use a server and not just the default request module of JavaScript in React Native, such as Axios? First of all, it’s not really a good practice to put env keys on the front end, as they can be easily accessed, and this can result in a sensitive data leak. Using these keys on the server side significantly reduces the risk. So, a mini server is a better solution in our case.
We’ll be making requests to the mini server from the React Native application instead of directly hitting the Mux API on the React Native side. Now, let’s go.
First of all, let’s create a virtual environment.
cd flask-api
virtualenv --python=/usr/bin/activate venv
source venv/bin/activate
Once it’s done, create and install Flask.
pip install Flask python-dotenv
Also, let’s install the Mux Python package.
pip install git+https://github.com/muxinc/mux-python.git
Now, create a file .env, and add the following information.
MUX_TOKEN_ID="<mux_token_id>"
MUX_TOKEN_SECRET="<mux_token_secret>"
The next step is to create an app.py, and then we’ll start writing the code logic.
import os
from flask import Flask, request, jsonify
import mux_python
from mux_python.rest import ApiException
import json

# Authentication Setup
configuration = mux_python.Configuration()
configuration.username = os.environ.get('MUX_TOKEN_ID')
configuration.password = os.environ.get('MUX_TOKEN_SECRET')

# API Client Initialization
assets_api = mux_python.AssetsApi(mux_python.ApiClient(configuration))
playback_ids_api = mux_python.PlaybackIDApi(mux_python.ApiClient(configuration))

app = Flask(__name__)
We are importing the Flask utilities, as well as some utilities from the mux_python package. This will help us initialize the clients to make requests to the Mux API.
As a first step here, let’s write a route to create a new video asset.
@app.route('/assets', methods=['POST'])
def create_asset():
    input_json = request.get_json(force=True)
    url = input_json.get('url')
    if url is None or not isinstance(url, str):
        abort(400, {'url': "This field is required"})
    input_settings = [mux_python.InputSettings(url=url)]
    try:
        create_asset_request = mux_python.CreateAssetRequest(input=input_settings)
        create_asset_response = assets_api.create_asset(create_asset_request)
    except ApiException:
        abort(400, {'message': "An error has occurred"})

    asset = create_asset_response.data
    new_data = {
        "id": asset.id,
        "status": asset.status,
        "created_at": asset.created_at,
        "duration": asset.duration,
        "max_stored_resolution": asset.max_stored_resolution,
        "max_stored_frame_rate": asset.max_stored_frame_rate,
        "aspect_ratio": asset.aspect_ratio
    }
    return json.dumps(new_data)
This function will create an asset. We are getting the body in the request and performing some verification. Once the check is done, we are using the API client we defined earlier to make a request to create a Mux asset.
Start running the server using this command.
flask run
Now that we can create assets, we’ll use Insomnia or Postman to make a POST request at http://127.0.0.1:5000/assets.
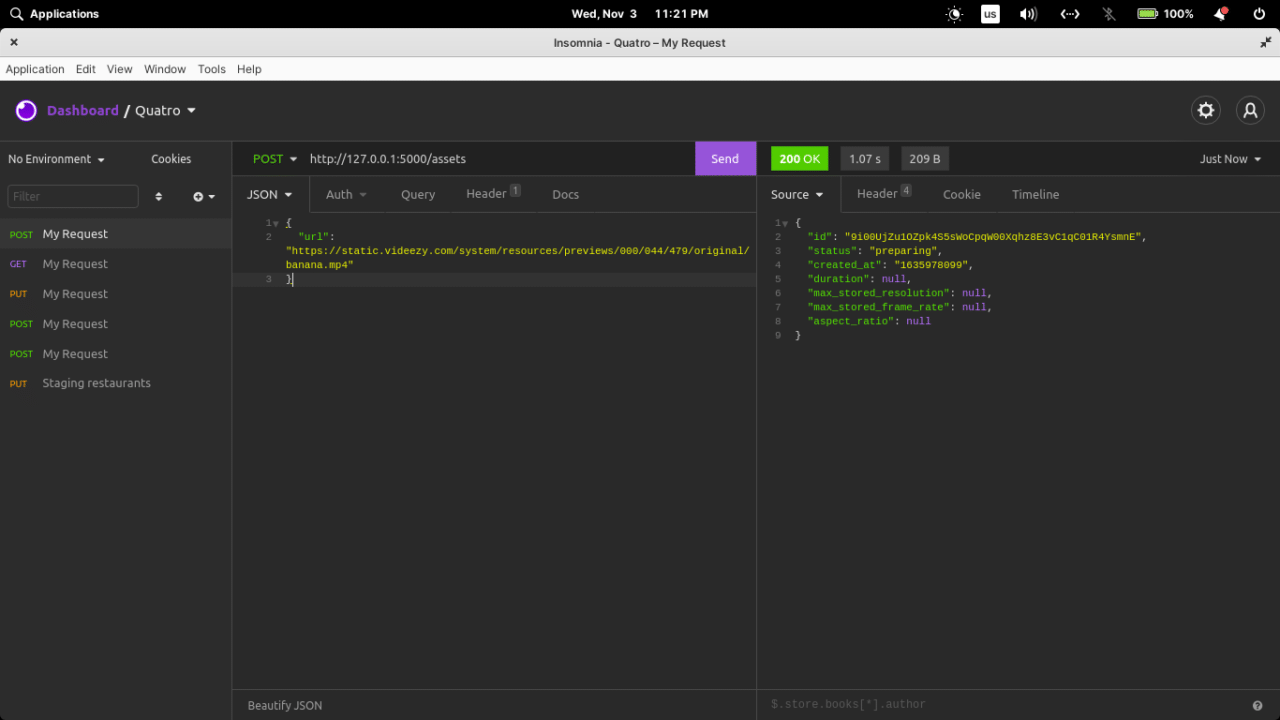
Let’s add endpoints — one to retrieve all assets and another one for one asset.
@app.route('/assets', methods=['GET'])
def list_assets():
    try:
        list_assets_response = assets_api.list_assets()
    except ApiException:
        abort(400, {'message': "An error has occurred"})
    new_data = map(lambda asset: {
        "id": asset.id,
        "status": asset.status,
        "created_at": asset.created_at,
        "duration": asset.duration,
        "max_stored_resolution": asset.max_stored_resolution,
        "max_stored_frame_rate": asset.max_stored_frame_rate,
        "aspect_ratio": asset.aspect_ratio
    }, list_assets_response.data)
    return jsonify(list(new_data))

@app.route('/assets/<string:asset_id>', methods=['GET'])
def get_asset(asset_id):
    try:
        asset_object_response = assets_api.get_asset(asset_id)
        asset = asset_object_response.data
    except ApiException:
        return "An error has occurred"
    new_data = {
        "id": asset.id,
        "status": asset.status,
        "created_at": asset.created_at,
        "playback_id": asset.playback_ids[0].id,
        "duration": asset.duration,
        "max_stored_resolution": asset.max_stored_resolution,
        "max_stored_frame_rate": asset.max_stored_frame_rate,
        "aspect_ratio": asset.aspect_ratio
    }
    return jsonify(new_data)

if __name__ == '__main__':
    app.run()
These two functions also use some functions provided by the mux_python package.
- The
assets_api.list_assets()function will return a Python object containing some attributes and the list of assets. - The
assets_api.get_asset(asset_id)function will return a Python object containing some attributes as well as data about the asset we are looking for.
All right, the server is ready. As you can see, this was done very quickly with Flask. Now, let’s move to the front-end part with React Native.

How to build React Native apps on Codemagic
Start now
Building the front end with React Native
React Native is a framework that allows you to build native mobile apps using JavaScript or TypeScript. It provides a slick, smooth, and responsive UI while allowing you to maintain one codebase. If you are interested in working with Mux using other mobile frameworks, we also have a similar post for Flutter.
Let’s create the React Native project.
npx react-native init MuxReactNative
Once it’s done, move the directory, build the app on your device, and start the server.
yarn run ios // or android
yarn start
Adding packages
Let’s install the packages we’ll be using for this small project.
yarn add swr axios react-native-elements react-native-video react-native-safe-area-context react-native-vector-icons react-native-notifier
Now, let’s briefly describe what we need each of the packages for:
- swr : React Hook for data fetching;
- axios: JavaScript packages to make requests and fetch data;
- react-native-elements: a React Native library that comes with reusable UI components;
- react-native-video: a React Native component to display videos;
- react-native-notifier: a React Native package to show warnings or notifications inside the application.
Now, we can start coding. Create a directory named src at the root of the project.
mkdir src
Application logic
Configurations
In the src dir, add a file named config.js. This file will contain the configurations and utilities we’ll be using for this project.
import axios from 'axios';
import {Notifier, NotifierComponents} from 'react-native-notifier';

// API for sending videos
export const muxBaseUrl="https://api.mux.com";

// API server running on localhost
export const muxServerUrl="http://localhost:5000";

// API for generating thumbnails of a video
export const muxImageBaseUrl="https://image.mux.com";

// API for streaming a video
export const muxStreamBaseUrl="https://stream.mux.com";

// Received video file format
export const videoExtension = 'm3u8';

// Thumbnail file type and size
export const imageTypeSize="thumbnail.jpg?time=5&width=200";

// Content Type used in API calls
export const contentType="application/json";

export const fetcher = url =>
  axios.get(url).then(res => {
    console.log(res.headers);
    return res.data;
  });

export const notify = {
  notify(title: string, description: string, type: string) {
    Notifier.showNotification({
      title,
      description,
      Component: NotifierComponents.Alert,
      componentProps: {
        alertType: type,
      },
    });
  },
  error(title: string, description?: string) {
    notify.notify(title, description, 'error');
  },
  success(title: string, description?: string) {
    notify.notify(title, description, 'success');
  },
};

export function getFormattedDate(timestamp) {
  const date = new Date(timestamp * 1000);

  return (
    date.getDate() +
    '/' +
    (date.getMonth() + 1) +
    '/' +
    date.getFullYear() +
    ' ' +
    date.getHours() +
    ':' +
    date.getMinutes() +
    ':' +
    date.getSeconds()
  );
}
With the local server, you may encounter issues while trying to connect to the API. To resolve these issues, install ngrok, and expose the 5000 port by running
ngrok http 5000. Then, replace the generated URL with the one in the file.
Navigation in the application
Let’s create the file that will contain our navigator, StackNavigator.js.
import * as React from 'react';
import {createStackNavigator} from '@react-navigation/stack';
import HomeScreen from '../Home';
import {VideoStreaming} from '../VideoStreaming';

const Stack = createStackNavigator();

const StackNavigator = () => {
  return (
    <Stack.Navigator>
      <Stack.Screen
        options={{
          title: 'Home',
          headerStyle: {
            backgroundColor: '#5000ca',
          },
          headerTitleStyle: {
            color: '#fff',
          },
        }}
        name="Home"
        component={HomeScreen}
      />
    </Stack.Navigator>
  );
};

export default StackNavigator;
And now, let’s wrap the application into the Navigator as well as the Notifier so that we can easily trigger notifications. We’ll be working on App.js.
import React from 'react';
import {NavigationContainer} from '@react-navigation/native';
import StackNavigator from './src/StackNavigator';
import { NotifierWrapper } from 'react-native-notifier';

export default function App() {
  return (
    <NotifierWrapper>
      <NavigationContainer>
        <StackNavigator />
      </NavigationContainer>
    </NotifierWrapper>
  );
}
First of all, let’s create a file, a layout we’ll use for our components.
import * as React from 'react';
import {SafeAreaView, StyleSheet} from 'react-native';

const Layout = props => {
  return <SafeAreaView style={styles.container}>{props.children}</SafeAreaView>;
};

const styles = StyleSheet.create({
  container: {
    flex: 1,
    backgroundColor: '#fff',
  },
});

export default Layout;
Home screen
Once that’s done, create a file named Home.js. First of all, let’s make the necessary requests to fetch all the assets. We’ll also need to write the function to create a new asset.
import React, {useState} from 'react';
import Layout from './Layout';
import {Input, Text, Button} from 'react-native-elements';
import {
  TouchableOpacity,
  View,
  Dimensions,
  ScrollView,
  Image,
} from 'react-native';
import {
  fetcher,
  getFormattedDate,
  imageTypeSize,
  muxImageBaseUrl,
  muxServerUrl,
  notify,
} from './config';
import useSWR from 'swr';
import axios from 'axios';

const windowHeight = Dimensions.get('window').height;

function HomeScreen({navigation}) {
  const [videoURL, setVideoURL] = useState('');

  const navigateToStreamingScreen = (videoId: string) => {
    navigation.navigate('VideoStreaming', {
      videoId: videoId,
    });
  };

  const assets = useSWR(`${muxServerUrl}/assets`, fetcher);

  const assetsData = assets.data || [];

  const handleVideoLinkSubmit = videoUrl => {
    axios
      .post('`${muxServerUrl}/assets', {url: videoUrl})
      .then(res => {
        notify.success('Video added.');
      })
      .catch(error => notify.error('An error has occurred'));
  };

return ();

}

export default HomeScreen;
We can write the view for this component now.
...
return (
    <Layout>
      <View
        style={{
          paddingHorizontal: '2%',
        }}>
        <Text
          style={{
            paddingHorizontal: '2%',
          }}
          h3>
          Upload
        </Text>
        <Input
          label={'Video URL'}
          containerStyle={{
            maxWidth: '100%',
          }}
          placeholder={'https://video.mp4'}
          onChangeText={setVideoURL}
        />
        <Button
          title="Send"
          buttonStyle={{backgroundColor: '#5000ca'}}
          onPress={() => handleVideoLinkSubmit(videoURL)}
        />
      </View>

      <ScrollView style={{margin: '3%'}}>
        {assetsData.map((asset, index) => (
          <TouchableOpacity
            style={{
              height: windowHeight * 0.25,
              marginVertical: '1%',
            }}
            onPress={() => navigateToStreamingScreen(asset.id)}>
            <Text
              style={{
                marginVertical: '2%',
                textAlign: 'center',
                backgroundColor: 'gray',
                color: 'white',
              }}>
              id: {asset.id}
            </Text>
            <View
              style={{
                flexDirection: 'row',
                height: '60%',
              }}>
              <Image
                style={{
                  height: 150,
                  width: 150,
                }}
                source={{
                  uri: `${muxImageBaseUrl}/${asset?.playback_id}/${imageTypeSize}`,
                }}
              />
              <View
                style={{
                  width: '50%',
                  height: windowHeight * 0.2,
                  padding: '2%',
                }}>
                <View
                  style={{
                    flexDirection: 'row',
                    alignItems: 'baseline',
                  }}>
                  <Text
                    style={{
                      fontSize: 18,
                      fontWeight: '700',
                    }}>
                    Duration:
                  </Text>
                  <Text
                    style={{
                      paddingBottom: '1%',
                    }}>
                    {' '}
                    {asset.duration} seconds
                  </Text>
                </View>
                <View
                  style={{
                    flexDirection: 'row',
                    alignItems: 'baseline',
                  }}>
                  <Text
                    style={{
                      fontSize: 18,
                      fontWeight: '700',
                    }}>
                    Status:
                  </Text>
                  <Text
                    style={{
                      paddingBottom: '1%',
                    }}>
                    {' '}
                    {asset.status}
                  </Text>
                </View>
                <View
                  style={{
                    flexDirection: 'row',
                    alignItems: 'baseline',
                  }}>
                  <Text
                    style={{
                      fontSize: 18,
                      fontWeight: '700',
                    }}>
                    Created at:
                  </Text>
                  <Text
                    style={{
                      paddingBottom: '1%',
                    }}>
                    {' '}
                    {getFormattedDate(parseInt(asset.created_at))}
                  </Text>
                </View>
              </View>
            </View>
          </TouchableOpacity>
        ))}
      </ScrollView>
    </Layout>
  );
...
After we’ve finished all of these, the screen should look like this.
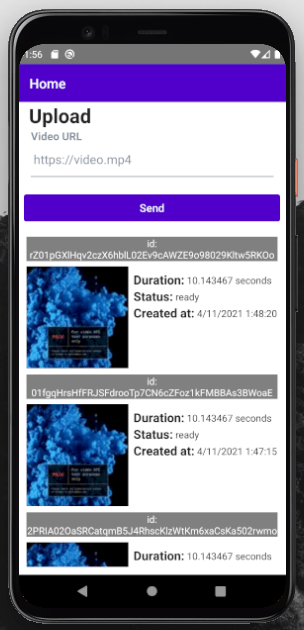
This is the first screen of our app, where we select the content that we want to stream. The other screen we need to build for our Mux + React Native app is the video streaming screen.
Video streaming screen
In the same directory, create a file named VideoStreaming.js.
import React from 'react';
import Video from 'react-native-video';
import {
  fetcher,
  getFormattedDate,
  muxServerUrl,
  muxStreamBaseUrl,
  videoExtension,
} from './config';
import useSWR from 'swr';
import {View} from 'react-native';
import {Divider, Text} from 'react-native-elements';
import Layout from './Layout';

export const VideoStreaming = ({route, navigation}) => {
  const {videoId} = route.params;

  const asset = useSWR(``${muxServerUrl}/assets/${videoId}`, fetcher);
  const assetData = asset.data;

return ();

}
Notice the usage of route in the props of this component. This will help us get the parameters that have been passed when navigating to this screen.
We can now write the view using the Video component.
...
return (
    <Layout>
      {assetData ? (
        <>
          <Video
            source={{
              uri: `${muxStreamBaseUrl}/${assetData.playback_id}.${videoExtension}`,
            }}
            paused={false}
            style={{
              height: '40%',
              marginBottom: '2%',
            }}
            repeat={true}
          />
          <View
            style={{
              paddingHorizontal: '4%',
            }}>
            <View>
              <Text h4>Asset ID</Text>
              <Text>{assetData.id}</Text>
            </View>

            <Divider
              width={1}
              style={{
                marginVertical: '5%',
              }}
            />
          </View>
          <View
            style={{
              paddingHorizontal: '4%',
            }}>
            <View>
              <Text h4>Created at</Text>
              <Text>{getFormattedDate(parseInt(assetData.created_at))}</Text>
            </View>

            <Divider
              width={1}
              style={{
                marginVertical: '5%',
              }}
            />
          </View>
          <View
            style={{
              paddingHorizontal: '4%',
            }}>
            <View>
              <Text h4>Duration</Text>
              <Text>{assetData.duration}</Text>
            </View>

            <Divider
              width={1}
              style={{
                marginVertical: '5%',
              }}
            />
          </View>
          <View
            style={{
              paddingHorizontal: '4%',
            }}>
            <View>
              <Text h4>Max Resolution</Text>
              <Text>{assetData.max_stored_resolution}</Text>
            </View>

            <Divider
              width={1}
              style={{
                marginVertical: '5%',
              }}
            />
          </View>
        </>
      ) : (
        <Text>Loading</Text>
      )}
    </Layout>
  );
...
Let’s add this screen to our Navigator.
import {VideoStreaming} from '../VideoStreaming';
...
      <Stack.Screen
        options={{
          title: 'Video Streaming',
          headerStyle: {
            backgroundColor: '#5000ca',
          },
          headerTitleStyle: {
            color: '#fff',
          },
          headerTintColor: '#fff',
        }}
        name="VideoStreaming"
        component={VideoStreaming}
      />
...
Your video streaming screen should look like this.
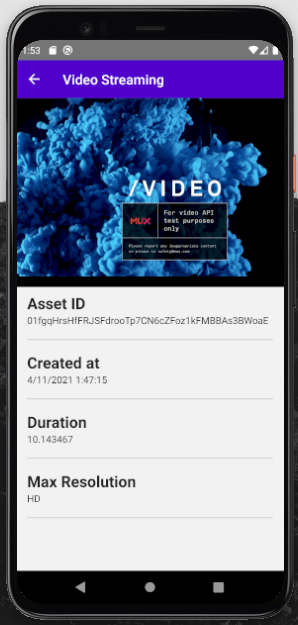
Great! We are done integrating Mux with React Native, and the code for our app is ready.
What’s next?
Building the project with Codemagic
Codemagic helps you write CI/CD pipelines for mobile applications, including building, testing, and publishing your apps. For React Native, it’s one of the simplest ways to build your apps for both Android and iOS, as well as do code signing for both platforms and publish the app to Google Play Store and Apple App Store. However, for the sake of brevity, we’ll only build the Android .apk in this post. If you want a detailed getting started guide for React Native and Codemagic CI/CD, check out this blog post.
First, you’ll have to log in to your Codemagic account, or sign up if you don’t have one.
Once this is done, add a new application, and select the source control service you want to use to save your source code. I am working with GitHub in this example, but you can choose whatever service you want.
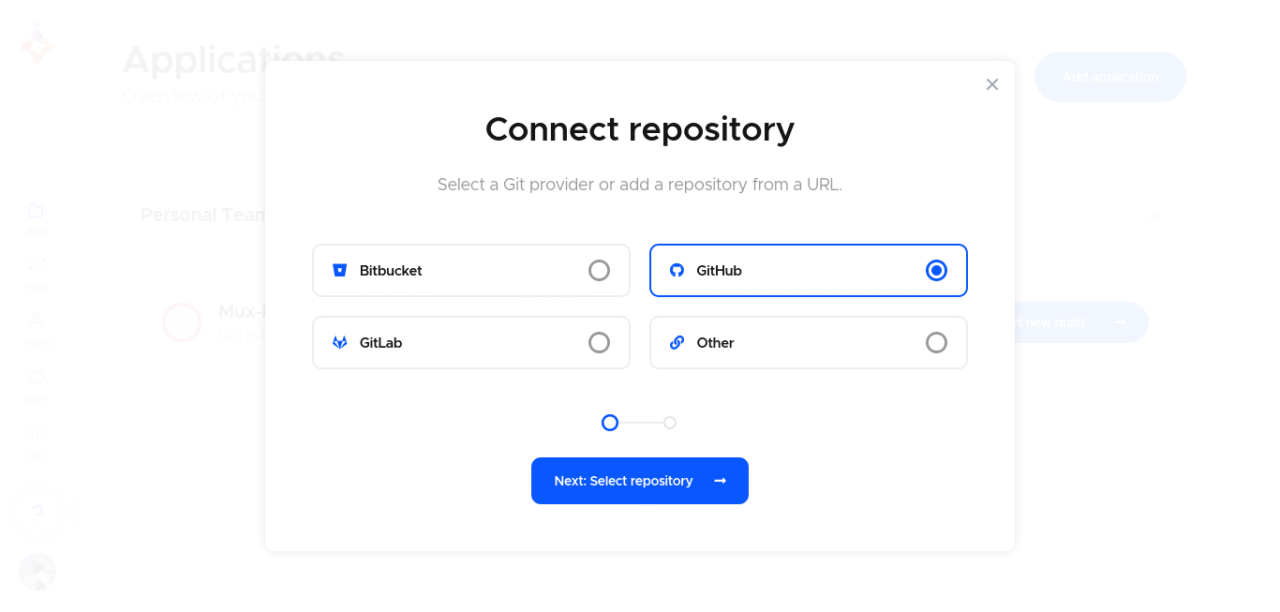
Once that’s done, you can select your project in the next step. Make sure that the project type is set to React Native App.
After that, you’ll be brought to an editor.
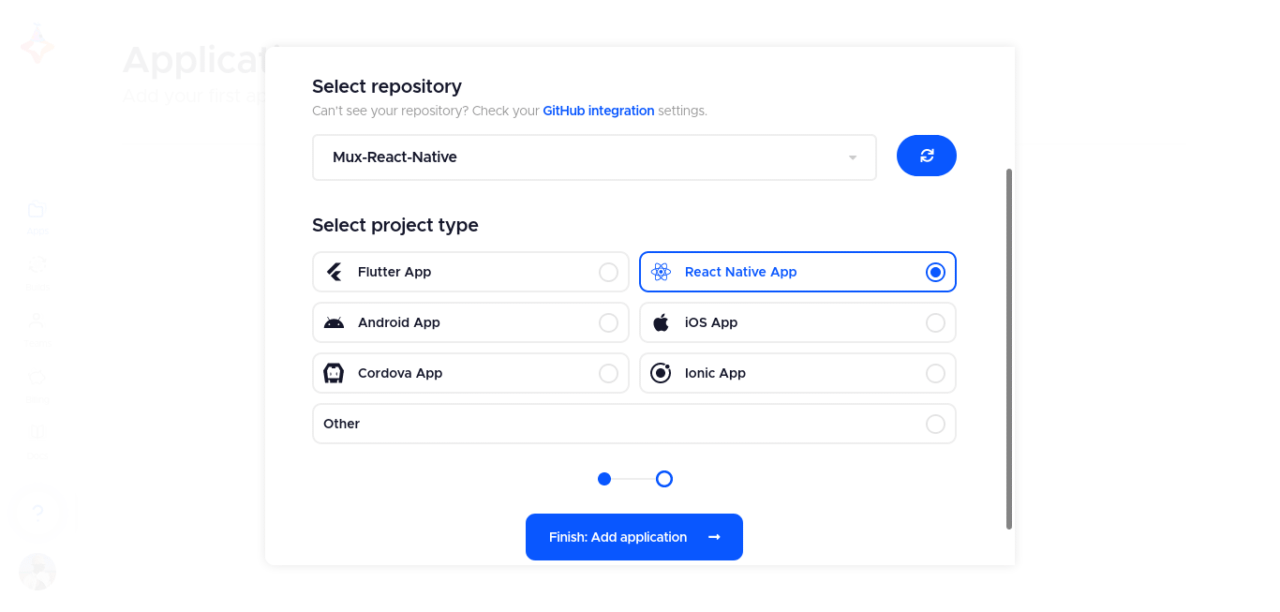
Basically, all we need to do is create a codemagic.yaml file containing the CI/CD logic we are looking for at the root of your project.
For the debug version of our app, it will look like this.
# Check out https://docs.codemagic.io/getting-started/building-a-react-native-app/ for more information
# Please review and update values in curly braces

workflows:
    react-native:
        name: React Native App
        environment:
            node: 16.13.1
        scripts:
            - npm install
            - echo "sdk.dir=$HOME/programs/android-sdk-macosx" > "$CM_BUILD_DIR/android/local.properties"
            - |
                # build Android
                cd android
                ./gradlew assembleDebug
        artifacts:
            - android/app/build/outputs/**/**/*.apk
This will create a debug version of your mobile application that is ready to be installed and used. But you’ll probably want to go with a release version of your mobile application.
Let’s modify the workflow and adapt it to our needs. But first of all, let’s talk about the required changes.
- |
                # build Android
                cd android
                ./gradlew assembleRelease
The build process will follow the path as defined in the build.gradle file. This will require code signing, which you can read about here. For iOS, the process is a bit more complicated, but we’ve explained it here.
When the release build command starts running, it’ll use the release signing details. The build.gradle will contain the release signing details used by Codemagic when the build is running.
signingConfigs {
        debug {
            storeFile file('debug.keystore')
            storePassword 'android'
            keyAlias 'androiddebugkey'
            keyPassword 'android'
        }        release {
            if (System.getenv()['CI']) { // CI=true is exported by Codemagic
                storeFile file(System.getenv()['CM_BUILD_DIR'] + '/keystore.jks')
                storePassword System.getenv()['CM_KEYSTORE_PASSWORD']
                keyAlias System.getenv()['CM_KEY_ALIAS']
                keyPassword System.getenv()['CM_KEY_PASSWORD']
            }
                   else {
                def keystorePropertiesFile = rootProject.file('key.properties')
                def keystoreProperties = new Properties()
                keystoreProperties.load(new FileInputStream(keystorePropertiesFile))
                keyAlias keystoreProperties['keyAlias']
                keyPassword keystoreProperties['keyPassword']
                storeFile file(keystoreProperties['storeFile'])
                storePassword keystoreProperties['storePassword']
                   }
        }
    }
Two things are happening here:
-
We check if the CI environment variable has been declared. If this is the case, we fetch the location of the keystore and appropriate signing details from the environment.
-
Or we simply use the local
key.propertiesfile to fetch the details.
The next step is to encrypt the environment variables for YAML configuration.
storePassword=android
keyPassword=yourpassword
keyAlias=androiddebugkey
storeFile=keystore.keystore
Encrypting build dependencies
On the project configuration page, you can see a tab option named Environment variables. Create a group name called mux-app (you can change it according to your needs), and add the values according to your key.properties file.
Let’s quickly talk about some environment variables we’ll be adding here:
CM_KEYSTORE_PASSWORD: storePassword
CM_KEY_PASSWORD: keyPassword
CM_KEY_ALIAS: keyAlias
These are just the values for the application environment variables for an Android application. These values have already been created when signing the application.
- CM_KEYSTORE_PASSWORD: This represents your keystore password.
- CM_KEY_PASSWORD: If you have created a keystore alias password, you can put it here.
- CM_KEY_ALIAS: This represents your keystore alias username.
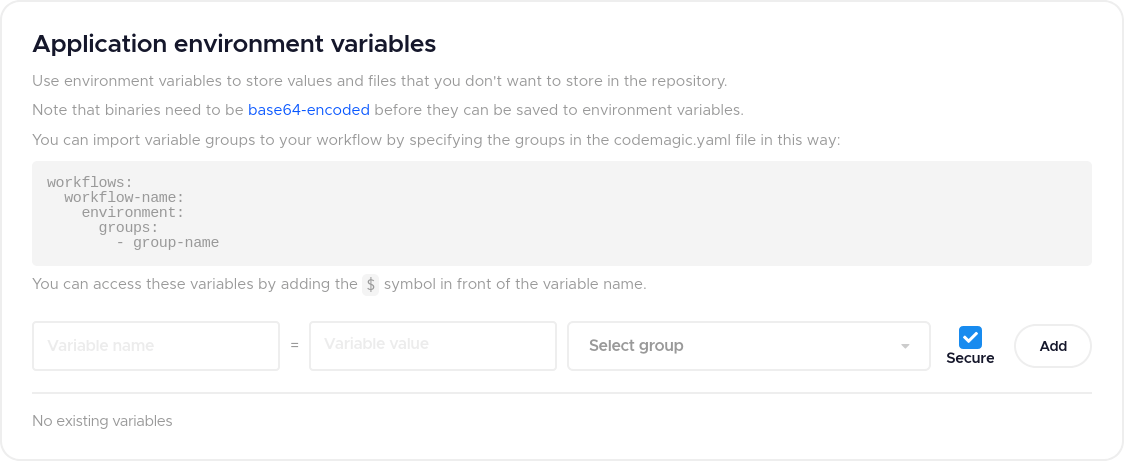
After that, you should have a codemagic.yaml file that looks like this.
workflows:
    react-native:
        name: React Native App
        environment:
            groups:
                - mux-app
            vars:
                CM_KEYSTORE_PASSWORD: Encrypted(...)
                CM_KEY_PASSWORD: Encrypted(...)
                CM_KEY_ALIAS: Encrypted(...)
            node: 16.13.1
        scripts:
            - yarn install
            - react-native bundle --platform android --dev false --entry-file index.js --bundle-output android/app/src/main/assets/app.bundle
            - echo "sdk.dir=$HOME/programs/android-sdk-macosx" > "$CM_BUILD_DIR/android/local.properties"
            - |
                chmod -R 777 $CM_BUILD_DIR
                echo $CM_KEYSTORE | base64 --decode > $CM_BUILD_DIR/keystore.jks
                # build Android
                cd android
                ./gradlew assembleRelease
Conclusion
In this article, we’ve covered how to easily integrate Mux with React Native. The Mux API is very large and interesting to play with. Don’t hesitate to explore their docs.
And finally, you can find the code of this project with a working codemagic.yaml file on GitHub here.
Kolawole Mangabo is a fullstack engineer working with Python and JavaScript. Currently busy building things in a foodtech company, he’s also a technical writer, covering Django, React and React Native on his personal blog.


Discussion about this post