









iOS continuous integration & delivery – this guide gets you started on building iOS apps with Codemagic CI/CD. Updated in June 2021.
Whether you are building native iOS, Android, React Native or Flutter applications, Codemagic CI/CD is there for you. Although it does not support building native Android and iOS apps directly using the UI, you can easily configure the Codemagic YAML file for building native apps. With the updated first build flow, configuring and building your native apps is even smoother than before.
In this article, you will learn how to use the codemagic.yaml file to build, test and deliver native iOS apps on Codemagic.
We recommend going through the article to gain a better understanding, but if you already have experience using the
codemagic.yamlfile, you can get YAML templates for a native iOS project here.
Written by Souvik Biswas
Getting started
Make sure that your native iOS project is uploaded to a code hosting platform (like GitHub, Bitbucket or GitLab) using a version control system. Follow the steps below to get the codemagic.yaml file template:
- Log in to Codemagic. If you’re not a user, then sign up:
-
On the Applications page, click Add application:
-
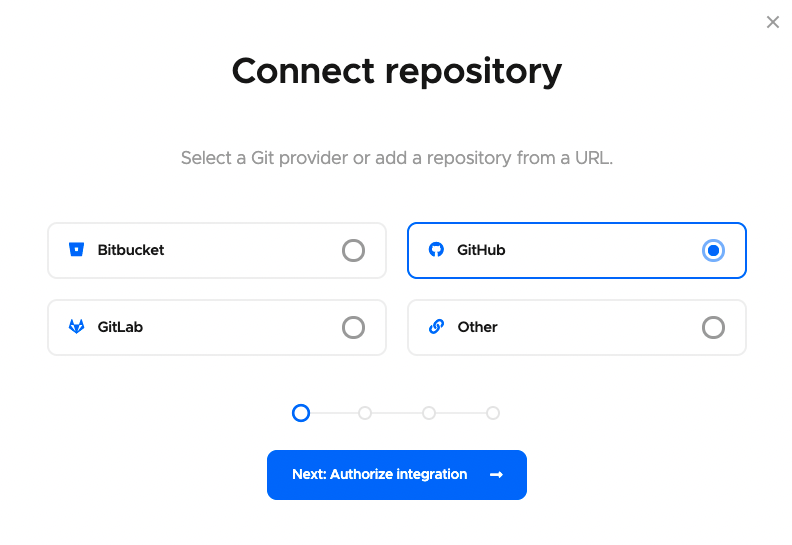
Select a Git provider (or select Other if you want to add using the clone URL of a repository) you want to use:
-
Click Next: Authorize integration to authorize Codemagic. If you have already authorized your selected Git provider, click Next: Select repository instead.
If you are using GitHub as your Git provider then there is one additional step before selecting repository, click Install GitHub App to set up the integration. Know more about configuring GitHub App integration here.
-
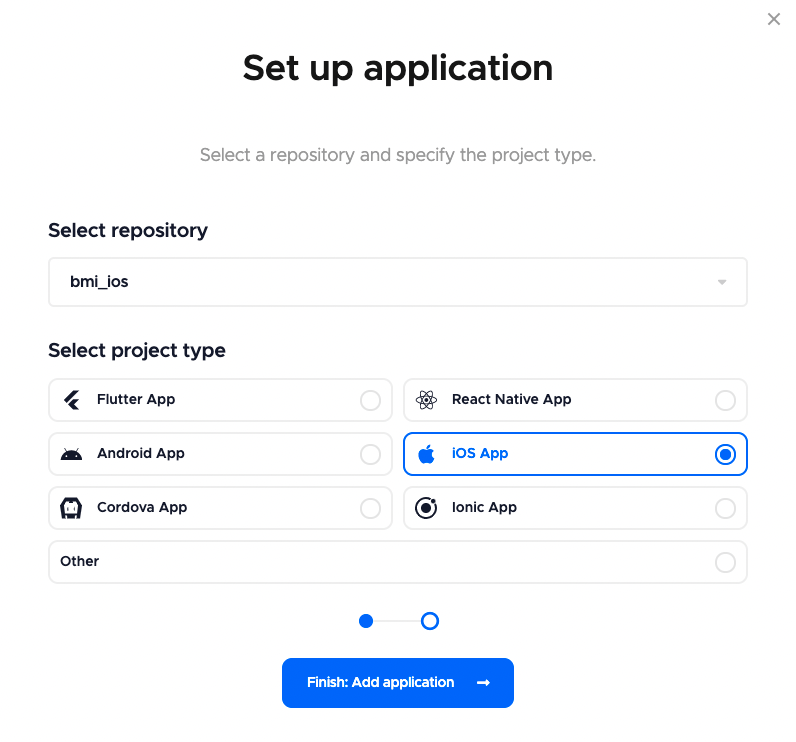
Now, select your repository (or add the clone URL if using Others) and select the project type, click Finish: Add application:
-
You will be taken to the project settings. Here, you will see text saying that there is No configuration file found because we haven’t yet added a
codemagic.yamlfile to the project.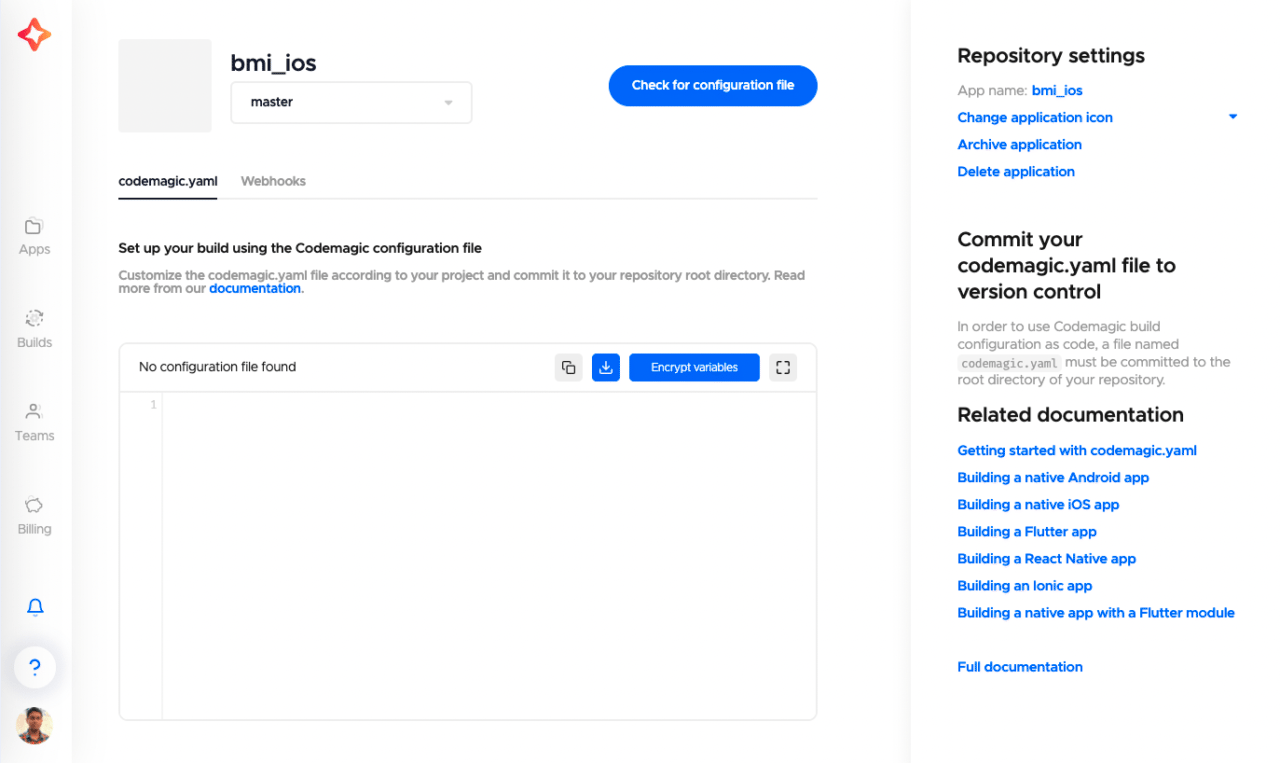
You will also see some links to the documentation, which will help you get started with your iOS project using
codemagic.yaml.
iOS workflow example
The following is a simple example of a codemagic.yaml file for generating debug (unsigned .app) builds of an iOS app:
workflows:
  ios-project-debug: # workflow ID
    name: iOS debug # workflow name
    environment:
      xcode: latest
      cocoapods: default
      vars:
          XCODE_PROJECT: "BMI Calculator.xcodeproj" # <-- Put the name of your project here.
          XCODE_SCHEME: "BMI Calculator" # <-- Put the name of your scheme here.
    scripts:
      - name: Run tests
        script: |
          xcodebuild
          -project "$XCODE_PROJECT"
          -scheme "$XCODE_SCHEME"
          -sdk iphonesimulator
          -destination 'platform=iOS Simulator,name=iPhone 12,OS=14.1'
          clean build test CODE_SIGN_IDENTITY="" CODE_SIGNING_REQUIRED=NO
      - name: Build debug app
        script: |
          xcodebuild build -project "$XCODE_PROJECT"
          -scheme "$XCODE_SCHEME"
          CODE_SIGN_IDENTITY="" CODE_SIGNING_REQUIRED=NO CODE_SIGNING_ALLOWED=NO
    artifacts:
      - $HOME/Library/Developer/Xcode/DerivedData/**/Build/**/*.app
    publishing:
      email:
        recipients:
          - sbis1999@gmail.com
In the above example, ios-project-debug is the workflow ID, and iOS debug is the workflow name. You can change these two names to whatever is suitable for your project.
Deep dive into YAML
Let’s take a closer look at the codemagic.yaml file.
Environment variables
You have to define the name of your Xcode project and Xcode scheme in the environment variables section of the YAML file. In the above example, we have defined them under XCODE_PROJECT and XCODE_SCHEME, respectively. You will need these environment variables while specifying the build commands.
Scripts
To run iOS UI tests, you have to define the following script in the codemagic.yaml file:
xcodebuild
  -project "$XCODE_PROJECT"
  -scheme "$XCODE_SCHEME"
  -sdk iphonesimulator
  -destination 'platform=iOS Simulator,name=iPhone 12,OS=14.1'
  clean build test CODE_SIGN_IDENTITY="" CODE_SIGNING_REQUIRED=NO
The -destination flag specifies the Simulator device on which the tests should be run.
You can also use the
-workspaceflag instead of-projectif you want to specify the Xcode workspace name.
Building the app in debug mode to generate the .app file:
xcodebuild build -project "$XCODE_PROJECT"
  -scheme "$XCODE_SCHEME"
  CODE_SIGN_IDENTITY="" CODE_SIGNING_REQUIRED=NO CODE_SIGNING_ALLOWED=NO
Artifacts
You can get the generated .app file by adding its path under the artifacts. Normally, the path looks like this:
artifacts:
  - $HOME/Library/Developer/Xcode/DerivedData/**/Build/**/*.app
Publishing
To get a report of the build along with the generated artifacts in your email, specify the following:
publishing:
  email:
    recipients:
      - name@example.com # enter your email id here
For more information about publishing, refer to this link.
Setting up code signing for iOS apps
In order to generate the .ipa file, you will need to set up code signing. You can perform code signing of iOS apps in two ways – automatic code signing and manual code signing. We will first take a look at the automatic code signing process.
If you just want to generate the
.ipafile for personal use, you can use the iOS Development Certificate. To publish your app on App Store Connect, you need to use an iOS Distribution Certificate.
Automatic code signing
The prerequisites for iOS automatic code signing are:
- Apple Developer Program membership
- App Store Connect admin access
You have to configure API access to App Store Connect in order to allow Codemagic to manage signing certificates and provisioning profiles on your behalf and perform automatic code signing.
Creating App Store Connect API key
-
Log in to App Store Connect, and navigate to Users and Access > Keys.
-
Click on the “+” sign to generate a new API key.
-
Give a name to the key, and define an access level. We recommend choosing either
DeveloperorApp Manager.Read more about Apple Developer Program role permissions here.
-
Click Generate.
-
You can see that a new key is added to the list of active keys after it is generated. Click Download API Key to save the private key for later use.
Note: The key can only be downloaded once.
You should also take note of the Issuer ID and the Key ID of the generated key, as they will be required while integrating with Codemagic.
Now, you need to modify the codemagic.yaml file to use automatic code signing for generating a release build.
Modifying the YAML
First, you need to add a few more environment variables in the encrypted format:
environment:
  vars:
    XCODE_WORKSPACE: "swiftly.xcworkspace" # <-- Put the name of your workspace here
    XCODE_SCHEME: "swiftly" # <-- Put the name of your scheme here
    # Add the following
    BUNDLE_ID: "io.codemagic.swiftly" # <-- Put your bundle ID here
    APP_STORE_CONNECT_ISSUER_ID: Encrypted(...) # <-- Put your encrypted App Store Connect Issuer ID here
    APP_STORE_CONNECT_KEY_IDENTIFIER: Encrypted(...) # <-- Put your encrypted App Store Connect Key Identifier here
    APP_STORE_CONNECT_PRIVATE_KEY: Encrypted(...) # <-- Put your encrypted App Store Connect Private Key here
    CERTIFICATE_PRIVATE_KEY: Encrypted(...) # <-- Put your encrypted Certificate Private Key here
-
APP_STORE_CONNECT_KEY_IDENTIFIERis the Key ID of the key. You can get it by going to App Store Connect > Users and Access > Keys. -
APP_STORE_CONNECT_ISSUER_IDis the Issuer ID displayed above the table of active keys. You can get it by going to App Store Connect > Users and Access > Keys. -
APP_STORE_CONNECT_PRIVATE_KEYis the private API key that you downloaded from App Store Connect previously. -
CERTIFICATE_PRIVATE_KEYcan be generated by running the following in the terminal:ssh-keygen -t rsa -b 2048 -m PEM -f ~/Desktop/codemagic_private_key -q -N ""
Now, you have to add some new scripts inside the scripts section in order to perform code signing.
-
Initialize the keychain to be used for code signing using the Codemagic CLI
keychaincommand:- name: Set up keychain script: | keychain initialize -
Fetch the signing certificate from App Store Connect:
- name: Fetch signing files script: | app-store-connect fetch-signing-files $BUNDLE_ID --type IOS_APP_STORE --create -
Add the new signing certificate to the keychain:
- name: Use system default keychain script: | keychain add-certificates -
Use the signing certificate in the Xcode project
- name: Set up code signing settings on Xcode project script: | xcode-project use-profiles -
Use the following to increment the build number automatically:
- name: Increment build number script: | #!/bin/sh set -e set -x cd $CM_BUILD_DIR agvtool new-version -all $(($BUILD_NUMBER + 1)) -
Generate the
.ipafile:- name: Build ipa for distribution script: | xcode-project build-ipa --workspace "$XCODE_WORKSPACE" --scheme "$XCODE_SCHEME"
Change the path for retrieving the artifacts:
artifacts:
  - build/ios/ipa/*.ipa
  - $HOME/Library/Developer/Xcode/DerivedData/**/Build/**/*.dSYM
You can find the entire example
codemagic.yamlfile for iOS automatic code signing here.
Manual code signing
In order to perform manual code signing, you will need two files:
- Certificate
- Provisioning profile
If you just want to generate the .ipa file for personal use, you can use the iOS Development Certificate.
To publish your app on App Store Connect, you need to use an iOS Distribution Certificate. You can follow the article here to learn more.
Generating certificate and provisioning profile
Follow the steps below to generate an iOS Development Certificate and the provisioning profile:
-
Open Xcode.
-
Go to
Xcode > Preferencesfrom the navigation bar. -
From the top menu of the window, select Accounts.
-
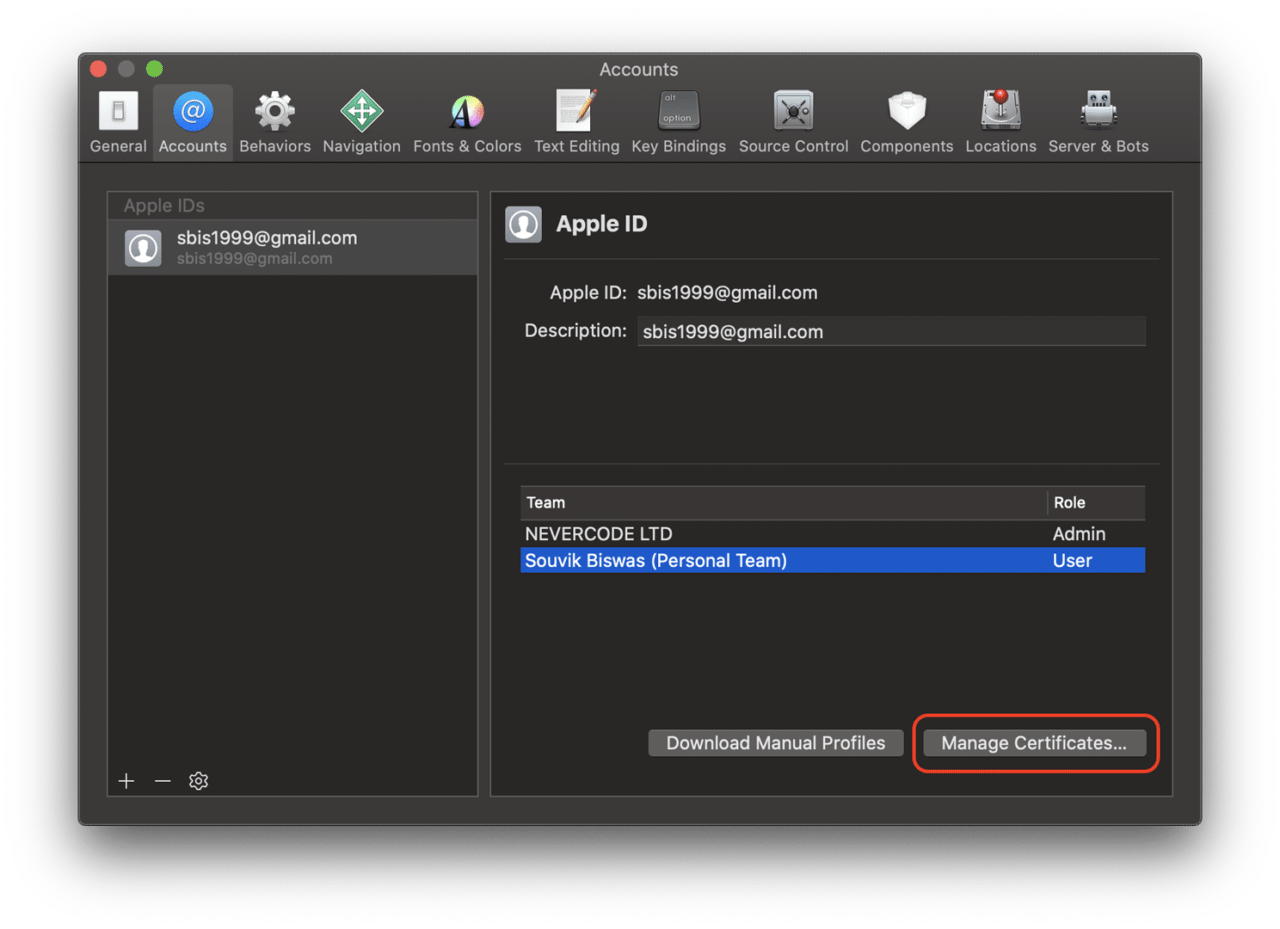
Under your Apple ID, select the Team for which you want the certificate.
-
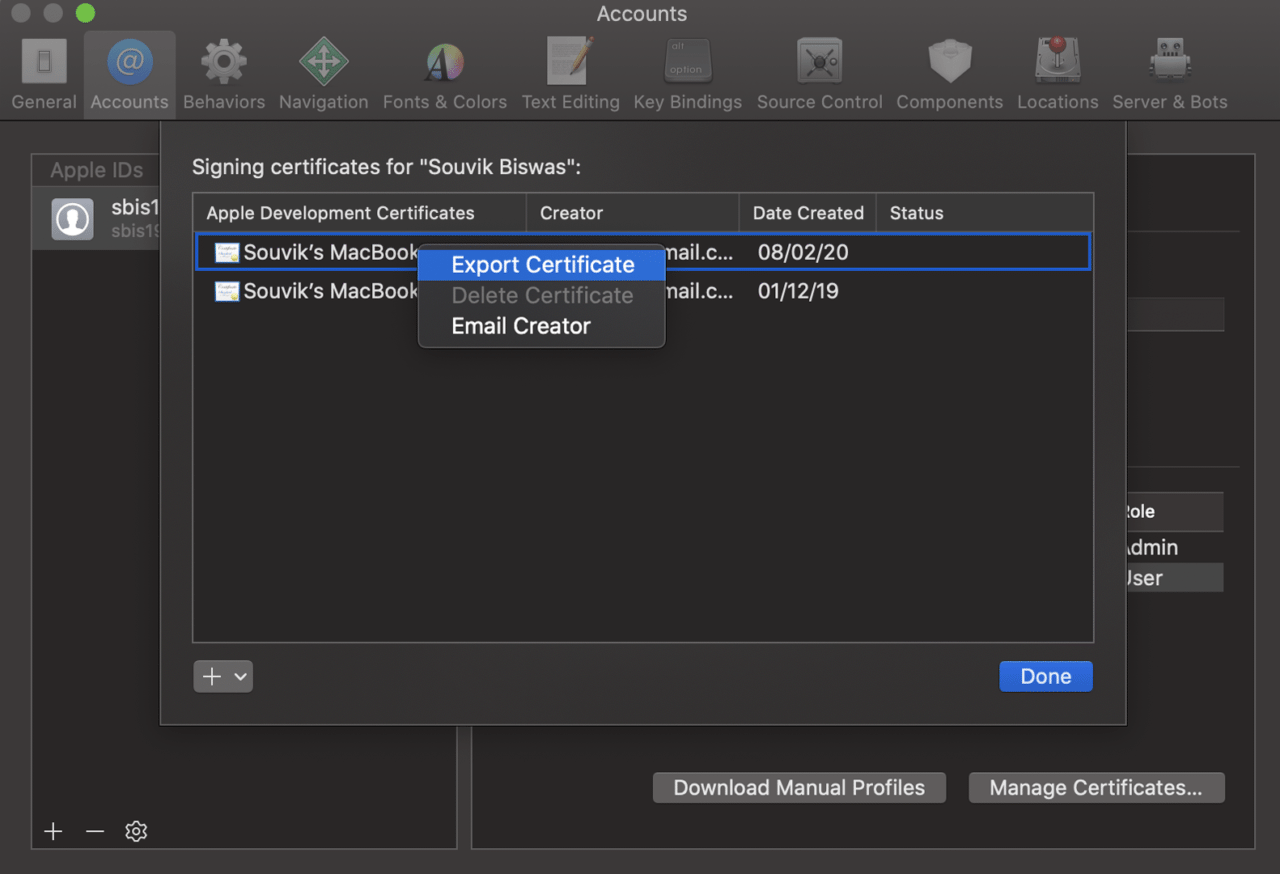
Click Manage Certificates.
-
Right-click the Development Certificate and select Export Certificate.
-
Enter the certificate name, password and path for storing the certificate.
-
To generate the provisioning profile, click Download Manual Profiles.
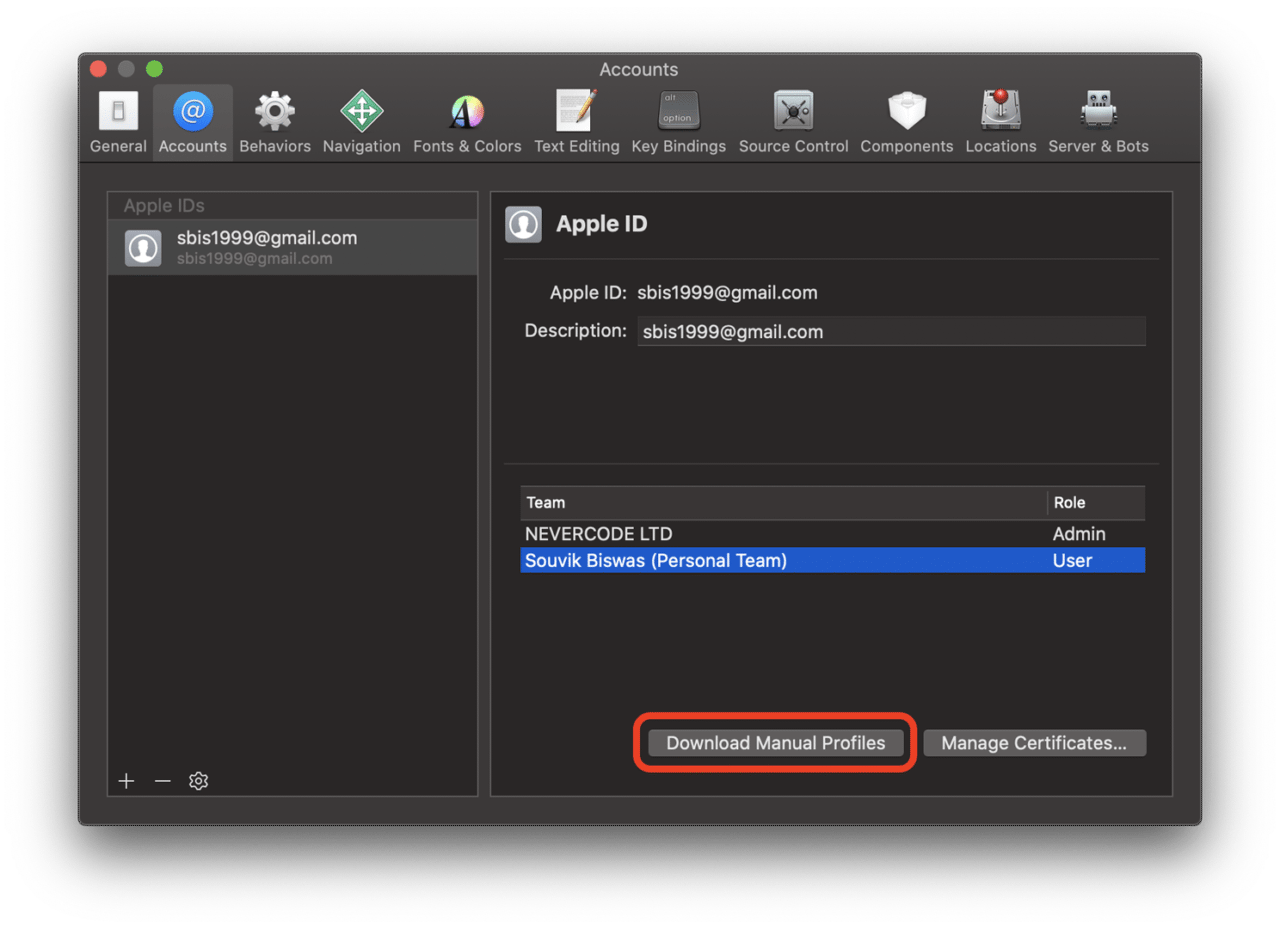
This will save the profile in the directory
~/Library/MobileDevice/Provisioning Profiles/
Modifying the YAML
You need to add the certificate and the provisioning profile in encrypted form as key-value pairs in the environment variables section of the codemagic.yaml file.
environment:
  vars:
    XCODE_WORKSPACE: "swiftly.xcworkspace" # <-- Put the name of your workspace here.
    XCODE_SCHEME: "swiftly" # <-- Put the name of your scheme here.
    # Add the following
    CM_CERTIFICATE: Encrypted(...) # <-- Put your encrypted distribution certificate here.
    CM_CERTIFICATE_PASSWORD: Encrypted(...) # <-- Put your encrypted distribution certificate password here.
    CM_PROVISIONING_PROFILE: Encrypted(...) # <-- Put your encrypted provisioning profile here.
Update the scripts section with the following:
-
Initialize the keychain to be used for code signing using the Codemagic CLI
keychaincommand:- name: Set up keychain script: | keychain initialize -
Set up the provisioning profile:
- name: set up provisioning profiles script: | PROFILES_HOME="$HOME/Library/MobileDevice/Provisioning Profiles" mkdir -p "$PROFILES_HOME" PROFILE_PATH="$(mktemp "$PROFILES_HOME"/$(uuidgen).mobileprovision)" echo ${CM_PROVISIONING_PROFILE} | base64 --decode > $PROFILE_PATH echo "Saved provisioning profile $PROFILE_PATH" -
Add the certificate to the keychain:
- name: Add signing certificate to keychain script: | echo $CM_CERTIFICATE | base64 --decode > /tmp/certificate.p12 keychain add-certificates --certificate /tmp/certificate.p12 --certificate-password $CM_CERTIFICATE_PASSWORD -
Use the following to increment the build number automatically:
- name: Increment build number script: | # increment build number #!/bin/sh set -e set -x cd $CM_BUILD_DIR agvtool new-version -all $(($BUILD_NUMBER +1)) -
Use the signing certificate in the Xcode project:
- name: Set up code signing settings on Xcode project script: | xcode-project use-profiles -
Generate the
.ipafile:- name: Build .ipa script: | xcode-project build-ipa --workspace "$XCODE_WORKSPACE" --scheme "$XCODE_SCHEME"
You can find the entire example
codemagic.yamlfile for iOS manual code signing here.
Releasing to App Store Connect
Codemagic allows you to automatically publish iOS apps to App Store Connect. You will need one more thing to enable auto-publishing: an app-specific password.
Generating app-specific password
You can generate the app-specific password by following the steps below:
-
Sign in to your Apple ID account page.
-
Scroll down to the Security section, and click on Generate Password under App-Specific Passwords.
-
You will have to give a name to the app, and then the password will be generated.
-
Copy and paste it in the
codemagic.yamlfile.
Configuring auto-publishing on Codemagic
In order to automate the publishing of your app to App Store Connect using Codemagic, follow the steps below:
-
Go to the
codemagic.yamlfile inside your project directory. -
Inside the
publishingsection of the YAML file, you can add App Store Connect support using the following:publishing: app_store_connect: apple_id: appleId@example.com # <-- Put your Apple ID here password: Encrypted(...) # <-- Put your encrypted app-specific password hereEncrypt the app-specific password before defining it here.
You have successfully completed the workflow setup for building and deploying a native iOS app.
Building on Codemagic
Before starting a build on Codemagic, make sure that you have committed the codemagic.yaml file to the version control system.
Follow the steps below to start a build:
-
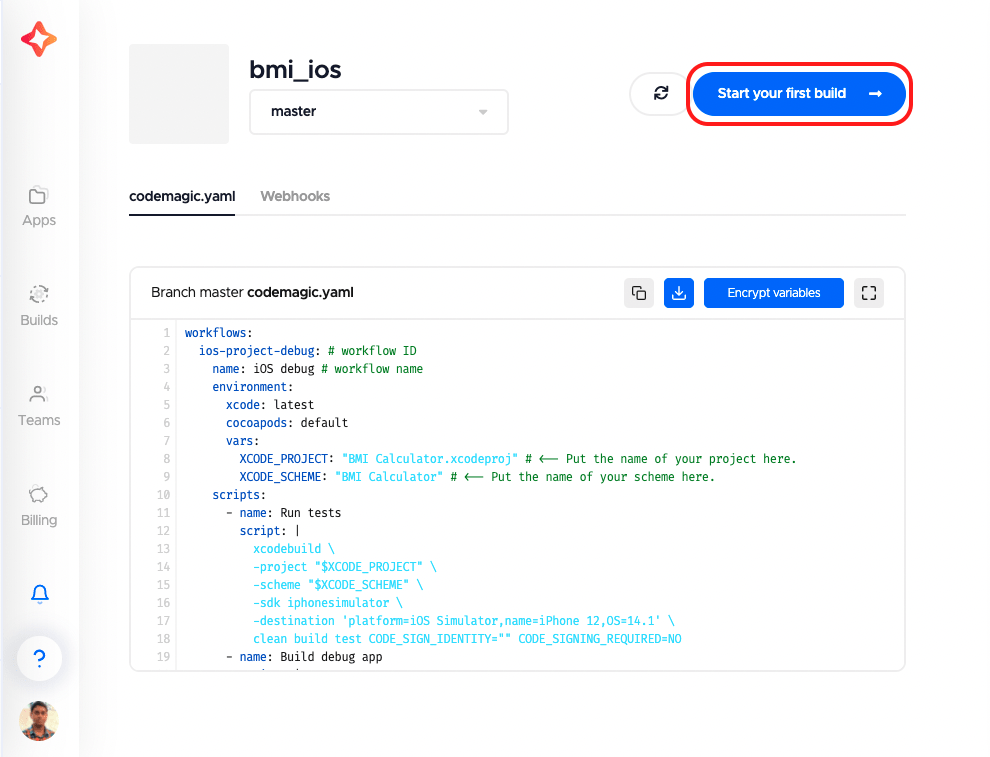
Go to your project settings, and click on Start your first build.
-
Select a workflow, and click on Start new build.
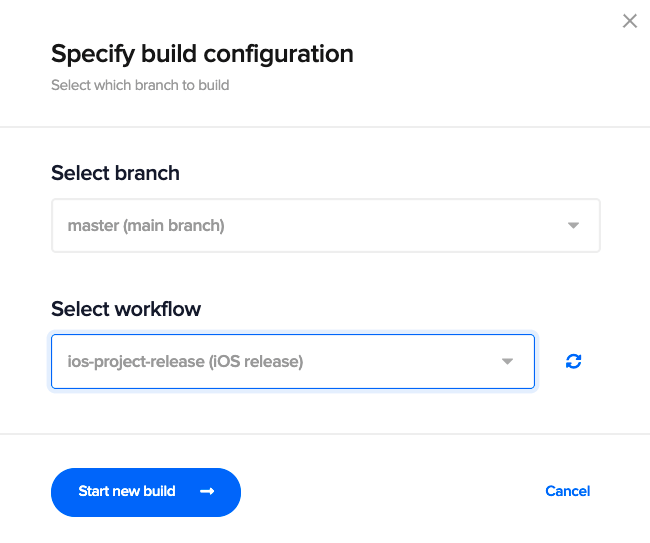
This will start a new build for your native iOS project.
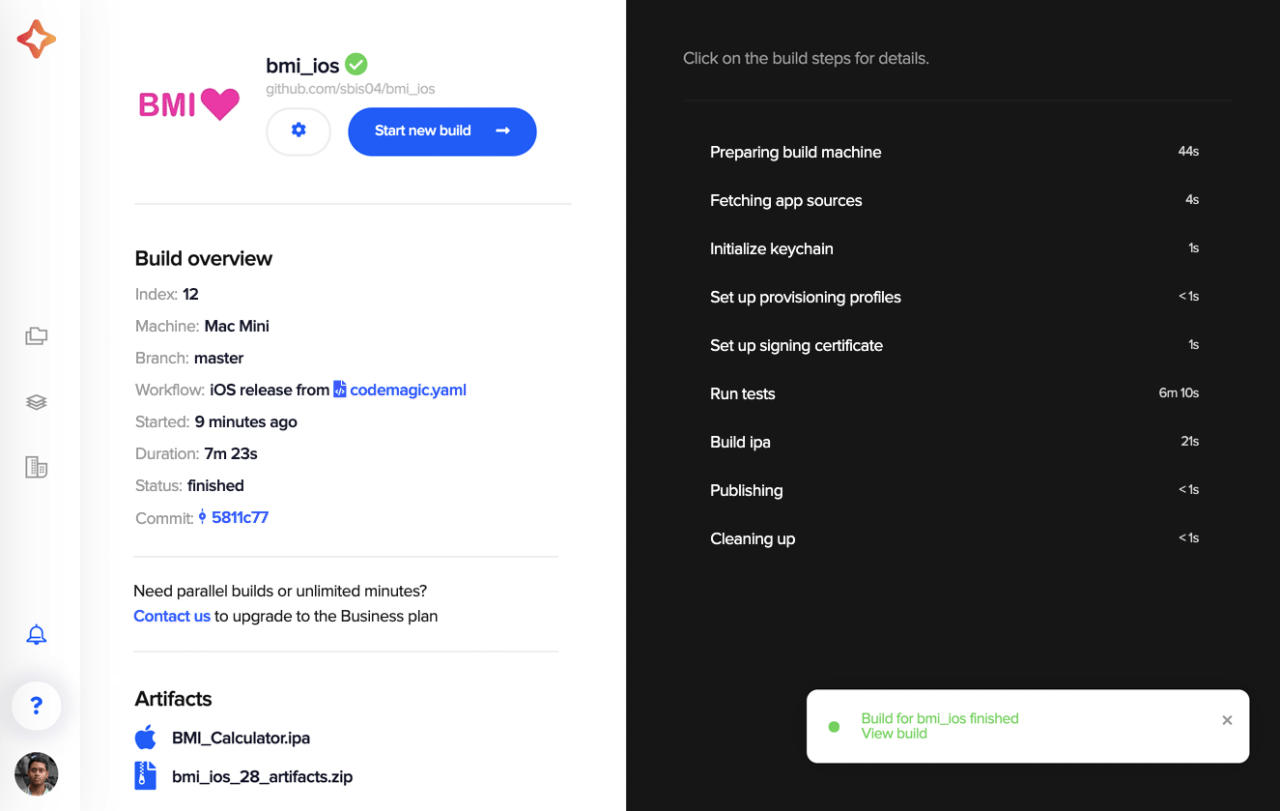
Congratulations, your first iOS build on Codemagic CI/CD is complete! ?
Conclusion
Using the codemagic.yaml file gives you an added advantage, as it makes it a lot easier to manage your workflows and keep your build configurations more organized. Also, it gets automatically detected from the version control system when starting a build on Codemagic.
Useful links and references
Souvik Biswas is a passionate Mobile App Developer (Android and Flutter). He has worked on a number of mobile apps throughout his journey. He loves open-source contribution on GitHub. He is currently pursuing a B.Tech degree in Computer Science and Engineering from Indian Institute of Information Technology Kalyani. He also writes Flutter articles on Medium – Flutter Community.






Discussion about this post